 Photo 1: Mat Corner
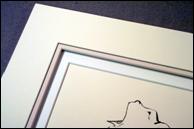
A triple mat was chosen in neutral colors with a 3/16" spacer between the top double mat unit and the bottom mat. The top mat ended up being a surface tiered pin striped creation to match the art paper.
First thoughts of mounting involve preservation vs. invasive affixing of artwork to a backing for visual presentation. But that is only part of the picture. Mounting comes in many forms: hot, wet, spray, pressure-sensitive, and can be technical or creative. Flip through the pages of my second book Creative Mounting, Wrapping and Laminating, available through PubCo and the PFM Bookstore, and you will see wrapped mats, embossed mats, shadowboxes, and tiered mats.
A plethora of creative applications using fabrics, decorative papers, and traditional adhesives to invent and design new reaches for the art of mounting.
Even with the plethora of assorted neutral mat colors, styles and textures in today's framing market there are still times when a creme colored mat may still not be the correct creme colored mat required to match the art paper an image has been painted on. Such is the case with this month's kitten. Remember the five stages of design? They are definition, creativity, analysis, production and clarification (see PFM, Essence of Design series during 2000). Step one is definition so let's define the project.
The Design: Definition and Creativity
There are four original kitten paintings on 90# Stonehenge Creme paper. Since this series of four were to be placed in a retail gallery situation, the initial framing design needed to best enhance the artwork and did not need to take additional room surroundings into account. Historically when framing for the art, the resulting design generally fits well into any room. Besides, eclectic is very popular these days.
The images are small 10x10" squares of contemporary, line paintings using only black sumi ink. The series of four minimalist cats were to be framed simply while remaining classy and contemporary. The singular line of the art called for a narrow black or dark grey moulding to prevent the frame from overpowering the image. Triple mats were selected from a neutral palette to help the pieces fit into any colored decor. Three 4-ply Alpharag mats, Colonial Creme #8667, Khaki #8646 and Pearl White #8647, were selected to stay within the range of base neutral Stonehenge paper while still adding subtle color variety.
Problems During Analysis
Along with the triple mat, there was to be a 3/16" spacer between the top double mat unit and the bottom mat. The idea and color choices looked great under fluorescent, color corrected and daylight, until the conservation glass was cut and laid over the mat samples.
With the glass in place, the top mat Alpharag Colonial Creme now appeared to have a green tint and no longer matched the Stonehenge paper the art was painted on. Every attempt was made with all the current company museum 4 ply boards and a matching color could not be located. Looked like the solution would be a surface tiered mat (photo 1).
Photo 1: Mat Corner
A triple mat was chosen in neutral colors with a 3/16" spacer between the top double mat unit and the bottom mat. The top mat ended up being a surface tiered pin striped creation to match the art paper.
Tiered Mats
Yes, I said tiered mat and not tired mat. Tiered matting is a creative solution to creating a mat that works in a design when nothing else will. It is the process of mounting fine art papers to commercial mat boards to create a totally new board. These layers may end up recreating the surface of an existing board (surface tiering); may be layered to the back of a board (under tiering); the layers may end up between two or more boards in the bevel itself (pin striping); or a combination of the above.
The solution to this above problem turned out to be the first option: a surface tiered mat. A new sheet of Stonehenge paper would be mounted to the top mat to create a board that matched the original art exactly. Though I frequently use tiered mats in my designing, this is only the third time in the twenty-five year history of my frame shop that I was forced to created a surface tiered mat to specifically solve a problem of color matching a piece of art.
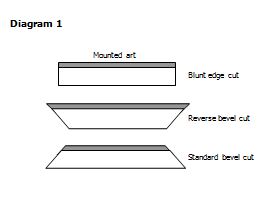
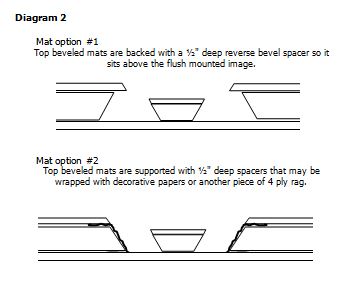
Since I would be mounting layers together for the top mat I opted to go little further and add the hairline effect seen in pin striped bevels. The resulting mat used a sheet of the same Stonehenge Creme 90# paper used for the original artwork; a 2 ply sheet of Strathmore rag in the center as the mat base; and a 60 # black Strathmore Charcoal paper as the bottom layer (diagram 1). The completed design (diagram 2) replaced the top Colonial Creme 4 ply mat with the new 4-5 ply surface tiered mat, with black pin stripe.
Sizing and Mounting
The rag backing board, first, second, and third window mats had already been sized and cut prior to discovering the green tinting color issue beneath the glazing. Usually all materials for tiered matting are cut slightly larger than the window requirements and the window is then sized after mounting. In photo 2 the materials are all sized and ready to be aligned and mounted. The black 60# paper (bottom), Fusion 4000 film adhesive (between each layer), 2 ply Strathmore creme mat blank (center) and Stonehenge creme 90# art paper (top) are seen to the right of the kitten.
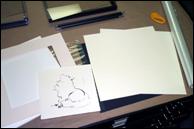 Photo 2: Sized Supplies
The rag backing board, second, and third window mats are seen laying beneath the kitten art (L), while the black Strathmore, Bienfang Fusion 4000 film adhesive, 2 ply Strathmore creme mat and Stonehenge creme art paper are stacked at right.
Once all the layers are sized, or rough sized as in the case of the film adhesive, they are stacked squarely and trimmed at the edges before placing into the press (photo 3). Use a metal straightedge and run a sharp knife along the edge of the presized mat blanks for close trim. Trimming excess adhesive prevents it from leaving adhesive residue on release papers or worst case scenario sticking out from the edges of the release paper and melting to the press platen or the felt beneath. It also prevents bits of adhesive from ending up on the surface of the new formed mat board.
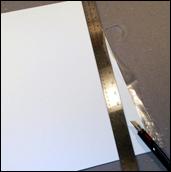 Photo 3: Pre Mount Trimming
Once all the layers are sized, or rough sized as in the case of the film adhesive, they are stacked squarely and trimmed at the edges to keep adhesive bleed to a minimum.
This mat unit has been placed into a 210M-X mechanical press set at 200ºF for 5 minutes. The longer dwell time accounts for additional layers the heat must penetrate and the hotter temperature is only 10 degrees higher than manufacturer suggested temperatures and since these are raw materials there is no risk of damage. In a vacuum system the unit may also be bonded at 200 degrees but will require 3-5 minutes dwell time.
Once mounted and cooled under a weight the mat unit needs to be again trimmed to smooth the edges and prepare it for cutting the window opening. If oversized it may be squared on a wall or straightline cutter, but if nearly to actual size then a metal straightedge and sharp blade is better. Check for square and accuracy prior to trimming (photo 4).
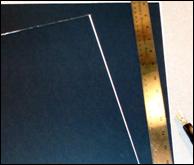 Photo 4: Post Mount Squaring
Once mounted and cooled under a weight the mat unit needs to be again trimmed to resquare it from the back using a metal straightedge and sharp knife. Remeasure for square and accuracy prior to trimming.
Cutting and Trimming
When creating tiered mats their ply thicknesses will vary so traditional straightline and CMC cutters may not have been calibrated to accommodate the added thickness. Therefore undercutting is a frequent occurrence and corners may need to be carefully cut out with a sharp double edged 1200 mat blade after the window has been cut four sides (photo 5).
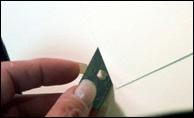 Photo 5: Undercut Corners
When creating tiered mats their ply thicknesses will vary so traditional straightline and CMC cutters may not have been calibrated to accommodate the added thickness. Undercutting is a frequent occurrence and corners may need to be carefully cut out with a sharp double edged .1200 mat blade. This is being cut from the front of the mat.
I prefer to trim out the corner from the front of the mat to better control the possibility of overcutting. When fitted into the track of the cut edge, a thin blade will lie and slide smoothly along to the uncut corner. Carefully trim the corner keeping the bevel in alignment. Tiered mats absolutely demand clean straight cut window corners, particularly when there are pin stripes. A hooked corner or wavy corner trim will look like an edge of curly lasagna and will be VERY obvious.
Stacking and Completition
To polish up and professionally complete any mat window, lightly run a bone burnisher along the top edge of the bevel to take away the raw fresh cut paper edge. This is particularly important when bonding multiple paper and board layers together in tiered matting. Just as a wavy corner will attract unwanted attention, an unburnished bevel will also. Burnishing does not mean aggressive or hard pressure, but nearly just the weight of the bone itself to just turn the raw paper edge (photo 6). It is much like swiping a newly cut piece of glass to take the raw edge off.
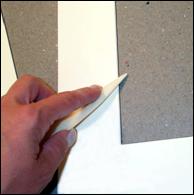 Photo 6: Bevel Smoothing
To clean up any finished mat window after cutting, lightly run a bone burnisher along the top raw edge to smooth and give the window a completed look. This is particularly important when bonding multiple paper and board layers together in tiered matting.
A spacer may be of 3 /16" acid free foam board, 100% Cotton Rag foam board, or two pieces of 8 ply rag mat for the spacer. This project used 3/16" Bienfang AF foam board, bevel cut for the back of the top double mat unit, about one-half inch back from the window opening (photo 7). The blade in the straightline mat cutter will need to be extended to accommodate the thickness of the spacer and up to 1" overcuts are encouraged to allow for a clean inner corner. After cutting, adhere the spacer as a reverse bevel to the mat back with full length strips of ATG tape surrounding the window on all sides. Once all the mats are assembled and the art has been hinged in place within the window the frame may be completed. TruVue Conservation Clear glass was selected for this original and the frame is a Nielsen Arthuas Dusk #117-164 (photo 8).
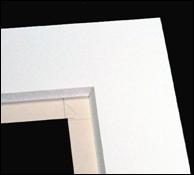 Photo 7: Foam Spacer
Cut the 3/16" acid free or 100% Cotton Rag foam board reverse bevel spacer for the back of the double mat unit one-quarter to one-half inch from the window opening and adhere it with full length strips of ATG tape all sides.
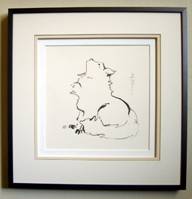 Photo 8: Completed Kitten
The completed piece looks clean, contemporary and adorable. The mats match perfectly and the colors all enhance and protect this original. Original Chris A. Paschke art and framing shown courtesy of Designs Ink Gallery.
Materials Selection
When selecting papers for tiered matting or any decorative application the lightfastness of the paper must be addressed. Pigmented colors are very lightfast while dyed colors are light fugitive. Stonehenge paper is not the most lightfast paper available but it was selected because it was the same paper the original art was painted on and no mat boards matched it. Both the art paper and the top mat surface paper will fade, but at least they will fade at the same rate and therefore will always match.
I've dealt with this issue for years when selecting some beautiful papers such as Ogura, Unyru or Washi colored papers for wrapping or embossing. If colored with dye they probably will fade and the only time I will use them is when the original has used the same paper in its composition. Acid content and lightfastness both need to be known for an educated judgment to be made when opting to use a decorative paper in framing. Particularly in preservation applications.
Conservation glazing has been used in the featured project to help retard the fading potential of the papers but unfortunately many dyed papers fade by visible light as well as UV light. That means the very light rays that allow us to see a pink, blue or green color are the damaging rays that will fade the colors away. Unfortunately Stonehenge is a dye rather than pigmented color and will not be protected from visible light wavelengths by the UV glass.
The adhesives and foam boards selected for this project are inert and will not react with anything else in the package to create any new chemical reactions. So all in all it is considered to be preservation framing. The black pin striped paper is neutral pH and very lightfast, and the mats will fade...well, as mats do.
Putting the Kitten to Bed
OK, all things completed the gallery images turned out fabulous. They are neutral colored, minimalist, eye catching framing designs. The mats match perfectly and the colors all enhance and protect this original. So the tiered mat turned out to be the perfect solution to kitten happiness.
END
Copyright © 2005 Chris A Paschke
For more articles on mounting basics look under the mounting section in Articles by Subject.
Additional information on all types of mounting is found in:
The Mounting and Laminating Handbook, Second Edition, 2002,
The Mounting And Laminating Handbook, Third Edition, 2008 and
Creative Mounting, Wrapping, And Laminating, 2000 will teach you everything you need to know about getting the most from your dry mount equipment and materials as an innovative frame designer.
All books are available from Designs Ink Publishing through this website.
Chris A Paschke, CPF GCF
Designs Ink
Designs Ink Publishing
785 Tucker Road, Suite G-183
Tehachapi, CA 93561
P 661-821-2188
chris@designsinkart.com