 Photo 1
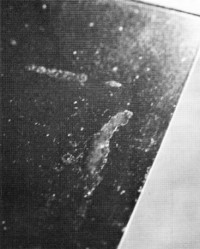
A dirty platen equals ugly mounting! A press will indeed "press" undesirable shapes and textures that remain on the platen or release paper into any soft substrate. Don't let this be your press!
You eat right, exercise and take vitamins...the good life right? So why do you still have those days when everything goes wrong? Maybe you aren't taking the appropriate steps to ensure your equipment's health too. Regular maintenance of your equipment is every bit as essential to a smooth flowing operation as vitamins are to your body's machinery.
Routine Maintenance
Though the mechanics of good mounting technique (through TTPM) must be fully understood and practiced, they can be totally overridden by poor maintenance. The pressure within a press required for dry mounting may indeed transfer wrinkles into more pliable foam board substrates from over-worked release papers, see "Release Paper". Negligence in routinely checking these same release papers for remnants of adhesive may allow bits or strips of remaining adhesive residue to be inadvertently transferred to the surface of an ensuing project.
Avoid over-worked, wrinkled sheets by regularly wiping them with a clean, soft, lint-free rag to remove bits of unwanted adhesive and dust particles. Good lighting is imperative to be able to see alien dust particles which will show up under any surface, but always a dark surface far worse than a light colored one.
It is also extremely important to constantly check the release materials during the course of the day. Any project might be the one responsible for adhesive left on a release envelope. Check them between mountings if over-sized or pre-mounted adhesive procedures are routinely being used.
Equipment Maintenance
Dirt and dust particles may locate themselves within the environment of any press awaiting an unsuspecting mounting project. These particles, often stuck to the platen, can create tiny pinpoint indentations on the mounted surface and substrate.
Develop a daily routine of wiping down the inside of your mounting equipment to cut down on particles looking for a place to relocate. Also keep presses closed when not in use to avoid dust and particle build-up. Just as with your mat cutter, daily cleaning and nightly covering will allow for better control over your work.
Properly adjusted presses will ensure proper mounting pressure, but even proper pressure can't avoid the indentation of a dirty platen (photo 1) into a foam board substrate. It only stands to reason that if release paper can transfer wrinkles to a mounting project, then the alien texture of adhesive residue remaining on the platen surface of the mounting press can also transfer the same type of pattern. Though use of a release board will creates a barrier between adhesive stuck to the platen and the project, release papers are thin enough to transfer unwanted textures.
Photo 1
A dirty platen equals ugly mounting! A press will indeed "press" undesirable shapes and textures that remain on the platen or release paper into any soft substrate. Don't let this be your press!
Cleaning the Vacuum Platen
If examination of the platen through wiping with a lint-free rag or perhaps running your hand smoothly across the cold surface indicates particles or adhesive, it is imperative to remove them (photo 2). Adhesive residue is easily removed by using an adhesive solvent such as UnSeal, Bestine thinner, or Toluene, (photo 3) though make certain to open windows for adequate ventilation. Never use any abrasive materials on the platen. Sandpaper, steel wool or sharp objects could permanently scratch the platen surface allowing these permanent scratches to be transferred to later mounting projects.
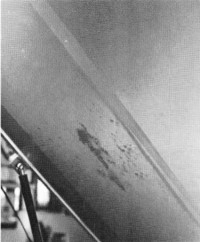 Photo 2
The long strip of adhesive residue along the left side of the vacuum press platen could stick to single-sided release paper or indent a project—so it must be removed!
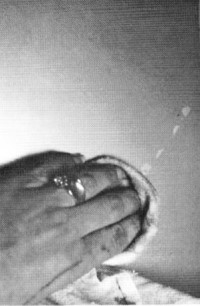 Photo 3
A soft, lint-free, solvent-saturated rag will remove small pieces of adhesive easily without scratching.
Silicone residue from release materials often results in a visual discoloration on the surface of used vacuum platens (photo 4). They are generally detectable only when viewed at an angle and pose no danger to successful mountings since there is no texture to transfer indentations.
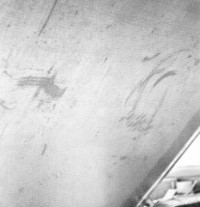 Photo 4
Silicone residue from release materials often results in spots of visual discoloration on the platen. These are only seen with light reflection at an angle, have no texture, and are not harmful. This is a clean healthy press.
Unhinging a Mechanical Press
If the platen of your mechanical press is in need of massive attention due to lengthy neglect or long term build-up (photo 1), the hex bolts and nuts located on the lower arm of the press may be removed allowing a full opening of the press (photo 5). Always remove the lowest of the three bolts and be careful to inspect the placement and exact order in which the washers, bolt and nuts need to be replaced. Once the lower bolt has been removed (both 9/16" and ⅝" are required for the 210M in the photo) and the top is laid open like a book, platen accessibility for application of solvents and creams is quite easy (photo 6).
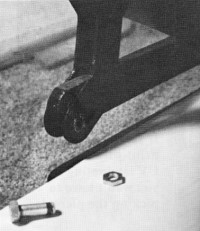 Photo 5
Remove the hex bolts and nuts from the lowest hinge of the press arm.
 Photo 6
Lay the press open like a book to expose the dirty platen for easy cleaning. (This is a clean press)
Preventative Measures
You wouldn't think of cutting mats all day without changing the blade, why wouldn't you check the release paper or dust the platen of your press? Necessity of a daily, weekly or monthly routine monitoring the cleanliness of your press will be determined by it's basic work load...but it MUST be done!
Wrapping single-sided release paper around the sponge pad of a mechanical press is a simple preventative measure to ensure a clean felt surface. This will protect it if a project were to be accidentally mounted without a release envelope allowing edges of adhesive to be physically mounted to the felt layer on top of the pad. An excess of adhesive residue on the sponge pad could not only create a messy situation, but excess adhesives could restrict the foam from conforming to the shape of the item being mounted. This could essentially result in a poor mounting due to inconsistent pressure against the platen, possibly encouraging center bubbles.
Cut a piece of release paper to the width of the pad, fold the excess paper around the ends of the pad and tuck them between (not under) the pad and the masonite . The limp heavy nature of the pad in conjunction with the toothed back of the single-sided release paper holds well without much slipping (photo 7). A wrapped pad is not meant to be a substitution for release materials, but rather additional insurance to protect the pad from ambitious new mounters who may forget the critical "release paper" bottom sheet.
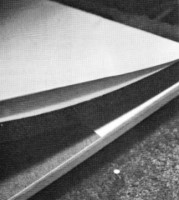 Photo 7
Wrap a sheet of single-sided release paper around two sides of the mechanical press foam pad. Tuck the paper between the sponge and the masonite. I prefer to wrap front to back to prevent catching the open edge of the wrap, rather than side to side, as in the photo.
Putting it all Together
Regardless of your choice of release materials or maintenance procedures, the important thing is to practice good, clean mounting. It is always best to work in a well lit area where you are able to clearly see any potential problems long before they occur.
So what's the bottom line? No matter how great your technical skills, if you don't keep it clean, your press just could turn on you! Remember clean process...clean product.
END
Copyright © 1995 Chris A Paschke
For more articles on mounting basics look under the mounting section in Articles by Subject.
Additional information on all types of mounting is found in:
The Mounting and Laminating Handbook, Second Edition, 2002,
The Mounting And Laminating Handbook, Third Edition, 2008 and
Creative Mounting, Wrapping, And Laminating, 2000 will teach you everything you need to know about getting the most from your dry mount equipment and materials as an innovative frame designer.
All books are available from Designs Ink Publishing through this website.
Chris A Paschke, CPF GCF
Designs Ink
Designs Ink Publishing
785 Tucker Road, Suite G-183
Tehachapi, CA 93561
P 661-821-2188
chris@designsinkart.com