 Photo 1
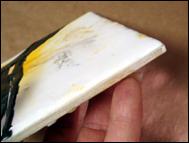
Layered wax and oil stick on ¼" birch wood panel.
Knowing how to prepare a metal frame for assembly is no doubt something every professional framer already knows, but here are a few additional tips that you may not know. Metal is considered inert, which will not react with any other element to create a new chemical reaction making it a preservation material. It is clean, bolts together easily and there are numerous wonderful contemporary profiles well suited to contemporary art (photo 1).
Photo 1
Layered wax and oil stick on ¼" birch wood panel.
Take a few simple steps prior to frame assembly you will maintain that professional presentation we all strive for. Chopped metal legs often arrive with rough edges remaining from the cutting saw. Lightly pass one quick stroke of a 100 grit file over the raw cut edge to remove any metal burrs that might prevent the corner from perfectly joining once assembled (photo 2). Though sanding sticks are sold through frame suppliers the best sanding stick I have found is a 7"x1"x3/16" thick sanding stick sold by Sally's Beauty Supply from their Beauty Secrets line. It is a two-sided, course grit 100/100, washable stick, #169400 regularly priced at a low 99¢ that is often on sale for only 69¢ each. I purchase 3-4 dozen at a time because I use them for sanding everything from plaque edges to cleaning of chopped miters prior to gluing.
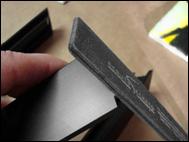 Photo 2
Lightly run a 100 grit file over the cut edge to remove metal burrs.
Just as you would tint the inside mitered edge of a wood chop, the mitered corners of a metal chop should also be colored before assembly. After testing a dozen markers, the three in photo 3 covered the metal best, with the Sanford KING SIZE Permanent Marker as my first choice (photo 3). Cover the entire raw metal edge above the base of the frame, and use two coats (photo 4). This obviously prevents raw silver metal from showing at the corner miters.
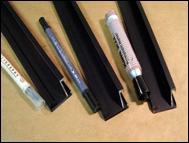 Photo 3
(L to R) ZIG Permanent Calligraphy Marker; ZIG Permanent Textile Marker, and Sanford KING SIZE Permanent Marker.
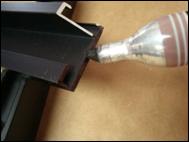 Photo 4
Cover the entire raw metal above the base.
So polishing your metal frames—regardless of whether they were custom cut, ordered online or scavenged from old paintings—is as easy as 1-2-3—sand, color, and snap in the hanger.
END
Copyright © 2012 Chris A Paschke
For more articles on mounting basics look under the mounting section in Articles by Subject.
Additional information on all types of mounting is found in:
The Mounting and Laminating Handbook, Second Edition, 2002,
The Mounting And Laminating Handbook, Third Edition, 2008 and
Creative Mounting, Wrapping, And Laminating, 2000 will teach you everything you need to know about getting the most from your dry mount equipment and materials as an innovative frame designer.
All books are available from Designs Ink Publishing through this website.
Chris A Paschke, CPF GCF
Designs Ink
Designs Ink Publishing
785 Tucker Road, Suite G-183
Tehachapi, CA 93561
P 661-821-2188
chris@designsinkart.com