Paschke Online
Designs Ink Publishing Article Archive and Reference Library
Articles by Chris A. Paschke, CPF GCF
"Bo Leaf, Papyrus and Dry Float Mounting"
December 2006
My December column has annually been a wrap up and re-visitation of the most asked questions for the year. I regularly monitor PPFA Hitchhikers, The Grumble, and PFM Framer to
Framer just to make sure everyone is on track and to keep up with current affairs. I also receive regular emails and calls with questions and for advice on what to do, what to buy, and just for moral support. Who knew when I began writing this column in 1991 I'd turn into the industry Ann Landers of mounting.
Mounting items this year included the usual suspects like digital canvases and photographs, but there were lots of unusual things too. The forums saw numerous discussions
over mounting and framing leather, silk, papyrus, papercuts, vellum, bark paintings (tapa cloth), and even art made of butterfly wings. Since traveling to other continents is becoming common place, the art being framed has become much more diverse.
Bo Leaf Paintings
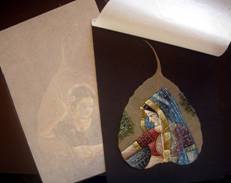 Bo Leaf paintings from India are opaque tempera paint on very delicate spade shaped leaves from the Bo Tree. Problem is, these are lacy ivory colored leaves that are best showcased when mounted to a contrasting decorative backing. The leaves are often spot glued to a dark backing paper the weight and feel of construction paper, then covered with a protective glassine sheet. Be very careful if attempting to remove the leaf from the backing as they tear very easily.
If unable to easily remove the leaf from the backing, mat over the edges of the black backing. With the advent of computerized mat cutters, emulating the shape of the leaf with a decorative top mat may be the design solution to a solidly attached leaf and backing. A common paint media in many cultures is tempera pigment, such as the paint on the Bo leaf. It is a
mineral pigment mixed with egg yolk, gum or glue to create a painting emulsion for use on natural materials. Art created on materials such as Bo Leaf, bark paintings, papyrus or Kozo paper may also have an uneven or ragged edge.
Papyrus Paintings
The Egyptian painting in (photo 2) uses tempera on a woven papyrus reed sheet. Though heat safe, they should be considered
moisture sensitive. Cut papyrus reeds are interwoven and pounded to form a meshed sheet, then dried. They are used for writing or painting. The ragged edged, or out-of-square, construction may either be covered by a window mat or floated to showcase the reeds by preservation float hinges, S-hinges or dry float mounting. (photo 3)
Use only dry heat when flattening papyrus. Never introduce steam or moisture of any kind, including humidifiers, as moisture can make the reeds come apart or cause the paint to soften and smear. Float mounting is the best presentation, allowing them to revel in their natural warpage. They should look like the natural plant reeds they are.
Dry Float Mounting
The small contemporary calligraphy has been written on heavy kozo paper with four deckled edges, requiring float mounting. The dry float mount process would be perfect
for this piece. Size a heat activated foam board to the desired outside frame dimension and cut a square edge fallout ½" smaller than the art to be floated (photo
4). Make sure to overcut at the corners a full 1" to insure a clean cut foam corner (photo 5). Place a faint "x" in pencil on the backside of the adhesive fallout and the remaining window to help identify the non-adhesive side of the HA foam. Remove fallout, turn it over and reinsert into the foam window. The fallout must be cut perpendicular and not traditionally window bevel cut or the fallout will not fit back into the opening when reversed.
Turn the foam board so the X of the window mat is face up indicating it is not the adhesive side of the board. Align the deckled art over the extended overcut corners to square it up on the foam (photo 6).
Make sure there is a visible X to indicate the nonadhesive side of the HA foam board, otherwise the adhesive on the window support will also bond to the art deckle
edge.
Depending on the value of the art, and the customer, any heat activated (HA) foam board may be used for this technique. There are permanent high temperature boards, that bond at
F185; more delicate low temperature, short dwell time boards that bond at F150; and reversible HA boards that also bond at low F150 temperatures. It's not the adhesive that makes any specific process non-archival. Even if removable, when adhesive remains within a removed piece of art it is nonreversible. It should also be stressed that the actual dry mount adhesive (as with many pressure-sensitives) are basically inert and stable, making them preservation quality even though they are not reversible.
Mount in mechanical or hot vacuum press at desired HA temperature. By placing the window foam around the fallout the art will not be dented at the edges in the press during mounting. Once cooled under a weight, gently remove the fallout with attached art. It will be mounted to the fallout with a beautiful deckle edge surrounding and hanging over the edge (photo 7). Now the raised float mount may be positioned over a decorative mat within a window and framed (photo 8). The float mount may then be placed within the window mat design with or without an elevated, single mat, multiple mat, or commercial spacer. Just make sure the art does not touch the glazing.
Panorama Photos
Thanks to wide-format printers and RA-4 photo developing we now have many fine art photographers and publishers producing long narrow images, with 24" wide by 90" long common these days. There have been many questions asking what is the best mount board to use for oversize or extra long panorama images. First order of business is to locate a rigid substrate long enough for the project, then a machine capable of mounting it.
Gatorfoam, MightyCore, Smooth Mount, Sintra, even Masonite (if you don't mind the base material) are all substrates strong enough if they are large enough. Roller laminators using Neschen Gudy 870 or Drytac MediaTac high tack pressure-sensitive adhesive would be the best choice. Stay away from repositionable P-S adhesives because the longevity may have been sacrificed for repositionability.
Face Mounting
As more and more framers purchase cold roller laminators, more are thinking about the possibilities of face mounting, and I have read a few posts this year suggesting face mounting of panoramic photos as an option. As long as there is an available substrate rigid and long enough to handle it, and you are up to speed on the technique it might be a good option. But I would never consider this process unless you are well practiced in the art of face mounting to acrylic and have the correct pressure-sensitive adhesive designed for the technique, which is crystal clear.
Framers be careful...this is not a process that may be done with regular dry mount film adhesives in a heat press or with any typical P-S film such as PerfectMount, Gudy 870, or PMA. I have seen it advised on some of the forums as an alternative to mounting digitals. This is an involved process that takes practice and more than anything else...the right materials. More
on face mounting in an upcoming 2007 article.
Warping Issues
The question of substrate rigidity brings to mind another issue I noticed frequently this year: framers using board much too thin to accommodate the image they are mounting. There is more to successful mount than just TTPM. Time, temperature, pressure and moisture are all imperative, but even if you have controlled all of these, if the selected substrate is too flimsy or the size and weight of the art warping will occur.
A basic rule of thumb for mat and foam substrates is 4-ply for up to 8x10"; ⅛" foam for 8x10" to 16x20"; 3/16" for 16x20" to 32x40"; and ½" over 32x40". More rigid boards will handle larger images as
a thinner substrate. Just as orange peel is the result of mounting to a lumpy surface, warping is the result of mounting to a board too thin.
Countermounting
There are two solutions to the warping issue: 1) mount to a more rigid or thicker board; or 2) countermount the thinner selection. Countermounting is the act of facing the verso side of the thinner board to compensate for the surface tension created by the adhesive and art. Sample boards for this article have been wet and dry mounted to illustrate the results of a heavy 60# open edition paper print on both 2-ply and 4-ply boards. Since a 2-ply board is never thick enough to really be used as a valid substrate it is a perfect board to illustrate countermounting techniques.
The pink 2-ply wet mounted sample is very warped in (photo 9), while the white 4-ply is fairly flat. This shows even a small 8x10 requires at a least 4-ply substrate. The dry mounted sample in (photo 10) is the same weight print on the same test substrates. Note the cat on the 2-ply (L) is visibly warped while the cat on the 4-ply (R) lies flatter. Now take the same dry mount adhesive and 2-ply substrate with a heavier RC photograph and the warping includes additional cockling (photo 11). The same RC photo on the right was counter mounted with the same size and weight photo on the verso side to counter the back by creating exactly the same tension.
When countermounting, it is necessary to match your materials to the project. A 60# image must be backed with another 60# image. An over laminate must be backed with a matched laminated image. Ansel Adams dry mounted all of his fine art photographs, but he also countermounted every one with discarded photo images of the same size and weight on the back. Countermounting requires mounting of equal weight (thickness) and porosity with the same adhesive on the back...or don't bother.
Year in Review
That seems to be the year in review. Not a lot of the same questions over and over, but more of a diversity of assorted new, cool, and unusual items from around the globe to frame. Digitals are alive and well and causing more problems than ever, but they will never go away. So on behalf of digitals and digitals canvases everywhere...happy holidays and we will revisit you in 2007.
END
Copyright © 2006 Chris A Paschke
Photo 1
This pair of Bo Tree leaves from India are painted with opaque tempera. The delicate leaves are spot mounted to a black backing with a glassine cover. Removal from the backing may damage the leaf, so be very careful or mat over the backing.
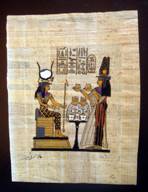
Photo 2
This Egyptian painting uses egg or gum tempera on an uneven woven reed papyrus sheet which is heat safe, but moisture sensitive.
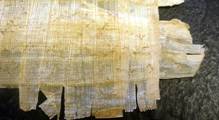
Photo 3
Papyrus reeds are interwoven and pounded into a meshed sheet for writing and painting. The ragged edged construction makes it a perfect candidate for preservation float or S-hinging or float mounting.
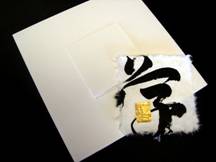
Photo 4
The small contemporary calligraphy has been written on heavy kozo paper with four deckled sides, perfect for dry float mounting. Size a heat activated foam board to the desired outside frame dimension and cut a square edge fallout ½" smaller than the art to be floated.
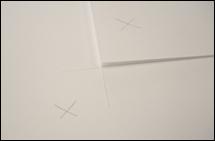
Photo 5
Overcut the corners of the foam to insure for a clean cut foam corner using the straight side of the mat cutter. Place a faint "x" in pencil on the backside of the adhesive fallout and the remaining window to help identify and remind of the adhesive at a glance.
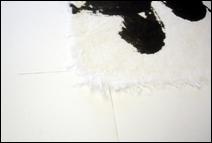
Photo 6
Align the deckled art over the extended overcut corners to square it up on the foam. Make sure there is a visible X to indicate the nonadhesive side of the HA foam board.
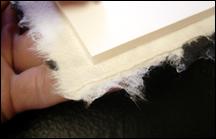
Photo 7
Mount, cool and remove the fallout with art attached from the foam window support. The deckle will be free hanging over the edges ¼" to ½" depending on the desired design.
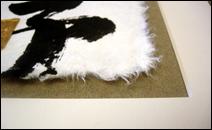
Photo 8
The float mount may then be placed within the window mat design with or without an elevated or multiple mat. Just make sure the art does not touch the glazing.
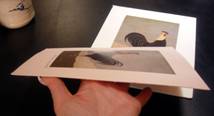
Photo 9
Sample boards have been wet mounted to illustrate the results of a 60# open edition paper image onto both 2-ply and 4-ply boards. The pink 2-ply (front) is very warped while the white 4-ply is fairly flat. Even an 8x10 requires at a least 4-ply substrate.
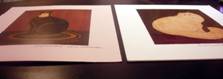
Photo 10
Sample boards have been mounted to illustrate the results of a 60# open edition paper image mounted with tissue adhesive onto both 2-ply and 4-ply boards. The pink 2-ply is very warped.
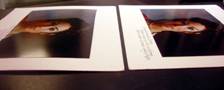
Photo 11
Having been mounted to a thin 2-ply the substrate is incapable of keeping the photo flat. The cockled surface is worse than the paper print.
For more articles on mounting basics look under the mounting section in Articles by Subject.
Additional information on all types of mounting is found in:
The Mounting and Laminating Handbook, Second Edition, 2002,
The Mounting And Laminating Handbook, Third Edition, 2008 and
Creative Mounting, Wrapping, And Laminating, 2000 will teach you everything you need to know about getting the most from your dry mount equipment and materials as an innovative frame designer.
All books are available from Designs Ink Publishing through this website.
Chris A Paschke, CPF GCF
Designs Ink
Designs Ink Publishing
785 Tucker Road, Suite G-183
Tehachapi, CA 93561
P 661-821-2188
chris@designsinkart.com