Paschke Online
Designs Ink Publishing Article Archive and Reference Library
Articles by Chris A. Paschke, CPF GCF
"In-House release Boards"
March 2008
When a photo customer demands a smooth, high gloss image mounted, you may begin to sweat. So in the nature of "never letting them see you sweat" the job is written up and hopefully the mounting Gods will smile upon you with no orange peel, dents, or scuffing appearing on the photo once mounted.
Orange peel is the lumpy surface appearance that occurs when a photograph, inkjet image or thin paper is mounted to an uneven substrate. When the photo is correctly mounted, all the highs and lows of the substrate will mirror the substrate contours on the surface of the photo. If the selected board is lumpy, the surface of the mounted image will also be lumpy. Selecting the right substrate is good, but may be only half the solution.
Commercial Release Materials
Release materials are designed to keep adhesive from contaminating mounting surfaces and residue from coming into contact with artwork. They protect both the platen in the top of the press and the pad or diaphragm in the bottom of the press. There are many types of silicone-coated materials all with varying degrees of nonstick capability (photo 1).
 Photo 1
The single sided paper has a slight blue tint to the silicone treated side as demonstrated by the familiar blue commercial boards. (L to R) Bienfang (two-sided) Release Board, Bienfang Double-sided Paper, Drytac Clear Silicone, Drytac Single-sided Paper, and Bienfang Single-sided Paper.
Double-sided release paper is a slick, lightweight white paper with a silicone coating on both sides. It is very slick, limp, and more prone to folding over when working with a 40x60" format. Drytac Clear Release Liner is a coated sheet of plastic film, originally designed for use with glass topped vacuum presses so mountings could be better visually monitored.
Drytac single-sided release paper is a lightweight liner that has a grid pattern on the uncoated side. It is the same release liner found on its vinyl laminate products. Bienfang single-sided paper is a heavyweight base paper has a blue tint added to the silicone treated side allowing for easier identification during mounting. The uncoated, side is raw paper and will bond itself to exposed adhesive when placed wrong side against a mount project. Bienfang Release Boards are a thin x-board substrate with a sheet of this single-sided release paper bonded to each side. They are available up to 40x60" in size, and are sold individually or in boxes of 5-10 boards.
Why Are Board Used?
There is only one time when use of a release board is mandatory in mounting and that is when mounting an oversized project in multiple bites in a mechanical press. The board helps dissipate the pressure at the bite point and helps prevent indentations in softer foam boards. The only reason a board is used in a vacuum press is for ease of operation. It is a common misconception that use of a release board will cut down on the use of release materials, or that no damage will occur from a board. Scratches and creases happen in boards the same as they do in paper, but not as frequently.
Boards are used by many framers for the convenience of lifting the board during placement of a project into the press. It tips up out of the way with one hand while the other inserts the project between it and a sheet of release paper on the bottom. Never use a release board on the bottom of a mechanical or vacuum press. The lower sponge pad or rubber diaphragm must remain unrestricted so it can compress around the substrate and provide even pressure up against the heated platen or glass.
The draw back to using a commercial release board is its surface texture. Close examination of a board will immediately show a fair amount of orange peel (photo 2). This texture may be embedded, like a crease, to the surface of a soft substrate or photo emulsion. The solution would be to create your own release boards by mounting single-sided release paper to a smoother base boards than the gray board commercially used.
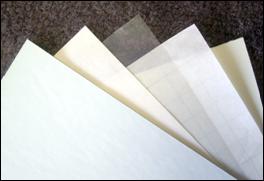 Photo 2
In-house release board (L); slightly yellow, retired commercial release board (C); new Bienfang Release Board (R). The orange peel is fairly visible on the center sample.
Board Costs
The cost of producing in-house boards will vary depending on how basic mounting materials are purchased. If rolls of adhesive and release paper are bought wide and in bulk, the square foot cost is less than when purchased in narrow, short rolls. Commercial boards are also less expensive when purchased in boxes of five or ten rather than one at a time.
Based on an average of 2007 distributor material costs, commercial boards run $13-15 each for 32x40" and $20-25 each for 40x60". In order to compare apple to apples the in-house board needs to be priced for mounting paper to both sides, though only one side is required. By mounting to both sides, both may then be used for the suggested 50 hour working time, extending the life of the board. A 32x40" board includes base board, adhesive and release paper for each side.
In-house boards should run $20-25 each for 32x40", and $30-35 each for 40x60". Obviously if paper is only mounted to one side the cost will be approximately $5.00 less. Your choice...produce a smoother surface, higher priced, release board of your choosing, or opt for the convenient, economical, commercial board that may contribute to orange peel surface texture.
Test Boards
For a number of years the board of choice for both photo substrate or a base for in-house release board was Crescent Super Smooth. When it was discontinued other boards were tested to determine the best replacement. A series of Crescent and Bainbridge boards from their art, photo, and mount board lines were selected. Crescent boards included: 201 Studio Board, 218 Regular Hi-Line HP (Hot Press), 20 Multi-Media HP, and 215 Brite White HP, and 2299 Crescent PhotoRag. Bainbridge illustration boards included 6000 Supreme Solid White, 4000 Premium, 2000 Ruling Mechanical, 172 HP, and 90S Smooth; and their photo and mount boards included 6601 Bainbridge Unbuffered Photorag, UB1 (newsboard), and 8734 AlphaMount (photo 3). Most of the illustration boards displayed a little more orange peel than I had hoped for, but all boards looked pretty good after mounting.
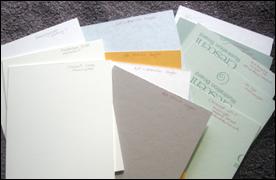 Photo 3
All boards shown were selected for the comparison test. Top to bottom (L) Bainbridge 6601 Photorag, 8734 AlphaMount, and Crescent 2299 PhotoRag; (C) Bainbridge 4000 Premium, 172 HP, 6000 Supreme Solid White, and 90S Smooth; (R) Bainbridge UB1, Crescent boards 201 Studio Board, 218 Regular Hi-Line HP, 20 Multi-Media HP, and 215 Brite White HP.
All tested boards are available as 30x40", single thick, though some boards are also double thick. Double thick boards are more costly and much heavier (photo 4) . Thicker boards have more rigidity, but are heavier to move about, and more costly to make. Thinner boards have more tendency to warp, particularly when paper is only applied to one side. It is recommended to mount release paper to both sides of the board to best control warp, also allowing for two-sided use.
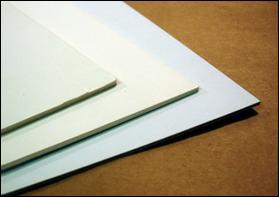 Photo 4
Top sample is a double thick Crescent Super Smooth, middle is a single thick Super Smooth, bottom is Bienfang Release Board on gray chipboard center. The thicker the selected base the heavier the board.
Test boards mounted with Drytac Single-Sided Release Liner warped the small 8x10 samples once applied, while the thicker Bienfang Single-Sided Release Paper on the same test boards did not warp as much. Also the Crescent art boards had a tendency to warp worse than the Bienfang illustration series boards (photo 5).
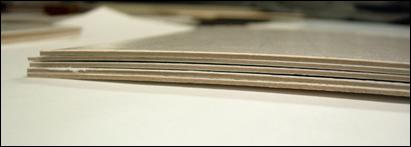 Photo 5
This stack of five in-house boards are mounted with the thinner Drytac Single-Sided release liner and they show visible warp as small 8x10 samples.
Materials
Select the board, adhesive and single-sided release liner to make your board (photo 6). Check the board surface by using the fingertip test to detect surface unevenness...or just trust my recommendations. I prefer a rigid, smooth, board. The acidity or buffering factors do not much matter since dry mounting is considered an invasive mounting method. If there is any visible surface texture in the selected board the bonding of tissue adhesive and heavyweight release material will not necessarily make it any smoother.
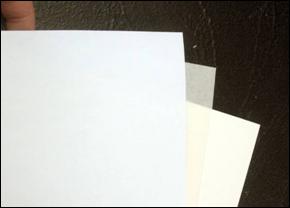 Photo 6
Bienfang Single-sided paper, Drytac Trimount tissue and Bainbridge 6601 Unbuffered Photorag are chosen for this board.
Use a permanent, porous, tissue adhesive to bond the release liner to the board. A permanent tissue will bond in the press as it reaches temperature and will stay bonded with each future heating. A single-sided liner must be used because double-sided silicone coated paper will not stick to anything. Drytac's liner is a thin very lightweight sheet, glossy on the silicone side, and though it meets all the requirements and pricing points, is not my first choice as the best single-sided paper for a release board.
Bienfang's single-sided paper has always been my release paper of choice either for in-house boards or folded envelopes. It has a very smooth surface and as a loose sheet has the strength to suspend itself when being placed into a large 40x60" press. It is a perfect accompaniment for the right board to create a smooth release board.
Making the Board
The base board should be cut to desired end size or mount as a full sheet. The adhesive and release paper may be irregular or slightly oversized for initial bonding. Gather into a common corner and tack the layers to hold them in place for mounting (photo 7). Cover the project will a sheet of release paper larger than the board to protect the heating platen or glass from being contaminated by exposed adhesive. After bonding trim the board to desired size cutting away excess release paper and mounted adhesive (photo 8). Exposed adhesive will bond to future mounting projects if not trimmed.
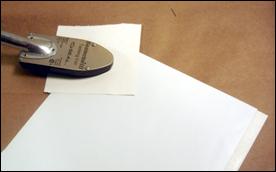 Photo 7
Gather the layers into one common corner and top tack through all layers to hold them for mounting. Lower right corner shows the top paper does not cover the entire sheet of adhesive or board. Place a release sheet on top to protect the platen or glass from adhesive residue.
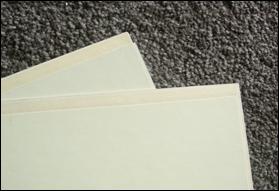 Photo 8
After bonding, trim board to desired size cutting away any exposed adhesive (top edge both boards) and overhanging release paper (far right top).
All the test boards mentioned were bonded with both the Drytac and the Bienfang release materials to test for surface smoothness and potential as a release board (photo 9).
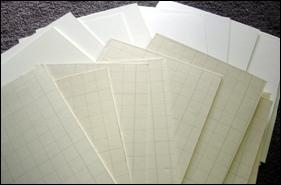 Photo 9
The same boards were mounted with both Drytac release liner (bottom row) and Bienfang release paper (top row) the check for surface smoothness and tolerance as a board. The top row is the slightly blue tinted single-sided Bienfang paper though it appears white in the photo.
Be very careful to ensure clean area...clean process. Good lighting and routine dusting or wiping of mounting layers will help produce dirt free mounting. The indentations in these two release boards is the result of a round clump of something that did not belong in the press during bonding. The clump indented the edge of the board and now it will likely transfer that pothole to next mounting project (photo 10). The heavyweight paper might have prevented that indent from occurring, but tough to know for sure.
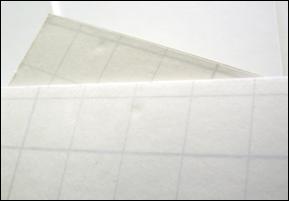 Photo 10
Be very careful to ensure clean area…clean process. The indentations in these two boards is the result of a round clump of something that did not belong in the press during bonding. The round indentation that appeared at the edge of these boards will likely transfer the pothole the to next project.
The Final Board
Crescent 2299 PhotoRag, Bainbridge 8734 AlphaMount, and Bainbridge 6601 Unbuffered Photorag topped the test, though all the selected boards faired well. There was little visible difference and very little tactile difference between the others, though Bainbridge 6000 and Crescent 201 HP were slightly smoother.
Most of the boards suggested above have a maximum size of 32x40", but a 40x60" Rising Museum board has the rigidity and smooth surface to create a perfect release board, it also carries a higher price, so perhaps a heavyweight single-sided release paper might be a better option. Whether in-house boards are in your future or not is totally a personal decision.
Additional production costs should not prevent you from making your own boards. All added material costs should be applied to mounting prices. If a smoother board will better protect a photo or thin digital image from orange peel, perhaps an added $5.00 charge in the photo set-up will adequately offset the release board costs. Or add $1.00 to every dry mounted piece which will both offset all in-house boards and bring in additional revenue for a job well done.
A special thank you to Bainbridge and Crescent for their donation of board samples; and, Drytac and Bienfang for adhesive and release liner materials.
END
Copyright © 2014 Chris A Paschke
For more articles on mounting basics look under the mounting section in Articles by Subject.
Additional information on all types of mounting is found in:
The Mounting and Laminating Handbook, Second Edition, 2002,
The Mounting And Laminating Handbook, Third Edition, 2008 and
Creative Mounting, Wrapping, And Laminating, 2000 will teach you everything you need to know about getting the most from your dry mount equipment and materials as an innovative frame designer.
All books are available from Designs Ink Publishing through this website.
Chris A Paschke, CPF GCF
Designs Ink
Designs Ink Publishing
785 Tucker Road, Suite G-183
Tehachapi, CA 93561
P 661-821-2188
chris@designsinkart.com