 Photo 1
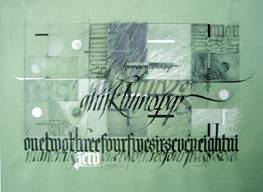
A full sheet of handmade green Roma paper features graphite and gouache in a abstraction by Dick Beasley using letterform as subject matter.
Though the camera image has been cropped the paper has four deckle edges.
A few months ago in the November 2004 issue of PFM I wrote "Hinge Basics" covering assorted preservation materials available both commercially and self assembled. In it one of the things I discussed was the differences between pressure-sensitive and gummed linen tapes, their impact, and limitations. At that time I didn't concentrate on the removal of such tapes or hinges other than mentioning the gummed types could be removed with water.
It seems like everything always happens for a reason, and as luck would have it one of the first framing challenges I had right after writing that article was to salvage and reframe an original piece of fine art calligraphy by Dick Beasley completed in 1985. Low and behold a perfect opportunity had arrived to illustrate damage, removal and minimal repair that a framer might attempt after heavy duty linen hinges had been used on a light 90# fine art paper. The techniques illustrated in this article are not formal conservation techniques, but rather those as suggested manufacturer removal techniques that might be implemented by a skilled framer.
The Project
Dick was a fellow educator and peer of mine in the fine art calligraphy world who died suddenly during the 1992 International Calligraphy Conference in Michigan that I was also attending. Sherrie Lovler owner of Ink Monkey Press, a dear friend, purchased a Beasley original at last year's 2004 conference. A special exhibition of Beasley's work had been assembled to honor his numerous contributions to the calligraphy world and excellence as an educator.
Known for his abstracted calligraphic artwork using no written text but only letters as his subject matter, this artwork is a graphite and gouache mixed media in neutrals of gray, white and black on a full sized piece of green Roma paper (photo 1). Roma paper is an handmade Italian paper loved by lettering artists for its toothy surface and four deckled edges. As artists generally do, "Beas" (as the calligraphy world referred to him) framed his own work. This piece was simply assembled in a narrow metal frame, no mat, with the four deckles exposed. It was floated on the center of a piece of Bainbridge Celadon Alphamat #8513 green mat board. The artwork was hinged from behind with reinforced V-hinges...of gummed linen tape (see PFM, "Hinges Floated", December 2004).
Photo 1
A full sheet of handmade green Roma paper features graphite and gouache in a abstraction by Dick Beasley using letterform as subject matter.
Though the camera image has been cropped the paper has four deckle edges.
Water Activate AKA Gummed Tapes
There are positives and negatives to all types of hinges. Linen hinges are no different.
Gummed tapes regardless of linen carrier or paper are generally neutral pH, easy to remove with water, and the adhesive is stable enough not to creep over time. They are strong enough to tolerate high degrees of temperature variation and humidity changes.
The trick to successful application or removal of a gummed hinge is: first, to select the correct hinge for the job; and second, not to apply too much moisture during either process, which could produce rippling, warping, cockling or buckling of the art paper. Hinges should be the same or lighter weight than the material being hinged...linen is very strong, and has fabric carrier rather than paper, which is what gives it the added strength.
Linen Hinges
As discussed in Hinge Basics, gummed linen tapes are excellent for the book hinging of the window mat to the backing board, but probable should not be used for hinging of the artwork itself. There are a number of reasons why linen hinges are not advised for the hinging of art. First, if too much moisture is used to activate the gummed adhesive there is risk of paper saturation and buckling, though that can also occur with cooked paste.
Second, the tough linen tape tends to restrict the paper from its natural expansion and contraction during temperature and humidity variations. Third, the hinge should always be the weakest link so it would tear before the art would tear if dropped or fell from the wall.
Unfortunately it appears the rule of the hinge being the weakest link had not been stressed enough to artists and art educators at that time. This piece appears to have been framed late 1980s, and Beasley most likely selected gummed hinges because of their perceived archival nature and holding strength. No telling whether is was too much moisture or restricted paper movement, but the result had been three distinct hinge echoes seen on the face of the artwork (photo 2).
 Photo 2
This detail photo clearly shows the front side of the buckled Roma paper where the gummed hinge had been attached to the back.
All three points of hinging were equally as damaged.
Framing Design
The selected moulding is a 1" flat topped antique pewter wood moulding from Valley Moulding Treasure Collection #34825. Sherrie originally wanted the old linen hinges removed, the paper repaired, then the art floated as Beasley had originally done with the four exposed deckle edges. After selecting the moulding we decided that with the additional width required for the outer float space added to the negative space already surrounding the art, the viewers eye was being drawn away from the inner abstracted lettered image. So we opted for a double mat with wrapped spacer to bring in the hint of green to the framing.
The ³⁄₁₆" deep bevel was wrapped with neutral pH, dark green fine art paper rather than matching the green Roma of the artwork (photo 10-corner detail of photo 9). Personally I would have preferred the Roma to better integrate the brighter green into the framing, but my conservative client (and friend) preferred the darker tone, and the customer is always right...well almost.
What to Do With the Tape
Sherrie and I had decided I would attempt to correct the hinging problem without resorting to heroic measures. If I was unable to remedy the problem we would contact a paper conservator. The hinges had been fully attached to the verso side of the art 1¼" at all three points across the top, rather than just a narrow ¼" band. He mounted the V-hinges quite nicely though, complete with reinforced cross piece. This artwork was never going to fall off its backing board (photo 3). The first order of business was to gently cut the three hinges at their fold to free the art from the backing board.
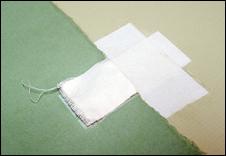 Photo 3
The gummed hinge was attached to the verso side of the darker green Roma paper to the right, while it was V-hinged and reinforced with the same linen tape onto the Celadon mat board to the left.
I would generally be very tentative about attempting to remove heavy gummed hinges from a piece of art by remoistening them, but in this case I was very familiar with the moisture tolerances of Roma paper as I have used many a sheet for my own fine art calligraphy. Sherrie was adamant about repairing the buckled paper so I thought at the very least I could remove the linen support fabric which might relieve the paper stress (photo 4).
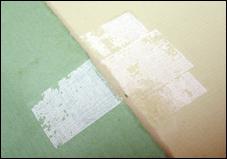 Photo 4
Upon removing moistening and peeling off the linen fabric the remaining dry adhesive still restricted the paper from lying flat. Once swollen by moisture paper fibers will never totally shrink back to their original state.
A clean rag was used to lightly moisten the linen tape just to soften it and not the paper beneath. The linen carrier was then able to be gently lifted from the back of the art. I thought I might be able to flatten out the buckled paper with the heat of a tacking iron or mechanical press enough to mat the art and cover the damage, but although it looked good from the back, the wrapped and buckled hinges still echoed the front.
A spun polyester interfacing (Pelon) and a blotter were placed beneath the art to cushion and protect it during the removal process. Though clean brushes are often the tool of choice for the application of water for hinge removal, a damp towel was used in this case to lightly apply a small bit of moisture to the adhesive area with blotting hand pressure. This softened the adhesive enough to remove it (photo 5). This may also be done with a clean stainless steel knife, as available from Lineco. After the bulk of the adhesive was removed another spun polyester sheet and blotter were used to cover the area to flatten and press any moisture from the paper surface (photo 6). This was then weighted and allowed to dry.
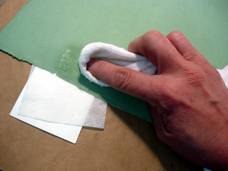 Photo 5
A spun polyester interfacing (Pelon) and a blotter were placed beneath the art to soften and protect it, then a damp dry towel was used to lightly apply a small bit of moisture to the adhesive area with blotting hand pressure.
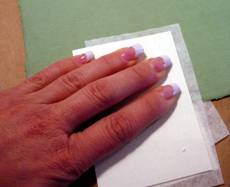 Photo 6
After the bulk of the adhesive was removed another spun polyester sheet and blotter were used to flatten and press any moisture from the paper surface.
Flattening with Warmth
After blotter removal there was just a slight bit of remaining adhesive left on the verso side of the art as can be barely detected in photo 7. After completely dry, the front of the paper was pressed with a tacking iron and release paper to help flatten the damaged areas. The piece was then placed into a 180ºF closed, but not locked, 210M-X mechanical press with a release board for further flattening. The press was not locked because the paper was too large for the particular press used and the edges of the press would have indented the edge of the artwork. Hinge removal was totally successful with no warping or buckling visible from the front of the art upon completion (photo 8).
 Photo 7
First with only finger pressure then with sanded hinge weights it was allowed to dry.
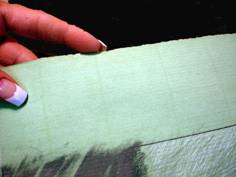 Photo 8
Hinge removal was totally successful with no warping or buckling visible from the front of the art upon completion.
New Framing
The newly refurbished artwork needed to be preservation hinged using Japanese starch paste and lightweight mulberry paper hinges. Since the old hinges were slightly too far away from the art edges, the new hinge locations were moved slightly to be attached. This also contacted undamaged paper fibers by hinging to a new raw area of the artwork that had not been previously saturated with adhesive. The new mulberry hinges were applied with Nori paste, weighted and allowed to dry.
The mats were cut, deep bevel wrap was assembled in the traditional pinwheel pattern between the two mats and the window unit was hinged...with gummed linen tape...to the 4 ply museum backing board. Then the prepared hinged art was then aligned and hinged to the Alpharag backing board with mulberry tissue pendent T-hinges. The frame was built, UV glazing cut, and with the completion of the mat unit, the project design was completed (photo 9). Beasley's artwork lives on and Sherrie is thrilled.
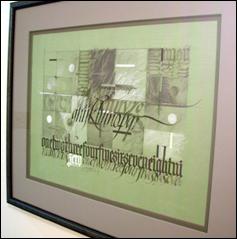 Photo 9
The completed reframing of the 1985 Dick Beasley original of fine art calligraphy turned out smooth and uncockled...as it should be.
Dick Beasley artwork and framing shown courtesy of Sherrie Lovler, Santa Rosa, California.
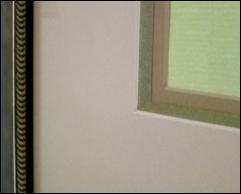 Photo 10
The ³⁄₁₆" deep bevel was wrapped with neutral pH, dark green fine art paper rather than matching the green Roma of the artwork. The green Roma paper could have also been used as a wrapper and would have helped integrate the framing into the art better.
END
Copyright © 2005 Chris A Paschke
* Thank you to Sherrie Lovler for use of Dick Beasley's artwork in this article. Sherrie's own fine art calligraphy may be viewed at www.inkmonkey.com.
For more articles on mounting basics look under the mounting section in Articles by Subject.
Additional information on all types of mounting is found in:
The Mounting and Laminating Handbook, Second Edition, 2002,
The Mounting And Laminating Handbook, Third Edition, 2008 and
Creative Mounting, Wrapping, And Laminating, 2000 will teach you everything you need to know about getting the most from your dry mount equipment and materials as an innovative frame designer.
All books are available from Designs Ink Publishing through this website.
Chris A Paschke, CPF GCF
Designs Ink
Designs Ink Publishing
785 Tucker Road, Suite G-183
Tehachapi, CA 93561
P 661-821-2188
chris@designsinkart.com