Paschke Online
Designs Ink Publishing Article Archive and Reference Library
Articles by Chris A. Paschke, CPF GCF
"Japanese Scroll Mounting - Part 2"
May 2001
Last month we embarked on an introductory tour and flash course in the history of Japanese scrolls. Now let's examine the materials, put on our yellow belt, and begin to explore the martial art and technique of scroll mounting. So here's the rest of the story.
Materials for Scroll Mounting
Pigments
The honshi is a painting or calligraphy done on silk or paper. Sometimes instead of a painting, embroidery on silk is used as the honshi. Paint used in traditional Asian painting is powdered pigment mixed with animal glue. Black sumi ink used in calligraphy and painting is soot and burned vegetable oil or pine wood, mixed with animal glue. Both are generally waterproof when dry and cured, unlike watercolors.
Decorative Front Papers
Either solid or patterned papers may be used for the decorative portions of the scrolls. Bamboo and gampi papers are favored for the solids. Woven silks, gouache (opaque watercolor) painted crumpled papers, patterned block prints, and hand painted papers are used for the patterns.
Fabrics
Any fabric may be used for the front, but silk is most common. Gold leaf is often added, gold brocade, silk gauze with embroidery, plain woven silk, and satin are all favored.
Backing Papers
All backing papers are handmade using strong long fibered plants. Kozo is the first backing layer because it is soft but strong. Misugami is the second layer which is very thin and soft. It is often used as the first layer when backing silk. Udagami (also from kozo fibers) is think and contains chins clay for the final layer of backing. Hanshi (from bleached kozo) is used for backing paintings on paper. The final backing layer is Uwamakiginu is a plain woven thin silk dyed lightly with indigo. This is often used for the top part of the final backing.
Note: there is a right and wrong side to all handmade Asian papers. The paper is dried on a smooth surface and are brushed flat to these surfaces while wet making the front the smoothest surface.
Adhesives
Standard paste (Ginjofunori) is standard wheat starch paste. The base formula is one part wheat starch to four parts water. This may be thinned as needed during different stages of mounting. Traditional cooking methods take 30-40 minutes stirring constantly as the paste turns from milky white, to thickly hardens, then turns transparent and loses the stiffness. It then must be strained and mashed with a paste brush. To dilute and thin water is mixed in during the mashing process.
Numerous other natural adhesives are also used including rice flour paste, or seaweed. Chemical adhesives are often used in lieu of rice flour today. The chemical adhesives are a mixture of polyvinyl acetate (white glue emulsion in water), polyvinyl alcohol (medium viscosity and water soluble, soluble in water at 80°C/176°F) and carboxymethylcellulose (high viscosity). This mixture has been used in Japan since WW II, is removable with water and is slow to react to climatic changes.
Different consistencies of this adhesive are mixed for different layers of the scroll. The first layer of backing is one adhesive to one water; second layer is one adhesive to twenty-four water; third layer is one adhesive to twelve water.
Traditional Mounting Technique
First Layer of Backing (Hadaura)
Testing of the inks and dyes of the art must be completed prior to any application of water during wet mounting. The artwork is then placed face down on a hard table, moistened with a water brush (hake or mizubake) and allowed to sit for five minutes in order to evenly saturate (photo 1).
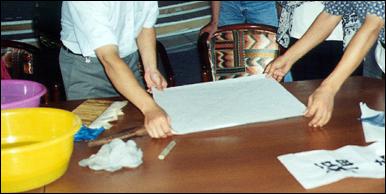 Photo 1
This gyo style scroll is traditionally used for mounting haiku (Japanese poetry), letters, and paintings of beauties. They may be either horizontal or long verticals. This was taken at the recent Princeton Collection of Chinese Art exhibit at the Metropolitan Museum NY.
A layer of adhesive is brushed to the front of the first layer of backing paper which is then lifted from the table beginning at the lower sheet corner. Just before the upper corner lifts free, the edge is supported by a stiff brush or bamboo rod as it is transported to the waiting artwork. The first layer is then gently positioned onto the painting and is brushed with a wide stiffer nadebake smoothing brush (photo 2). If a material being mounted is fabric the entire backing sheet should be gently tapped with a tapping brush for better contact.
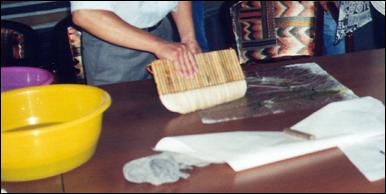 Photo 2
These contemporary scrolls are from an adult art class in Beijing, China. They showcase the more minimal Hyogu and Mincho style scrolls without fukuro trims at the top. Left to right scrolls 1 and 4 are based on so style (diagram 4C), while 2, 3, and 5 are hyogu.
The entire reinforced artwork is then lifted from the table (photo 3), supported by a brush and is carried to a drying blanket or smooth wall (photo 4).
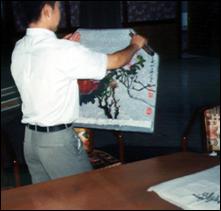 Photo 3
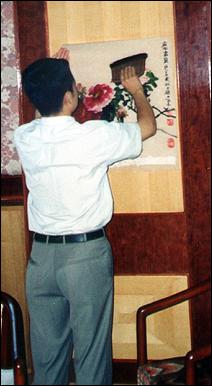 Photo 4
Second Layer of Backing (Mashiura)
Remoisten the now dried first backing layer face down with a water brush as in the first steps. A strip of misugami is placed face up on the mounting board or table. Thin paste is applied to this paper while it remains on the pasting board. It needs to be brushed two or three times to both roughen the paper by lifting the fibers and drive the paste into the paper.
This backing layer is then lifted with the brush or bamboo rod and gently aligned onto the back of the painting and first backing unit. It is tapped and smoothed as the first backing layer, lifted and repositioned to a drying blanket or smooth wall.
Joining the Trim Pieces
All materials are sized and readied for the trim pieces of joge and ichimonji-jo, ichimonji-ge, and chuberi. Any backing paper that extends beyond the art is trimmed as needed and all pieces are squared. Adhesive is brushed along the back edges of the top and bottom trim pieces and they are positioned, tapped in place, and trimmed. Next the hashira is sized, pasted, aligned, and trimmed. The chu-ge is pasted and overlapped onto the ichimonji-ge next, followed by the ge.
The same process is then applied to that of the chu-jo to the ichimonji-jo, and the jo to the chu-jo. The then entire scroll is allowed to dry. Any excess papers will be trimmed after dry but prior to final backing.
Third Layer of Backing (Ageura)
The dry decorated scroll is again placed face down on a work table and moistened with water as in preparation for the first two backings. A thin layer of paste is applied to the back of the first backing, which is then brushed several times to lift the fibers. The final third backing is prepared using a thicker paste, then positioned onto the double backed scroll, which is smoothed, tapped, and smoothed for good contact. It is then left to dry overnight.
The above process is an extremely abridged yellow belt version of the very elaborate method of the art of scroll mounting. Many of the steps during preparation, application, and finishing have been eliminated for brevity, but it is safe to suffice this is an art and not merely a mounting technique.
Displaying Scrolls
Once mounted as a scroll the question here in the Western world is how to frame or display it. We must always remember the reasoning behind the origination of the scroll in the first place and perhaps maintain the thoughts behind that origin. History has taught us that Asian homes were often built of thin rice paper walls and screens as room dividers. If art was ever to be displayed it needed to be very lightweight, durable and easy to transport.
A scroll is considered a completed (framed) piece of art ready to display. In order to maintain their original dignity they should be either hung as is, or encased in an acrylic box (photo 5). The three scrolls in the photo were in the same Chinese Art Collection at the Met this past December. They clearly show one of the best ways to protect an ancient or contemporary scroll while maintaining its originality of design. The addition of each owners seal to the beginning and/or end of a scroll was used to designate ownership, authority, and authenticity of that artwork or document. There are often numerous chops stacked in the margins, on the edged silk, and even infringing upon the art itself.
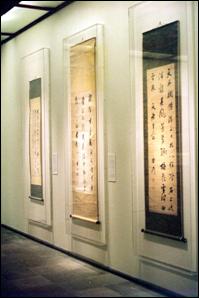 Photo 5
Acrylic boxes display antique scrolls in their naturally designed presentation. Met Museum, NY.
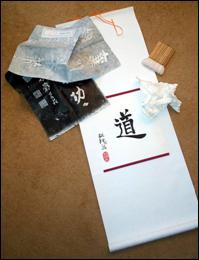 Photo 6
Upper left is a folded rubbing from The Stone Forest, Xi'an, China.
Right is a crumpled original after backing and scroll mounting.
Back to the Beginning
In photo 6 upper left, is a rubbing from The Stone Forest, Xi'an, China. It was aggressively folded after purchase by the shop for easy transport as is a common practice. Since the technique of mounting as described above involved moistening of papers, wrinkles will be brushed out as the paper is smoothed. To better illustrate that fact to us, in the mounting class prior to adding the first backing the painting was crumpled into a small ball, just as I have done to the piece of rice paper center right, photo 9. All the creases and wrinkles will come out during this traditional wet mounting method.
Now to readdress the forum question about silk type paper. The original question was about the removal of creases in a silk embroidery brought over from China. It was suggested to steam it flat...not a good idea since the water based adhesive is likely to release; then it was suggested to place it into a heat press...not a good idea because the creases could be permanently set; a warm hand iron might be more controllable but could still not solve the problem.
Based on the teachings in China the inks and dyes generally used become permanently set and waterproof over the time of a few weeks as the animal glue in them cures. Traditional techniques would include moistening the honshi (silk artwork) face down on a hard table, and applying the reinforced paper backing layers to create a scroll as described in this article. Since however, we cannot be certain of the process nor the exact materials used, perhaps the best would be to seek the help of a qualified conservator.
It seems wet gluing techniques may appear simple enough but the logistics, skills, and basic knowledge required is nearly overwhelming. Part of the job of a picture framing professional is to know their own limitations. Traditional scroll mounting takes years of training. In light of the fact our job is to 'enhance and protect'...call for a skilled scroll conservator to tackle this silk embroidery problem.
To become a third level black belt in scroll mounting would mean you would have been studying this art since high school, and even though I am a second generation framer having been in the industry for thirty years, I've yet to be anywhere near any black belt in scroll mounting.
Sayonara.
END
Copyright © 2001 Chris A Paschke
*****************************************
Long Vowel Japanese Words
All these have been highlighted in red within the text. They may or may not need capitals, I have capitalized when discussing them as proper groupings, but when the refer only to a section or part they are not. This is based on research and study, not guessing.
Gyo
So
Hyogu
Mincho
chuberi
soberi
jo
ichimonji-jo
chu-jo
chu-ge
futai
kozo
ginjofunori
For more articles on mounting basics look under the mounting section in Articles by Subject.
Additional information on all types of mounting is found in:
The Mounting and Laminating Handbook, Second Edition, 2002,
The Mounting And Laminating Handbook, Third Edition, 2008 and
Creative Mounting, Wrapping, And Laminating, 2000 will teach you everything you need to know about getting the most from your dry mount equipment and materials as an innovative frame designer.
All books are available from Designs Ink Publishing through this website.
Chris A Paschke, CPF GCF
Designs Ink
Designs Ink Publishing
785 Tucker Road, Suite G-183
Tehachapi, CA 93561
P 661-821-2188
chris@designsinkart.com