 Photo 1
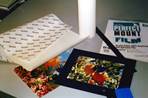
Pressure-sensitive adhesives are available as mounted boards and films. Shown are 3Ms PMA (left) and Crescent Perfect Mount Film (right), both great for float mounting photographs.
Photographs are a topic that will never be put to rest. Whether Ilfochrome Classic, resin-coated (RC), or fiber based (silver gelatin), they have our attention as concerned framers. Our biggest fear about photos is that we basically know nothing about them...taking a snapshot at the family picnic is a far cry from developing negatives. For anyone who has taken Photography 101 the concept of float mounting onto the center of a neutral black, grey or white mount board for presentation should be old hat.
Topic Review
Once again I'm back talking about photographs. This time the topic is float mounting using pressure sensitive adhesives (photo 1). In August ("Pre-Mounting for Float Mounting") I reviewed pre-mounting with heat tissues in preparation for float mounting. Two separate dry mounting procedures required for a quality end result. The concepts are similar but the reasons and applications are different than when using pressure-sensitive adhesive films.
Photo 1
Pressure-sensitive adhesives are available as mounted boards and films. Shown are 3Ms PMA (left) and Crescent Perfect Mount Film (right), both great for float mounting photographs.
The translucency of clear pressure-sensitive adhesives for controlling ghosting is only part of their potential. Use of pressure-sensitives goes way beyond the fact the films are clear. If that was the only criteria then sprays, wet glues and heat films are all options. Sometimes the issue is the possibility of heat sensitivity, or smoothness of the mounted end result, even if it isn't heat sensitive.
Orange Peel
The rough, rippled, uneven texture of an actual orange peel (photo 2) is the name given to the distorted surface of any mounted photo because of its similarity in appearance. It is generally created by the relaxation of the photo emulsion onto its new substrate.
The interesting thing about photographs is the extreme of their heat tolerances. An Ilfochrome Classic will not "melt" until somewhere around 325ºF, but it's polyester will casually relax to the contour of any substrate at 160ºF, resulting in some degree of orange peel. Fiber based photos have less tendency to orange peel, most likely the result of their heavy thicker backing paper.
The major offender of orange peel is the RC photo. Ironically it's the one we handle, dry mount and complain about the most. Mounting alternatives will help control the unwanted texture but may sacrifice mounting longevity, depending upon your process and available equipment. The white reflection area of photo 2 illustrates the greater control of orange peel when cold adhesives are used for float mounting photos.
 Photo 2
Orange peel is the rippled uneven surface of a mounted photo, not seen here when pressure-sensitive films are used for float mounting.
Pressure-Sensitives to the Rescue
If matting and framing the photo, any pressure-sensitive board or foam would suffice as a substrate. But if the photo is slated for competition or laminating then p-s films are in order, not for their clarity this time but for their self-shaping and orange peel control.
Whether pure p-s film or p-s film with a carrier is used (see "Ghosting" PFM September 1996) the procedure will vary slightly but the benefits are the same. Since some of the available films are too new to tell what might happen in 20 years, longevity is still based on application. In either case the best p-s mounting will be achieved when used in conjunction with a cold vacuum frame.
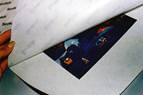 Photo 3
Trap photo between sized adhesive sheet and release sheet to apply film.
Pure P-S Film
The first of the two films discussed is pure p-s film adhesive sold on rolls with one release liner (3M Position Mounting Adhesive). Place the photo onto the sized, exposed adhesive sheet, cover with the release page (photo 3) and burnish with brayer, squeegee (photo 4) or run through pressure rollers to transfer adhesive to the photo back.
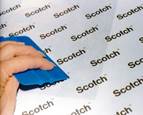 Photo 4
Squeegee the top of the unit to apply adhesive to the photo back in preparation for float mounting.
Notice the self-shaping nature of the adhesive as the photo is peeled from the roll liner (photo 5). It is separating at the division point, but be careful not to allow adhesive to split while lifting from the main sheet. This could leave non-adhesive areas which might later bubble due to humidity and moisture. The close up detail in photo 6 illustrates the normal edges of the pure p-s film after positioning. This is easily removed by lightly rubbing the exposed edge with a gloved finger.
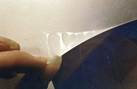 Photo 5
Notice the self-shaping nature of the adhesive as the photo is peeled from the roll liner.
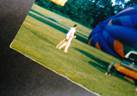 Photo 6
The extra lip of adhesive at the edges is easily removed by lightly rubbing with a gloved finger.
P-S Film with Carrier
The second film sampled is a tough sheet of adhesive film between two release liners (Crescent Perfect Mount Film). This is sold in pre-cut sheets and full 32"x40" mat sizes. The adhesive is extremely smooth, sheer and tolerates a great deal of handling without disintegration because of the thin carrier. It is once again sandwiched like an Oreo cookie, with a sheer Mylar layer in the center with p-s adhesive applied to either side (photo 7).
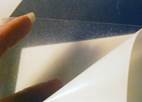 Photo 7
Notice the durability of the p-s film with a carrier to support the layers of adhesive.
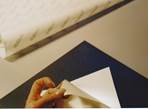 Photo 8
Peel back the top liner to expose the film sheet.
Peel back the top liner to expose the adhesive film (photo 8), position the photo on the adhesive, lay the top liner down to protect the photo during adhesive application and burnish with brayer or squeegee to apply. Since the film with carrier is incapable of self-shaping it must be carefully trimmed to size or desired shape prior to float mounting (photo 9).
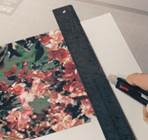 Photo 9
Trim the excess adhesive film/liner to size in preparation for floating.
The Actual Float
Once the photo has been prepared with adhesive, then align it onto the selected and sized mounting board. The sample is 11x14" Crescent Photographic Competition Board #6888. Mark the corners lightly with pencil to establish center and align into position (photo 10). Then cover with the removed adhesive release liner (photo 11), and burnish to set prior to weighting (photo 12).
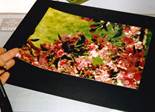 Photo 10
Align the photo onto the selected photo mount board, this sample being a Crescent All Black Mounting Board #6088.
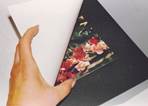 Photo 11
Cover the centered "floated" photograph with the release liner sheet. Repositioning is still available until burnished into place.
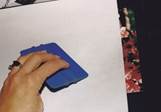 Photo 12
Burnish with squeegee or brayer being careful not to slip liner over photo surface or it may scratch.
The process is quick, clean and easy. The amount of pressure applied to the p-s mounting will determine the degree of potential orange peel. Earlier I stated it could be avoided by using p-s adhesives, but too much aggressive pressure may indeed still create a slight appearance of orange peel. Moderation is the key.
TTPM
Pay attention to the elements of mounting. Even pressure-sensitives require a bonding time under a weight. The temperature effects the overall bonding time also in that items will often bond in a shorter time at higher, drier temperatures and require a longer time when it is colder.
Temperature extremes should be controlled so all mounting items are acclimated before, during and after mounting...at least 24 hours. Framing shouldn't be completed until 24 hours after p-s mounting and weighting, which is pressure. Moisture must always be acknowledged. The biggest problems associated with p-s adhesives, as with any mountings, is humidity. Too radical a change in environment may cause bubbles. Paper expands when damp and contracts when dry. Thus pressure and moisture work hand in hand as does time and temperature during p-s mounting.
Backing Boards for Photo Floating
Obviously any board you select will be in line with the conservation requirements and longevity required for the particular project. Keep in mind however, that there are boards developed specifically for use with photographs and regardless of their costs, the best presentation should be your dominant selection decision.
Samples of boards designed for specific photo use include Crescent's Photographic Competition Mounting Boards buffered acid-free surfaces and meet all PPA competition requirements concerning size and thickness, available in white and black. Though often not the best choice for framing and definitely not conservation framing.
Archival Photomount boards are non-buffered, 100% rag boards that meet Library of Congress Standards for art requiring low alkaline environments. They are more rigid than their 4 ply Museum Board counterparts because of being 2-2 ply fused together, thus better able to protect a photo. Check with other leading companies for their versions of non-buffered boards specifically designed for use with photographs and always offer the best to you customer.
More Comparisons
Pressure-sensitive adhesives vary with their basic composition. Final visual product will be affected by smoothness of the original adhesive itself, application technique, and thickness of mounting and selected substrate. The one-step ease of a self-shaping p-s film (PMA) might also allow for voids where the adhesive may not have remained intact and sometimes lumps might be the result of poor application technique. The durability of handling when a p-s film with carrier (Perfect Mount) is used generally applies very smoothly and stays intact, but must be hand trimmed afterwards. There are always variations to consider when selecting the film to use.
Which is better? It's always up to the user. Try to remember we'd like to blame the manufacturer when it's often our technique, lack of familiarity or carelessness that creates a problem. If you own a heat press its unlikely pressure-sensitives may be heavily in your future for photos, but for died in the wool spray and wet glue users it is a viable option and strong alternative to consider. Then there is always the orange peel issue, Ilfochrome classics and those iffy color copies.
END
Copyright © 1996 Chris A Paschke
For more articles on mounting basics look under the mounting section in Articles by Subject.
Additional information on all types of mounting is found in:
The Mounting and Laminating Handbook, Second Edition, 2002,
The Mounting And Laminating Handbook, Third Edition, 2008 and
Creative Mounting, Wrapping, And Laminating, 2000 will teach you everything you need to know about getting the most from your dry mount equipment and materials as an innovative frame designer.
All books are available from Designs Ink Publishing through this website.
Chris A Paschke, CPF GCF
Designs Ink
Designs Ink Publishing
840 Tucker Road, Suite H-190
Tehachapi, CA 93561
P 661-821-2188
chris@designsinkart.com