 Photo 1
Broken glass, torn hinges and bent metal moulding. Image courtesy of Hunt Corp.
Each month I try to pick a topic that aligns itself in some small way with the theme of the issue. This is a mat design issue, and although I am discussing adhesives, tapes and longevity, mats do fall into the picture...no pun intended.
Broken Hinges
I framed the paper cast image Irises for Hunt Corporation in 1995 as a traveling show display. During the Atlanta 2002 show this display piece elected to leap from the wall one lonely night and crash to the floor. Since I was the original framer Hunt asked me to repair and replace the damaged portions of the image for future use (photo 1). It is always interesting when the opportunity arises to open up a frame that had been prepared for aggressive show travel to see how well it has faired over the years at the hands of UPS and assorted freight lines.
Photo 1
Broken glass, torn hinges and bent metal moulding. Image courtesy of Hunt Corp.
The conservation concept behind Japanese hinging is the noninvasive adhesive and the ability for the hinges to tear away before the art if the frame were to fall from the wall. Just is the case with the Iris piece. The hand cast heavy paper has four deckled edges and required to be floated above the 100% cotton board backing by being hinged to the cotton support with thin paper hinges. And just as they should, the hinges did tear when the frame hit the floor, leaving the artwork unscathed and ready to be rehung for future viewing.
Adhesive Strength and Longevity
When I began to disassemble the frame I had to remove Velcro surrounding the black paper dust cover backing. Remember this piece had been prepared for trade show travel, wires and hangers were not the booth method of hanging. After eight years, the heavy Velcro adhesive was still very aggressive and only matched by the high tack nature of the reinforced linen tape that surrounded the edges of the filler backing. This linen tape had been burnished to the inner edges of the metal moulding prior to the application of the ATG tape and dust cover. I was amazed at the aggressiveness of both of these pressure-sensitive tapes (photo 2). More about this later.
 Photo 2
The pressure-sensitive Velcro and linen tapes used to help seal the filler boards to the metal frame edges was still extremely aggressive. The linen carrier had dried out and the adhesive had peeled from it, but the saturation and bond remained aggressive to the paper and metal.
Where Does Hot Glue Fit In?
The cast paper Iris image had been properly Japanese hinged using cooked starch paste to a reverse bevel cut center panel. That floated panel was hot glued to the white rag board behind it. Not only did the hot glue pass the "90 degree peel" test, it was nearly impossible to remove from the backing at all (photo 3 and 4). Reversible...I think not.
 Photo 3
Hot glue was used to bond the float panel to the backing and was inseparable, massive T-peel strength.
 Photo 4
It required the base to be peeled from the float with a sharpened bamboo knife
Looking further into the frame there was no detectable visible damage or chemical reaction to the hot glue. The lasting bond of the 3M #3797 neutral pH hot glue stood solid. Though the nature of hot glue permanence may be generally frowned upon for use in a frame, there are situations where it may be applied with no damage. This traveling floated cast paper image makes a good case for that.
Two More To Repair
The second featured project is a set of traditional RC photos that had been printed from slides, enlarged and framed about ten years ago. They had been damaged in a move from east coast to west, and now I needed to disassemble, repair and reframe then both with updated mouldings, materials, et al (photo 5).
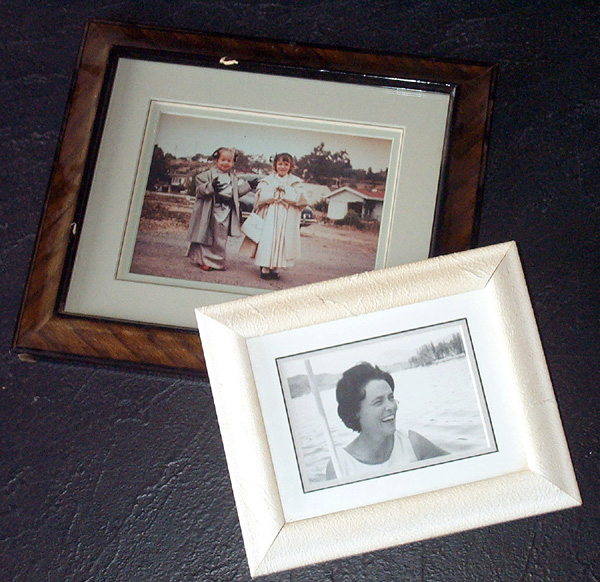 Photo 5
The two damaged frames had chips and corner separations but the photos and mats appeared fine beneath.
Photos courtesy of Sharon Lander, Copperopolis, CA
They were creatively framed about ten years ago for my childhood girlfriend using museum rag boards made into an assortment of 6-12 ply surface and bevel banded tiered mats. The photos were dry mounted to photo rag boards using a low temperature removable tissue, and they had been glazed with UV-conservation clear glass. There were custom made easels of suede mat board attached to the backs which also needed to be replaced (photo 6).
 Photo 6
They were backed with suede mat self-standing easel backs that needed to be replaced also.
Disassembly of Two
Having just dismantled the above Iris piece for repair, p-s adhesive tapes remained on my mind. As the two photos were dismantled the bond of the ATG tape holding the suede easels and backing paper to the mouldings was carefully examined. The tape on the larger piece had reacted with the stain and wood of the lacquered moulding and had tuned a bright red (photo 7). Regardless of the chemical changes that had been occurring there was no visible change or damage inside.
 Photo 7
The tape beneath the suede easel, between dust cover and easel had turned bright red.
 Photo 8
No interior damage or reaction. All mats and the photo remained lightfast.
The easel back had been attached to the dust cover beneath it using ATG tape, which was also bonded with ATG to the moulding. The bond was still very aggressive. The longevity of a pressure-sensitive tape is only as good as the process of its application. Too often p-s tapes are not burnished into place, hence the adhesive may only have been activated 50%. These tapes had been twice burnished, once for the dust cover, again with the easel back...this ATG was really stuck.
As with the Iris not only was there no visible damage, but everything inside looked as good as the day I originally framed it. There was no mat discoloration, no separation, no detectable fading of materials or image at all. The UV glazing had done its job and protected both the image and the framing materials. The edges of the glazing was dirty, but I could not detect ????
Pressure-sensitive adhesives are available as tapes and wide sheets, but the longevity and bonding issues remain the same with either. Having the opportunity 5-10 years after framing to disassemble, examine and reframe first hand is priceless. We teach customers to return framed images every five years for inspection and cleaning, this was that and more.
Adhesive Standards
Though not at liberty to discuss current committee proceedings I can refer to American National Standard IT4.20-1998 for pressure-sensitive adhesives. When offering sources for adhesives and mounting I have mistakenly listed ANSI 39, 48-1992 as the standard in The Mounting And Laminating Handbook, second edition. This is the one listed for reference in FACTS FRM-2000, which is also wrong. This standard was updated in 1997, again in 1998, and hopes to be voted on and released by the committee in 2003, having been rewritten to include all adhesives, as ISO 18932.
Scientific Testing Methods
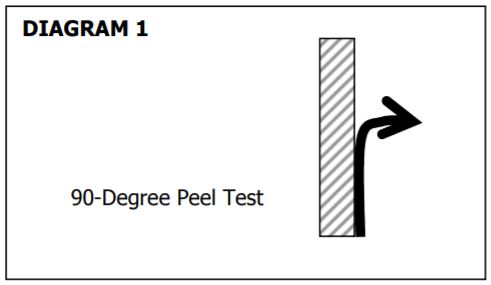
In the discussion is adhesives standards and longevity, there are two general tests that are used with pressure-sensitives for results. The 90-degree peel or the T-peel. The 90-degree peel is preformed when a porous paper has been bonded under controlled conditions to a rigid substrate which is held vertically while the paper is pulled at a 90-degree angle perpendicular to that substrate to test the adhesive bond (diagram 1).
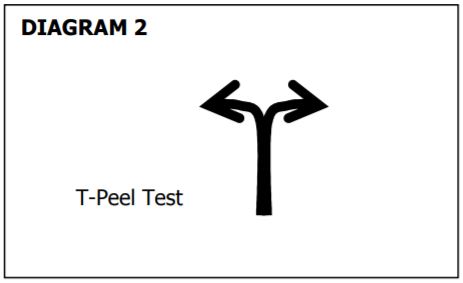
The T-peel is when the substrate is a flexible media such as another piece of paper. These two flexible layers are bonded with the test adhesive and are pulled apart in the air in 180-degree opposition while the remaining unpeeled sheet hangs between making the shape of a T (diagram 2). With either test the adhesive is expected to hold or tear apart the layers of the paper or substrate as they separate. The adhesive should not fail and simply pull apart without damage.
Personal Test Results
It must be noted that none of the discussed tapes in this article are scientific test results, nor were they conducted with any kind of a control. This is only a wonderful opportunity to see the actual results of pressure-sensitive tapes and to test their long term bonding capabilities after eight to ten years. Accelerated laboratory testing can only simulate lapsed time by aggravating the bond through the use of higher temperature and humidity.
Iris Cast Paper
Having already stated my surprise at the aggressiveness of the linen tape on the Iris frame I want to compare it to the tests. Though the remaining adhesives were well bonded to the papers, meaning the black dust cover and the filler boards, the carrier or the tape did let go. There was visible lack of adhesion due to the drying out of the tape adhesive itself, causing bond failure.
Photo Set
I have peeled off many a dust cover with dried out or oozy ATG tape, but these acted very differently. The heavily burnished ten year old 3M 924 on the smaller photo easel back that had been taped to the Kraft paper dust cover pulled the paper apart as it was separated manually from the back of the frame. The ATG tape on the back of the frame that bonded the dust cover to wood also tore apart during the peel. Both passed the 90 degree peel test with flying colors.
The ATG tape that had turned red showed no visible signs of failure as the chipped frame sat comfortably on the shelf. But with very minor manual separation using a bone burnisher at the corner between the moulding and the suede easel, the easel all but fell off, exposing the bright red adhesive strip against the suede mat backing. This one did not pass the peel test over time. The difference being the wood of the moulding and the stain of that moulding. It appears the red could be the adhesive and the stain creating the red reaction. It could also be a reaction to the adhesive and/or composition of the suede board used as the easel back.
So What?
It's the longevity and grip of the tape adhesives that impressed me. Whether five years or ten years, it is actual real time and not excelerated testing that was examined here. Now, lets put it into perspective. These tapes were not used nor are they meant to be used to hold art onto backing boards or into mat windows. They are only for sealing and sticking things together. The mentioned tapes are not specified by manufacturer, but rather by type (with the exception of the hoot glue). It is the application, the chemical changes that occurred, and the bond that inspired this article.
In the new world of digitals as I continue to pontificate about pressure-sensitive cold mounting, its wonderful to see the long term bond that can be created with correct TTPM, in this case pressure being the operative word.
END
Copyright © 2003 Chris A Paschke
For more articles on mounting basics look under the mounting section in Articles by Subject.
Additional information on all types of mounting is found in:
The Mounting and Laminating Handbook, Second Edition, 2002,
The Mounting And Laminating Handbook, Third Edition, 2008 and
Creative Mounting, Wrapping, And Laminating, 2000 will teach you everything you need to know about getting the most from your dry mount equipment and materials as an innovative frame designer.
All books are available from Designs Ink Publishing through this website.
Chris A Paschke, CPF GCF
Designs Ink
Designs Ink Publishing
840 Tucker Road, Suite H-190
Tehachapi, CA 93561
P 661-821-2188
chris@designsinkart.com