 Photo 1
Last month I began this two part series on shipping boxes...yet another untapped market of items needed by many, but still unknown to most. Let's look at the flatter items this month, the ones that are thin or without glazing...maybe laminated, or simply stretched.
In honor of this months needle art issue this is a perfect follow through. Isn't needle art often created for gifts by endearing Grandmothers and Aunts? And don't these gifts often need to be shipped to their recipient...especially during the holidays?
The Sink Box
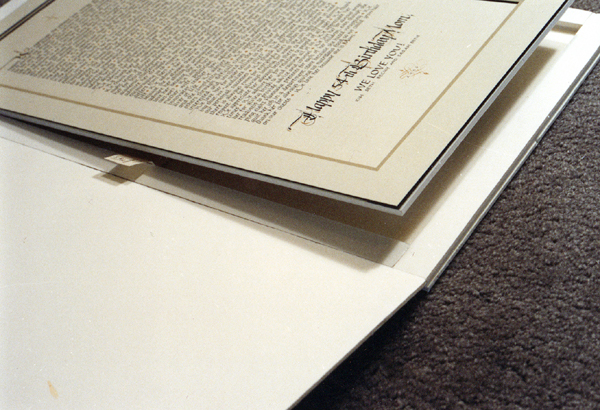
The idea of a sink box is somewhat the same as a sink mat, to build up the outer edges of the unit to protect and buffer the artwork from damage (photo 1). The reinforcement walls are built to be equal to or just slightly thicker than the matted, stretched or laminated piece to be shipped, and the protective walls are 1" to 1-½" wider on all sides than the matted art.
 Photo 1
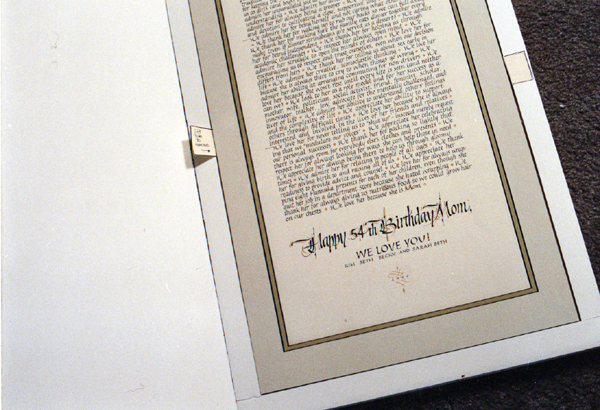
In the case of the featured sink box, the surface and backing are cut as 3/16" thick foam board panels which measure a total of 2-⅛" larger than the actual matted commissioned calligraphy to be shipped. That's 1" buffer on either side plus a ⅛" allowance (photo 2).
 Photo 2
The 1" side strips are cut on a straight line mat cutter or wall cutter for accurate widths, then these side buffers are ATG taped to the bottom back panel aligning them to the outer edges to create a clean sided unit. The lid is then hinged the full length of the box with a pressure sensitive linen tape.
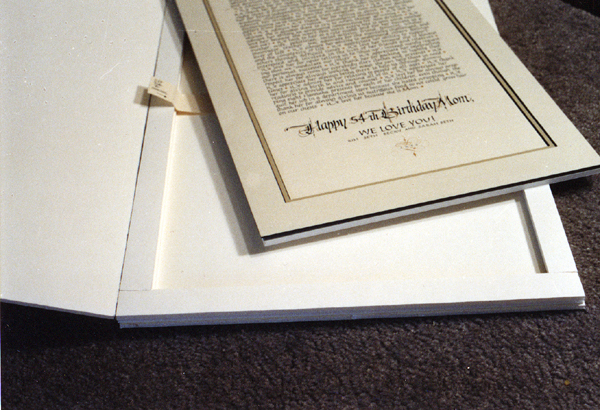
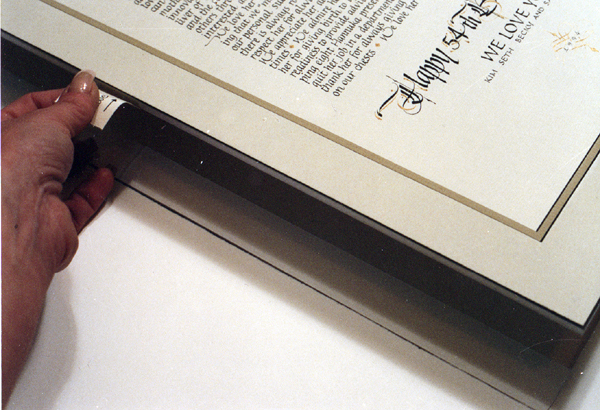
A lift tab is often nestled across behind the center back of the artwork visibly attaching on to the surface of one edge. This strip is only attached on one side to allow for the free tab to lift the art from the recessed sink box. The paper strip tucks down behind the art when recessed and easily pulls it up for removal (photo 3, 4). There probably isn't an quicker or easier reinforcement for safe shipment of thin, unglazed artwork.
 Photo 3
 Photo 4
Note April 2010:
As an artist for Wild Apple Graphics, Grand Image and Artaissance, I routinely build and use this style of flat shipping box for shipping my original art to these manufacturers for scanning or shooting. If I need it deeper I can add layers of ½" foam to build it up, or a can plan on deeper sides and just make a box. I use the same boxes many times before it needs reinforcement.
Pricing Sink Boxes
Generally flat sink boxes will be constructed mostly from scraps of foam. Dented sheets not suitable for mounting and endcuts of ⅛" and 3/16" may be taped together for additional depth and can easily be recycled into these units for added profits AND professional presentation!
Since I am not a gallery routinely shipping artwork, I generally include a handling/shipping charge when the service is requested. This includes the actual cost of shipping as well as a fee for the materials used in wrapping for safe shipment.
Whether you charge for the building of a sink box unit or not will be best determined by your individually targeted market. If all purchased artwork is shipped to your clients you may elect to somehow calculate the minor costs into your quoted prices. Then again, most people are accustomed to paying for additional services (like shipping and handling costs).
Selling Sink Boxes
As with almost any new services offered, building of a sink box may never be requested and might actually need to be actively sold. I deal with calligraphy clients and framers across the country and seem to be creating sink boxes quite routinely. The main concept is to prevent damage to the art during transport...but also to always make as much money from your initial sale as possible. It's the "selling up" concept again.
If I'm not going to benefit from the actual completed framing job, the least I will vie for is an upper end completed mat design to enhance and protect the custom lettering I may have been hired to create for them.— The same could be possible for delivery of any limited edition you may just have sold to someone living four states away visiting your gallery while on vacation. Don't ever overlook those great little opportunities for added sales.
Pricing Customized Shipping Boxes
Last month I promised you pricing guidelines for the reusable shipping boxes of ½" foam in part one. When calculating the price of a reusable customized shipping box, it will be determined for the most part by the materials selected for the box and the amount of time required to construct it.
Obviously corrugated cardboard is less then foam board which is less than Gatorfoam. Considerations need to be made concerning the required durability and repeated shipping use of the custom box you need to build.
Cost of selected materials and any additional time it takes to build boxes with tougher boards needs to be included in the price. As with any new process or design there will also be a learning curve to become comfortable with the formula of box sizing and assembly.
Check on the going rate for commercially available shipping boxes in your area and bulk buying costs. Always know what the competition is charging, but remember your boxes are truly custom sized to each individual piece. The best way to price is probable united inch or square foot pricing, based on your selected materials. And whether or not the materials are indeed recycled scraps you must always calculate them as though they were pulled fresh for this individual job.
Material Costs
On average, 48"x96" sheets of ½" thick foam, depending upon manufacturer and distributor, will run $15.00 to $20.00 per sheet. The same size piece of Gatorfoam is $55.00 to $65.00 a sheet. The box will be nearly indestructible but much more expensive to build. Thinner sheets of ⅛" and 3/16" foam board may be one third the price of ½" foam, but remember that building a box that with three sheets of ½" foam will take 9 sheets of ⅛" foam to complete. Don't skimp when the point is strength and durability.
My boxes run $50.-$100. using ½" foam, and many of my boxes have averaged 20x30" in overall outside dimension. At $4.00 per sheet, plus tape and hot glue, my materials average $15.-$20. per box and take about ½ hour shop time to calculate and construct. I'm comfortable with tripling my costs for a box charge, so I have a set chart for basic sizes I have pre-calculated.
END
Copyright © 1995 Chris A Paschke
For more articles on mounting basics look under the mounting section in Articles by Subject.
Additional information on all types of mounting is found in:
The Mounting and Laminating Handbook, Second Edition, 2002,
The Mounting And Laminating Handbook, Third Edition, 2008 and
Creative Mounting, Wrapping, And Laminating, 2000 will teach you everything you need to know about getting the most from your dry mount equipment and materials as an innovative frame designer.
All books are available from Designs Ink Publishing through this website.
Chris A Paschke, CPF GCF
Designs Ink
Designs Ink Publishing
785 Tucker Road, Suite G-183
Tehachapi, CA 93561
P 661-821-2188
chris@designsinkart.com