The practice and technique of wrapping mats with fabric has been around for a very long time, in fact long before fabric surface mat boards came onto the scene.Creating a basic wrapped mat is quick and easy, and mat wrapping should be in every framers repertoire. They may be completed with either cold or hot methods of mounting. Cold they may be done manually or with the assistance of a vacuum frame, and hot in a dry mount system.
Basic Wrap Materials
When wrapped and embossed designs are chosen for fine art always take into account the degree of acidity and lightfastness of any chosen decorative paper or fabric. Many beautifully colored materials that are dyed rather than pigmented can rapidly light fade even under normal tungsten lighting.The materials and visual textures should be subtle in pattern to work gently with the art to better enhance and protect without overpowering it.
In decorative art, there are times when a material may be selected because of its perfect visual texture, pattern or color regardless of the acidity or lightfastness issues.Some fabrics don—t absorb, some papers are tough to bend, just remember you are going to have to deal with the problems surrounding whatever material you select. But in the end, if well executed it is worth the extra effort.
Fabrics
Most fabrics adapt well to wrapped or embossed mats but there are a few basic considerations. Thick fabrics are more difficult to force down into a deep beveled foam window without a bulky clump of fabric at the corner.Thin fabrics have a tendency to color tint by picking up the ghosted color of the scrap mat board it is being mounted to.
A woven pattern can make the threads appear pulled, distorted, or out of alignment at the corners when forced into a corner. Synthetic materials don't absorb adhesive and the adhesion of objects will pull from the substrate as a result of gravity. Natural animal based materials such as wool and silk may require mounting specifically to unbuffered boards to better retard the acceleration of fabric deterioration by the higher levels of alkaline in buffered boards. Be familiar with selected fabrics, their properties, wrapping potential and limitations.There are fabulous fabrics available that are neutral pH and highly recommended for preservation wrapping.
Papers
Essentially any paper may be used for wrapping, from acidic, light fugitive newsprint to wallpaper to Mexican bark to Strathmore charcoal paper. Some are better suited to wrapping than others.The thicker or stiffer the paper the tougher it is to wrap.Some papers are very soft, pliable and flexible and adapt well to surface embossing (see Part Two: Embossed Matsnext month). Others may require wrinkled techniques to soften the fibers allowing for additional flexibility.
Adhesives
Dry mounting is the most time efficient and long term mounting process for wrapping. By selecting a 100% pure film adhesive the melted adhesive is allowed to contour and adhere the materials around and into all the nooks and crannies of the window mat design. An average mounting temperature of 185-200ºF for 3-5 minutes may vary with the press used, thickness or wrapping materials, and dimensions of the mat.Time held within the press will also affect the end product. Adhesive is drawn towards the heat source in a dry mount press so this also increases the absorption process as adhesive is pulled by heat into the paper.The longer a mounting is left in a press the more transparent a porous paper or fabric will become as it becomes more saturated with adhesive.
Many synthetic fibers such as polyester and acetate will not absorb adhesive. Once mounted, even a properly well mounted fabric may be peeled from the adhesive/substrate without damage. Mounts using films may appear shiny when viewed at an angle which may be mistaken for adhesive absorption, when it is merely the melted adhesive beneath the thin open weave of the sheer fabric.
Wet glue and cold mounting may also be selected as the adhesive and method of choice. Since many wet glues reactivate when heated, the fabric flaps and edges will adhere with an iron after initial bonding.
Substrates
Selecting a substrate that is stable, buffered, unbuffered, white, black, or colored will depend entirely upon the wrapped project itself.Papers and fabrics need to be matched to their appropriate substrate so not to accelerate deterioration or degradation of framed art or textiles. Whether 4-ply mat boards, black on black foam or 3/16" colored foam boards are selected, any time a colored substrate is used beneath a thin mounting, the color of the substrate may alter or tint the original mounting.Match materials carefully.
Acid free and black foam boards make good substrates for wrapping. They are more rigid and less likely to bow. Acid free foam is selected more for the tooth and texture of the board surface than for acid neutral treatments, though it remains an added bonus to be neutral pH. Its porosity has a greater desire to hold when mounted to regardless of the adhesive used.
Clay coated regular foam may be used, but the coated surface can transfer or rub off during wrapping.These clay coated boards are also not as absorbent as the other possible substrate choices. Soft cotton paper surfaced foam boards have a receptive surface but also have a tendency to drag when bevel cutting. Mat boards of 4, 6, or 8-ply work well and may be the substrate of choice for many projects. These boards may be the only choice for smaller projects or shallow mouldings.
Overcutting
The foam board chosen for wrapping must be capable of cutting a very clean edge with little or no bunching or pulling.There are numerous reasons why foam will bunch when cut. A dull, burred or broken tip blade; a blade not extended far enough or extended too far; or a foam board with a soft center prone to pulling will all create frustrations and pulled foam during cutting.
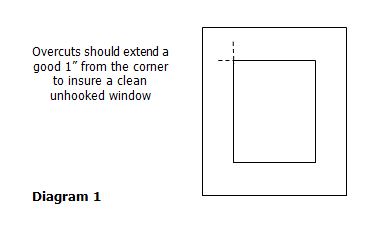
One way to avoid bunching is to always begin with a new, unused .012" blade and extend it to accommodate the thicker substrate.It is important to overcut the corners at least 1" to ensure a clean cut window corner, more is fine, just do not weaken the sides by cutting too close to the outer mat perimeter (diagram 1). When extending the blade to accommodate the thicker board it will be more prone to hooking during initial entry because of the lack of blade support when extended beyond traditional 8 ply thicknesses. Overcutting allows the hook to straighten out by the time it reaches the actual window corner and the resulting window will come out square, clean and crisp, ready to wrap.

Step by Step Technique: Dry Mounting
There are two simple steps required to achieve great wrapped mats in any mount system: first, fitting the fallout back into the window before mounting; and second, ironing the bevel to reactivate or reinforce the unmounted adhesive and adhere it to the bevel edge.
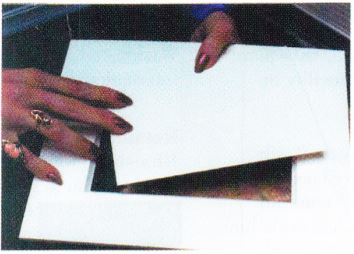 Photo 1: Window Mat
Size the mat and cut the window opening. Reserve the fallout for mounting.
Size and cut the basic mat or foam board window to its desired dimensions and size the fabric 1" larger then window mat (photo 1). Assemble and stack the mounting package bottom to top: bottom release paper, window mat, adhesive, fabric, fallout, fallout, top release paper (diagram 2). Make certain the fallout is well seated into the window opening (photo 2). Mount at 190-200ºF for 1-3 minutes in a softbed mechanical press, or 2-4 minutes in a hot vacuum press. Remove and cool under weight to allow the adhesive to cure.
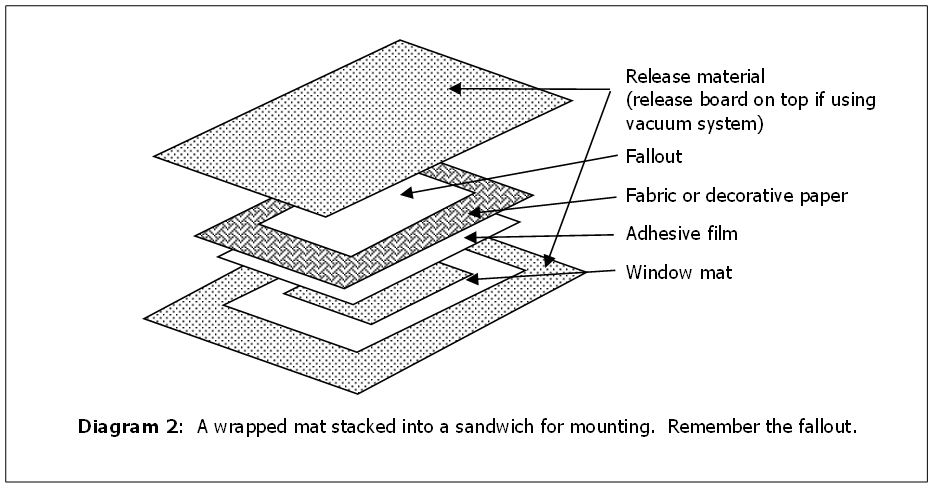
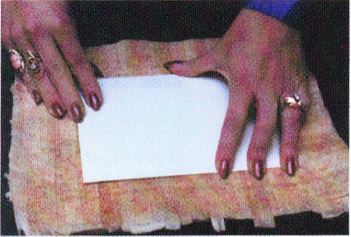 Photo 2: Seating the Fallout
By seating the fallout backinto the window opening, the papyrus will be forced into the shape of the opening; ensuring all the deep 3/16" foam bevels will be covered once wrapped.
Once cooled, place the window mat face up and cut the inner window opening leaving 1" of fabric to raw edge, miter corners, and prepare to reinforce the bevel (photo 3). Hand iron the bevel edge to mount loose fabric or paper (photo 4). Remember that foam board is an insulator rather than a conductor of heat so the bevel will not fully mount the wrapping material due to the inserted fallout. You may use either a commercial tacking iron or household iron set to just below wool, no steam. Foam board melts at 230°F so setting the iron just below wool melts the adhesive and not the foam. Too far below wool won't melt the adhesive.
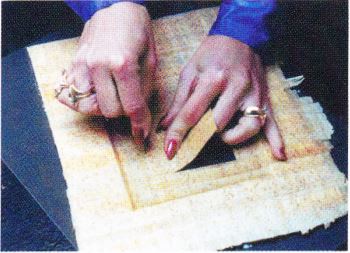 Photo 3: Removing the Window
Once it is mounted and cooled, remove the excess window material leaving about 1" to the bottom of the bevel. Always cut this with the mat face-up.
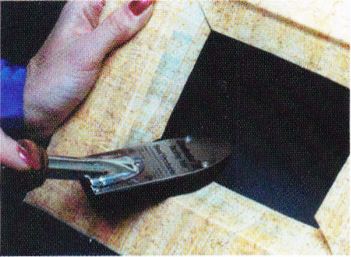 Photo 4: Reinforcing the Bevel
Since foamboard is a heat insulator, iron the bevel edge, making sure the flat of the iron is in total contact to the flat of the bevel in order to reactivate the adhesive and bond the papyrus to the bevel. Work well into the corners with the edge of the iron.
When the bevel is ironed and all the corners are flat, clean and nicely pressed turn the mat face down and proceed to ironing the flaps or turnbacks to the back or inside of the mat window (photo 5). When turning back the tabs to complete the wrap begin at the center and work toward the corners. Pull lightly from the center toward the outside mat border as you work into the corners. This prevents most bevel puckering. One of the best things about removable adhesive is having the option to reheat and shift small puckered bevels even after turnbacks have been ironed to the back of the mat.
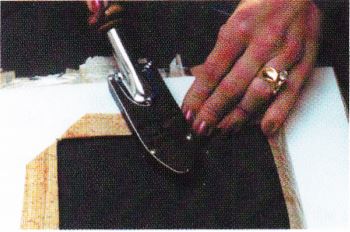 Photo 5: Ironing the Tabs
Once the bevels and corners are perfect, turn the mat face-down and iron the adhesive-backed tabs to the verso side of the mat opening.
Cold Mounting
When using a cold mount wet glue follow the same steps. Make certain to evenly apply the adhesive to prevent moisture bleed and stay away from mounting materials that may be too thin. Place in vacuum frame or under weight until dry then cut window opening with mat face up. The bevel will be mounted when the adhesive dries, unlike the above dry mounting, as long as it was properly applied to the bevel edge. Since the glue reactivates when heat is applied after drying iron the flaps to the back of the window as above.
Paper vs. Fabric
Paper is no difference in technique than fabric but there are options. Thin Japanese papers with long fibers may be readily wadded into a ball to create the wrinkled paper technique. The wrinkled paper technique softens the fibers of thin, stiff papers allowing them to contour around corners. This process applies well to long fibered Japanese papers as well as thick short fibered Western made papers (diagram 3).
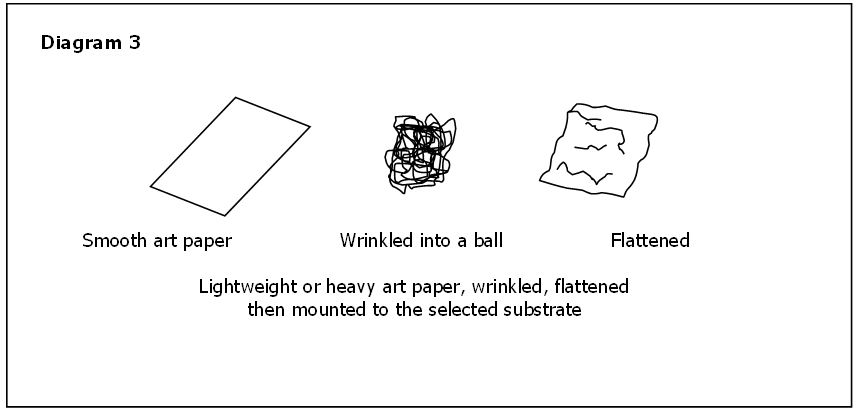
Use the same step-by-step process for paper wrapping as above with fabrics. Crush the selected paper into a ball before dry mounting to the window mat, open flat, and then mount with film adhesive. Wrinkling the paper breaks and softens the stiff fibers for easier contour around window openings and embossed mat surface designs.
Pricing
When calculating the pricing of a basic wrapped mat, consider the materials and time involved, then add in specialty, experience and excellence. The price of a wrapped mat completed in a heat press should include an additional mounting charge to any standard wrapping charges. This is true wil all mounting charges and techniques. Often suggested retail pricing is available through industry fabric supplier or distributor price lists. Sometimes it’s as simple as doubling or tripling a specialty mat column in POS system, but always verify that all materials are well covered and profits are added in. If anything, framers rarely charge too much.
As with any technique, the beauty in true custom framing is the excellence and skill with which the framing is completed. Never offer a technique (including wrapped mats) while it remains in its learning stage, and then never offer it as an in-store sample unless you really want to do it again. But if you never give it a try you’ll never realize the added profit potential nor how easy a wrapped mat truly is.
Next month I will delve into “Part 2: Embossed Mats”. Once the basic wrap is conquered, then applying a decorative surface design to that mat is simply one more step towards a true unique custom design. Let the creativity begin!
END
Copyright © 2004 Chris A Paschke
For more articles on mounting basics look under the mounting section in Articles by Subject.
Additional information on all types of mounting is found in:
The Mounting and Laminating Handbook, Second Edition, 2002,
The Mounting And Laminating Handbook, Third Edition, 2008 and
Creative Mounting, Wrapping, And Laminating, 2000 will teach you everything you need to know about getting the most from your dry mount equipment and materials as an innovative frame designer.
All books are available from Designs Ink Publishing through this website.
Chris A Paschke, CPF GCF
Designs Ink
Designs Ink Publishing
785 Tucker Road, Suite G-183
Tehachapi, CA 93561
P 661-821-2188
chris@designsinkart.com