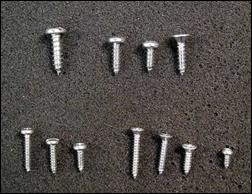
 Photo 1
Top row: Round head #8 x ¾"; Pan head #6 x ½", #6 x ⅜"; Flat head #6 x ⅝". Bottom row: Round head 4 x ⅝", 4 x ½", 4 x ⅜"; Flat head 4 x ¾", 4 x ⅝" 4 x ⅜"; head tiny #3 x ¼"
Professional picture famers are a cut above the do-it-yourself artist or hobbyist in their knowledge of framing materials and as such should promote the best and safest way to enclose and exhibit any customer art. That said, there are numerous old school methods still in practice when today's professional framer should be offering the best options available. Familiar hardware such as sawtooth hangers, screweyes, spring clips and wire may be used because they are a cheaper option—yet not necessarily the best choice. Small alterations in hardware or wire selection can significantly increase the stability and safety of custom framing. And always keep in mind the framing package and hanging system is only as dependable as its weakest link. So let's talk hardware.
Screws
Framing hardware is something all framers understand, right? True the wire needs to be heavy enough, the screw eyes large enough and the screw long enough to keep the frame on the wall, but armed with a more clear understanding of the technical aspects of hardware any framer may make better decisions about what to use, so there is nothing wrong with a few tips and a little basic terminology for clarification. This article is not designed to tell you what you must use, but rather to educate you so there is an understanding of what is the best choice. Sometimes altering what has been offered before with a new option makes the choice stronger and more dependable.
Shaft Weight or Gauge
The industrial world most often uses gauges to designate thickness measurement of sheet metal, diameter of wire, and screw shaft. The professional numbering system for fasteners (screws) may seem confusing as it is based on shaft dimensions and threading, but to simplify identification of smaller, more commonly used screws a number designation preceded by the # sign, such as #4 has been adopted. These numeric sizes are standardized shaft diameters based on sizes commonly in use in the hardware market. They do not show a number of threads-per-inch designation—as is common for most other sizes—and run from #0 through #15, with #0 the smallest and #15 the largest. In framing #4, #6 or #8 are most common, with #3 and #10 occasionally needed (photo 1).
Photo 1
Top row: Round head #8 x ¾"; Pan head #6 x ½", #6 x ⅜"; Flat head #6 x ⅝". Bottom row: Round head 4 x ⅝", 4 x ½", 4 x ⅜"; Flat head 4 x ¾", 4 x ⅝" 4 x ⅜"; head tiny #3 x ¼"
Types and Configuration
For our purposes, screws are identified and selected by shaft # (#3, #4, #6, #8); category (Wood, Metal, Machine); head style (Flat head, Pan head, Round head); and drive (Phillips, Slotted, Combination). Wood screws have a coarser pitch (few threads per inch) than sheet metal or machine screws, and often have an unthreaded shank below the head. The threadless shank allows the top piece of wood to be pulled flush against the under piece without getting caught on the threads. They are available with flat, pan or oval-heads. Metal screws—aka sheet metal screws—have sharp threads that cut into a material such as sheet metal, plastic or wood. They make excellent fasteners for attaching metal hardware to wood because the fully threaded shaft provides good retention in wood. (photo 2) Machine screws—generally not used in framing—are blunt ended, generally stronger than wood screws, have finer threads and are used with nuts or tapped holes.
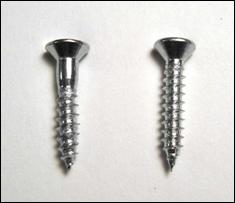 Photo 2
Wood screw with no threads at top (L), metal screw is threaded full length(R).
There are many head styles with flat head, pan head, and round head being most common for framing. Flat head screws are chosen when countersinking so the head is flush with the wood surface leaving nothing protruding (photo 3). Round head screws have a domed shape, while pan head screws have a slightly rounded head with short vertical sides (see photo above). A pan head is successor to the round head, and is slightly flatter with greater thickness near its circumference than the round head. This supplies more surface area for the driving bit to grip over the round head, especially for slotted or flat drivers. Pan head or round head are most common for D-rings, D-straps and steel plate hangers.
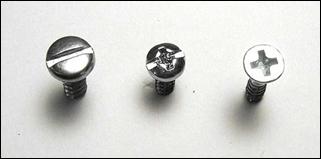 Photo 3
Slotted drive, pan head (L), Combination drive, pan head (C), Phillips drive, flat head (R).
There are many drive configurations but straight slotted, Phillips, and combination are shown here and most common in framing. Slotted drive is the traditional style which is installed with a standard flat screwdriver. Henry F. Phillips a businessman from Portland, Oregon has been credited with the invention of the screw style named after him in 1930. The importance of the screw design is its self-centering property, which became extremely useful on automated production lines that used automated screwdrivers. The combination drive—aka cross slot—was originally designed for versatility during installation by either straight or Phillips screwdriver with some foreign screws still of this design. Hardware purchased out of Canada often has the combination drive pattern.
Matching the correct screw shaft #, head, and drive can greatly simplify installation. Phillips screws are much less likely to slip than a slotted screw when driving with manual or electric driver. Tiny #3 round head metal screws best hold small sawtooth hangers rather than tacks. The smaller #4 and #3 Phillips head often require a smaller PH#1 screwdriver or electric driver tip for installation rather than the usual PH#2. Using too large of a driver may strip the drive head. Stocking twelve different sizes of screws may sound like a lot until you realize that there are four different shaft weights with a variety of lengths and drive patterns—all of which do serve a specific need.
Sawtooth Hangers
There are many variations but the typical sawtooth hanger is a jagged edged metal strip, from 1-2" long that resembles a saw edge (photo 4). Unfortunately sawtooth hangers get quite a bad rap because of hanging failure, but it is not the weakness of the metal strip but rather the softness of the moulding and fastener that is the weak point. Most sawtooth hardware comes with short ⅜" to ½" tacks that attach it to a painted panel or frame. If the wood is soft—such as pine—nails can fail by pulling out of the frame due to weight and gravity. Frameware, Inc. does carry sawtooth hangers supplied with #6 screws for larger frames, but those might be better with rings and wire.
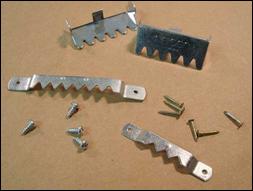 Photo 4
Snap-in for metal frames (top); long and short for wood frames.
Then there is the all-in-one "nailess" sawtooth hanger that should be avoided for all professional level framing. When wood is soft enough for a hanger to be pressed into, it also allows for it to pull out just as easily. The same is true for the ⅜" and ½" tacks that are usually supplied with sawtooth hangers, if they may be pressed into wood they can pull back out. A simple solution to prevent failure is to replace the tack with a small #3x¼"" or #2x⅜" metal screw to insure they will not pull out (photo 5). Use an awl to start the hole and get the threads started then using a PH1 tip on a 4.8V rechargeable battery screwdriver set it snug. It is difficult to locate tiny #2 or #3 screws for use with screweyes, but Bear Woods Supply out of Canada is a great resource. And using screws with sawtooth is the only way to depend on the strength of the hardware.
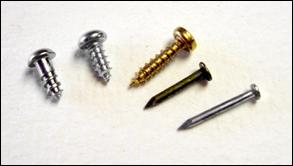 Photo 5
(L to R) Small #3x¼" wood screw; #3x¼" metal screw; #2x⅜" brass metal screw; ⅜" tack and ½" tack
There are also sawtooth hangers developed for specific uses including Canvas Hangers (photo 6) and Flush Mount Sawtooth for stretched canvases, but both of these target art studios rather than galleries and custom framers. The attachment to the canvas is secure enough by screwing to the bars, but once again it's a matter of display security. There are also snap-in sawtooth designed for use with metal frames that are very strong and once properly inserted cannot fall out, so they are quite dependable. That said, galleries generally do not accept framed art using sawtooth hangers of any kind because of hanging system restrictions and the potential of being knocked from the wall.
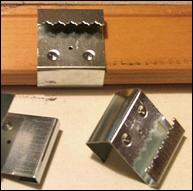 Photo 6
Canvas Sawtooth from Artright.com
Screweyes
A screw with a looped head is called an eye screw, eye hook, screw eye or screweye, with larger ones sometimes called lag eye screws. They are designed to be used as an attachment point, particularly for something that is hung from it, and are an all-in-one piece of hardware which screws into the back of a frame for attaching wire. Screweyes have been replaced by most custom framers though they are still favored by hobbyists and artists.
There are many reasons for reconsidering use of eyes. When an eye screw is twisted into it is generally held by the loop or a tool is inserted to spin the loop. When installing into hardwoods such as maple, oak or walnut, stresses occur at the transition point where the screw meets the eye weakening it. If too small an eye has been selected for too hard a wood the eye has been known to twist off from the inserted screw. In soft woods such as pine or reconstituted wood such as MDF—medium density fiberboard—the threading can create sawdust rather than grabbing the wood grain as it is inserted which allows for the screw to pull out. Remember hanging hardware is only as strong as its weakest link (photo 7).
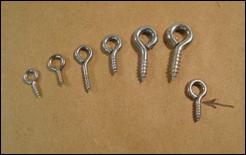 Photo 7
The eye is only as strong as the neck between the threads and the loop.
Also insertion of a strong enough eye to hold most standard frames forces the frame away from the wall while the eye rubs the wall leaving a mark, and if the eye is close to the exterior edge of the frame may by visually unpleasing. Screw eyes greatly stress the sides of the frame where they are inserted, weakening the wood on thin or narrow frames and can easily split dry wood if not predrilled. The logical replacement is an appropriate D-ring.
Spring Clips
A spring clip in framing is a flat U-shaped metal band made of spring steel used to retain artwork in sectional metal frames. Though commonly used by artists and economy framers, there is a problem that occurs from their use and should not be used when framing any original art (photo 8). The very pressure that holds the backing boards and glass or wood panels against the front lip of the frame is same thing that create unfavorable pressure points along the perimeters of the art (photo 9). The strength of the clip can indent board at those pressure points as seen in photo. Foam center board absorbs the compression damage, but mat boards do not and in humid environments the areas that have no pressure can absorb moisture and warp between the spring clips as the paper products expand. This is damage that cannot be reversed as once paper fibers have swollen by moisture they never retract to their original size even once again dry. A warped mat will need to be full replaced.
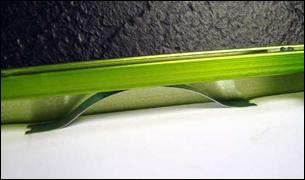 Photo 8
Pressure used to hold package solid.
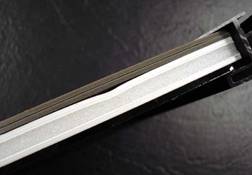 Photo 9
Indention created by spring clip could be avoided with filler boards.
The best way to avoid pressure point damage is to eliminate the pressure points by cutting same size filler boards from scuffed or surface damaged, unusable mat blanks or foam center board. The fit space in the photo 9 allows for two faded 4-ply mat blanks to be cut to size and slipped into the metal frame channel. This supplies adequate filler support and eliminates the pressure points. The only time spring clips may be used is when placing a wood stretcher frame or solid wood panel into a metal frame (photo 10). Though the pressure points are there the wood is rigid enough to resist damage.
 Photo 10
Spring clip hold stretched canvas, is OK.
END
Copyright © 2012 Chris A Paschke
Resources—Items
http://www.bearwood.com/hardware.html—Small screws #2x⅜", #3x¼"";½" D-rings
http://www.artright.com/hardware.htm—Canvas Sawtooth Hangers
http://www.canvasartzone.com—Flush Mount Canvas Sawtooth
http://framewareinc.com—Large sawtooth w/#6 screws; Mega Sawtooth for 250#
For more articles on mounting basics look under the mounting section in Articles by Subject.
Additional information on all types of mounting is found in:
The Mounting and Laminating Handbook, Second Edition, 2002,
The Mounting And Laminating Handbook, Third Edition, 2008 and
Creative Mounting, Wrapping, And Laminating, 2000 will teach you everything you need to know about getting the most from your dry mount equipment and materials as an innovative frame designer.
All books are available from Designs Ink Publishing through this website.
Chris A Paschke, CPF GCF
Designs Ink
Designs Ink Publishing
840 Tucker Road, Suite H-190
Tehachapi, CA 93561
P 661-821-2188
chris@designsinkart.com