Paschke Online
Designs Ink Publishing Article Archive and Reference Library
Articles by Chris A. Paschke, CPF GCF
FATG: Art Business Today
"Framing Pastels"
August 2011
The art of pastel is as popular as ever, with many artists selecting soft pastels as their medium of choice. Spacers, reverse bevels and sink mounts are all elements that may be used or adapted to framing an original pastel, as they have delicate surfaces which can smudge or dust-off (photo 1). Pastels must never be sprayed with fixative by any framer. There is much a willing framer may learn from their pastel artist clients and about the handling and framing of this delicate medium. In turn framers may need to help educate pastel artists about basic framing techniques for this medium.
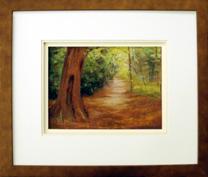 Photo 1: Original Pastel
The selected frame moulding should be deep enough to handle all layers including spacers. A Larson-Juhl Ferrosa Bronze #335556 with its mottled copper finish emulates the rich colors of the path and the tree. "A Path In France" is shown courtesy of pastel artist Gwen Walker-Strahan, Redding, CA, USA.
Plan Ahead
Though a custom framer shall never dry, wet, or pressure-sensitive mount an original pastel to a backing board, dry mounting raw sheets of sanded paper—such as Wallis—to a larger backing board prior to the application of any pastel pigment is allowed (photo 2). Advertising to your local artist community the service of premounting watercolor or pastel paper to a rigid substrate prior to the application of pigment is one way to avoid the later complications of how to mount a completed original.
 Photo 2: Pre-Mounted
Wallis sanded paper has been dry mounted with film adhesive to rag mount board for easier use during painting and later framing. The paper should be mounted to the center of the backing to allow for 3-4" mats to be applied when framing.
For the most part, dry mount adhesives are stable and inert which prevents them from chemically reacting with any other element to create a new chemical reaction. Most special sanded pastel paper is neutral and archival, though it is often packaged with an acid chipboard support backing, allowing acids from the backing to be absorbed by the pastel sheets, so mounting of these papers to a high quality cotton rag board may actually help.
Mounting Sanded Papers
Sanded paper should be dry mounted using a pure film adhesive to at least a 4-ply rag, though 8-ply is more rigid and therefore a better choice. Foam center board is not a good choice because it can easily dent or bend during pigment application. Sanded paper may either be premounted with film adhesive and flat mounted to the center of the substrate, or by centering the layers and mounting in one step (photo 2).
Measure and mark the substrate for ease of alignment. A 9x12" sheet sanded paper would be mounted to the center of a 16x20" backing to accommodate 3"-4" mats when in a frame. A 12x18" sanded paper fits an 18x24" substrate while a 32x40" requires at least 40x48".
Sink Mounting a Pastel
An alternative method to mount a pastel too narrow for the desired mat width is by creating a sink mount (photo 3). Cut a new 4-ply or foam backing the outside dimensions of the desired top mats, then use strips the same thickness of the original substrate build as a simple pinwheel to fill the void between the edge of the mounted pastel backing and the outer edge dimension of the window mat (photo 4). In this sample an additional ½" of 4 ply mat board was needed to expand the substrate to support the mats. Linen tape will be used later to create a book hinge connecting the window mat unit to the sink mount backing board with its fitted pastel (photo 5).
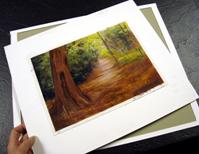 Photo 3: Sink Mount
A sink mount was created to fill out the additional ½" required to expand the backing board for framing. Note the white 4ply strips around the edge of the backing board.
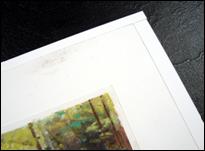 Photo 4: Pinwheel Detail
A simple pinwheel was built using the same 4-ply thickness as the original mount board making the sink mount level across the top.
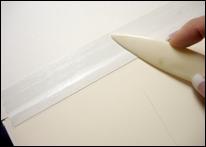 Photo 5: Linen Tape
Linen tape should only be used for book hinging the mat unit to the backing board with mounted pastel, never for hinging art.
If the pastel has not be premounted to a backing it will require an alternative method of mounting. There may be only ¼"-½" of unpainted edging where the paper had been taped down leaving an exterior trim of unused paper as a buffer surrounding the image for a spacer to press against while still never coming on contact with the pastel. If the pastel must remain unmounted and there is a clean border with no pigment then corner pockets might be an alternative mounting method. Just make certain they remain hidden behind the spacers. Edge strips or side mounts are another alternative mounting method. Just make certain they do not touch the pigment and are hidden beyond the spacer.
Spacers and Color Selection
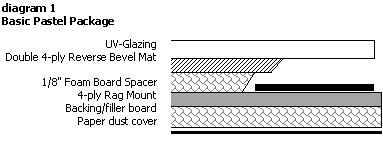
The basic pastel package includes frame, UV-glass, acid neutral or buffered mat(s), spacers to keep the mats from touching the pastel, mount backing, and/or filler boards (diagram 1). Foam center board is an accepted material for use in framing enclosures since the passing of International Standards Organization ISO 18902:2007 Albums, Framing and Storage Materials. If foam is unavailable then 4ply boards, 8ply boards, or acid free corrugate may be used, but MDF should be avoided.
Window mats should never be allowed to touch the surface of pastel pigment and the window should be cut using a reverse bevel. This prevents any pigment dust from landing on the edge of the window. Use of a 4-ply or ⅛" foam board reverse bevel spacer attached to the back of the bottom mat lifts it away from the pastel, also allowing for dry pigment to more easily land out of sight behind the bottom mat (photo 6).
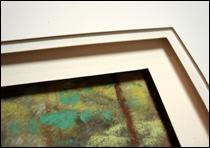 Photo 6: Spacers
A 3/16" reverse bevel foam board spacer has been applied to the back of the hinged mat. It sit atop the sink mount lifting the mat away from the pastel. Another spacer is between middle and bottom mat for visual impact and depth.
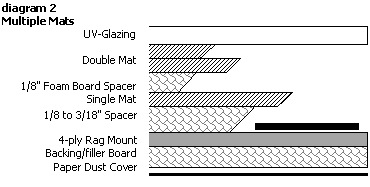
Mat colors for pastels should remain understated and neutral, never visually distracting the viewer. White is a popular neutral for pastels and there dozens of tints of white and créme to choose from. The innermost bottom mat should be lifted off the pastel by use of an 8-ply spacer mat, ⅛" foam center board, or commercial spacers, while it is optional to add spacers between the middle or top mats as desired. Use of spacers in a frame package adds depth and intensity to the design as well as drawing the viewer into the art.
There is a ½" reveal for the bottom Bainbridge Antique White #8640 mat which has been lifted away from the pastel with ⅛" AF (acid free) foam board. The middle Natural White #8656 has a 3/16" reveal and has been topped with Pearl White #8647. The top two mat unit has been lifted away from the bottom with another ⅛" AF foam spacer. Though never touching the art, the bottom mat visually overlaps the pastel about ¼" for sight lines to cover the art edges (diagram 2).
Larson-Juhl Ferrosa Bronze #335556 has a mottled copper finish which emulates the rich colors of the path and the tree (photo 7). The triple mat places the darkest neutral as the inner mat helping draw the eye into the art, while the middle and top mats match worn path and highlights in the pastel.
 Photo 7
Glazing
Acrylic sheets are not recommended for pastel because of static electricity. Anti-static cleaners and rags are designed to reduce static charges during cleaning and assembly, but not on a day-to-day basis. Because of this static, use of acrylic—even UV and abrasion resistant—should be avoided unless the pastel is unusually large and weight is an issue. In that case the glazing must be placed farther away from the pastel in a much deeper frame to protect pastel dust from transferring to the inside of the glazing.
Fixatives
There are basically two types of fixatives, both used only by the artist: workable fixative designed to help set layers to prevent smudging, which allows for additional pigment layering during application; and final fixative which may be applied by the artist at the completion of the work as protection. Though protective spray coatings are being promoted in conjunction with assorted commercial panels in lieu of traditional glazed framing practices, fixatives appear to be only short term effective and conservators have unanimously cautioned that such coatings cannot take the place of proper mounting, glazing, and handling of the art. Fixatives may only be applied by the artist and any reputable framer should never agree to apply any fixative to any art.
One final note, Ampersand Pastelbord is becoming very popular in USA with artists because of its working surface, and is slated as a substrate that does not require glazing. Regardless of this marketing always encourage your artist to glaze their pastel masterpiece. If the original pastel is on a 1-2" cradled Pastelbord the sink mount will just become deeper, but float frames sans glazing are not suitable for pastels.
The 9"x 12" original pastel "A Path In France" used in this article is shown courtesy of artist Gwen Walker-Strahan, Redding CA, USA.
END
Copyright © 2011 Chris A Paschke
For more articles on mounting basics look under the mounting section in Articles by Subject.
Additional information on all types of mounting is found in:
The Mounting and Laminating Handbook, Second Edition, 2002,
The Mounting And Laminating Handbook, Third Edition, 2008 and
Creative Mounting, Wrapping, And Laminating, 2000 will teach you everything you need to know about getting the most from your dry mount equipment and materials as an innovative frame designer.
All books are available from Designs Ink Publishing through this website.
Chris A Paschke, CPF GCF
Designs Ink
Designs Ink Publishing
840 Tucker Road, Suite H-190
Tehachapi, CA 93561
P 661-821-2188
chris@designsinkart.com