Now and then, it pays to take a look at how the world of mounting has changed, especially in an age of digitals, roller laminators, and mounting temperatures that run 130ºF to 215°F. This is important because you need to make sure you know what a project really involves before you decide what techniques to use.
Oversized Mounting
When a 40"x60" wide-format image is to be mounted in a 40"x60" press on the same sized board, there's no room for trimming after mounting. There will be some degree of board compression at the edges after mounting. An image that large is best applied to at least a ½" foamboard or to a thinner, high-density board. But even with a thicker foam substrate, there will still be edge compression, possibly even more than with a thinner board as the rubber diaphragm contracts during vacuum suction.
By inserting ½" to 1" wide strips around the full perimeter of the mount board—the same thickness of the substrate—the diaphragm compression will be absorbed by the disposable pieces and the edges of the actual mount should remain crisp and blunt without trimming. When 3/16" foamboard is the only option because of rabbet depth limitations or budget restrictions, a compressed edge will most likely be hidden by a frame. Permanent film laminates can be mounted to the surface of display images that readily serve as a washable, scratch resistant, non-breakable glass substitute. If a mount will be displayed with vinyl lamination and no frame, a thicker, ½" foamboard or more rigid substrate, such as a honeycomb panel or aluminum composite material (ACM), would make a better choice.
Mount Then Laminate
Common practice is to mount a print or photo then laminate. All adhesives—including HA boards—and laminates have windows of activation temperature with about a 25° activation span. Lower or higher temperatures than manufacturer recommendations can result in inadequate activation or bond failure and excessive heat or pressure can diminish the textured finish of an overlaminate.
Vinyl laminates come in smooth finishes (matte, luster, satin, semi-gloss—) and textures (linen, canvas, emery). The finishes may be available perforated prior to bonding. They are permanently mounted directly to the image surface as a glass substitute. All non-pierced films must be perforated prior to placement over a non-porous image. It is then covered with a ¼" sponge overlay and proper release materials to protect the platen and bonded.
The sponge is required when laminating for three reasons:
Material Selection
Laminates bond between 185ºF and 215°F depending on the manufacturer. The vinyl gets soft when heated, so the surface picks up the texture of what it's in contact with while bonding, either sponge or release paper. If the sponge is forgotten or eliminated, the film may not bond properly and the surface may appear mottled or scuffed. A smooth-finish laminate bonded to manufacturer specifications will reflect the texture of the sponge as its finish.
Since laminates bond at higher temperatures and 130ºF to 150ºF HA bonding temperatures are becoming common, there are occasions when mounting first and then laminating may not be an option. Say a poster is mounted at 130ºF to 160ºF then laminated at 215°F. In that case, the increased press temperature could impact the initial low-temperature mount. Or the entire board could be compressed, reducing a 3/16" foamboard sheet to a ⅛" throughout. A removable adhesive could also be weakened since the bond temperature would be outside the recommended range.
Remember that when an image is mounted to a removable board, it always reactivates when placed back under heat in a press, bonding only as it cools. So a removable 160"F HA board will soften and could potentially release from the bond when subjected to higher laminate temperatures.
Laminate Then Mount
Sometimes mounting first may not be an option, and if at all possible testing of any unfamiliar technique prior to execution on the final project is advised. A recent project called for mounting and laminating a 1970's open edition lithograph which had surface abrasions, moisture damage and ripples. A canvas texture laminate was selected to best camouflage the damage and protect the image. D&K Expression Canvas Finish Guard is a 5 mil textured vinyl film which bonds at 200ºF—225ºF, best at 215ºF designed to protect an image without glazing. Drytac (PVC) films bond at 185ºF—210ºF and are also backed with a low tack adhesive for alignment and release liner with their Artshield Canvastex UV is 10 mils thick embossed canvas finish.
The project needed to be mounted in two bites using a 210M-X mechanical press so a permanent adhesive was required as well as use of a release board. MountCor is the only HA product with a permanent adhesive available for bites and has a mount temperature of 130ºF, far less than the laminate temperature. The solution was actually simple, laminate then mount.
The Process
The 22x28" image had moisture ripples and surface damage and needed to be mounted in a mechanical press in two bites, so MountCor was my only permanent HA choice. Vinyl lamination would help reduce—not remove or repair—some of the visible damage. MountCor mounts at 130°F and the canvas texture vinyl laminate mounts at 21°F (D&K), or as low as 185ºF (Drytac).
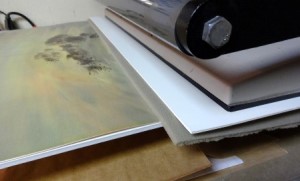
Foam tolerates heat up to 220ºF so it would be fine at the higher temp, but I didn't want to use higher temperatures on MountCor. Perforate the film from the top into the liner using the weight of the tool and cover so the holes are about ½" apart. Cut the laminate larger than the poster, peel back the film, align the poster between laminate and liner, and close film over print. Laminate the unmounted print at 215°F with sponge overlay and release board first. Trim the laminated print to exact size to match the 22x28" MountCor board and mount at the cooled press temp of 130ºF in two bites.
The film, print, and liner package is finally trimmed to the exact poster edges allowing the liner and excess film to fall away. The completed laminated then mounted lithograph was placed back into the original gold metal frame as requested. It's a bad idea to try to mount a laminated print to a cooler temperature HA board at the same laminate temperature by using simply shortening dwell time. That lacks the proper mounting control over the end product. With the addition of the required release board when multiple biting, all layers must reach bonding temperature; it's very difficult to determine the dwell time. Mounting at manufacturer-suggested temperatures is best.
 Perforate the film from the top down through the liner.
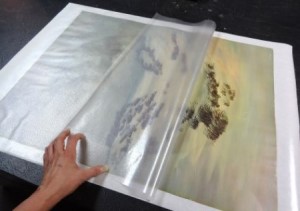 Cut the laminate larger than the poster, peel back the film, align the poster between laminate and liner, then close the vinyl over the print.
 The poster is laminated first in two bites with a sponge overlay and release board at the required higher temperature.
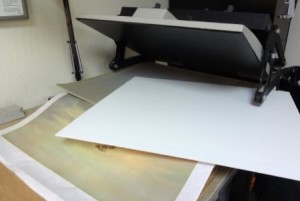
 Line up all layers squarely and clamp the lid into locked position five minutes for each bite. There is no substrate beneath the poster to lift it flat during bonding of the laminate.
 Size the HA MountCor foamboard to the exact desired of the laminated poster, align and tack in place to hold.
 Stack the substrate, tacked poster, sponge overlay, and release board for each bite. In this case the substrate holds the print flat.
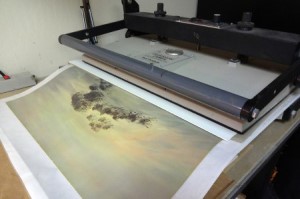
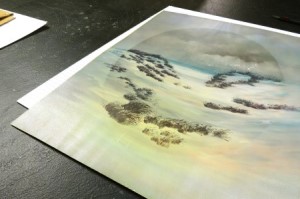
 The light reflection (upper right) shows the canvas texture of the film. Though textures help cover poster damage, visible creases will never be covered.
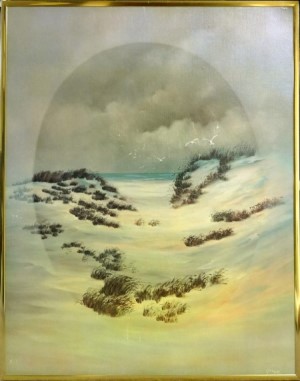 The completed laminated then mounted image went back into the original gold metal frame and lived happily ever after.
Is It Temperature or Something Else?
Framers and photographers often call with problems or questions. My response always goes back to the basics, with the elements of Time, Temperature, Pressure, and Moisture. How long was it in the press? What temperature was used? What type of press was used, and was it adjusted for the proper pressure? Did it need pre-drying prior to mounting? Sometimes it's a matter of really knowing what you have to mount in the first place and then what is actually going on if there is a resulting bond failure.
For example, a photo with a finish coat applied from the printer was mounted to a low temperature HA board, though it was not known if the finish would have a reaction to heat. After asking what seemed to be all of the correct questions, both the customer and the printer gave permission for the framer to proceed with the mounting. The prints mounted fine but there was blotchiness to the coating, and it seemed the coating was separating. Framers most often blame the product rather than think about poor technique or misuse.
To best determine what might really be happening, the question was what products were used. A wide-format) ecosolvent inkjet printer was used to print the photos onto an opaque white-vinyl, matte, digital film medium designed for exterior signage using eco-solvent inks. The selected film had a permanent pressure-sensitive adhesive applied to the back. After printing, it was coated with a 3-mil permanent, clear, pressure-sensitive, vinyl overlaminate film.
Since the media had a P-S on the back and the overlaminate was also applied as a P-S, the project should have been mounted using cold roller laminator to a high density, rigid substrate-not in a heat press to any HA board regardless of mounting temperature. A vinyl laminate in a heat press requires a sponge overlay to prevent the vinyl surface from reacting to the silicone-coated release liners. If there was surface blotching, it was most likely due to the lack of a sponge.
What seems to have happened was that the pressure-sensitive layer and the heat-activated adhesive were not compatible, and the failure resulted when more than one mounting process was being attempted. A successful result would mean beginning anew with another image and use either P-S or HA materials, but not both.
Do Nothing
This is a perfect example of needing to know all the facts prior to deciding how to proceed. All wide-format imagery is digital, but knowing that isn't enough. As a custom picture framer, you also need to know who printed it, how it was printed, on what printer, using what ink, on what media, and what—if anything—was used as a coating, before doing anything else. The framer in this case really didn't do anything wrong. It was more that the printer didn't inform the customer of how the new Photo should be handled-if it was to be displayed as framed art rather than exterior signage. It would be wonderful if printers today sent out info sheets with their printed images with a listing of products used in the creation of the image so issues like this might be prevented.
The point is to ask all the questions needed to help you make the right decisions. You may opt to make the calls and research all the elements, but be sure to add a "digital charge" or at least something to offset the additional research time. It looks as though printers, framers, and consumers must all work together to best determine the correct way to display fine art. If you still cannot fully identify all the elements involved in the production of a digital print, the best solution may be to do nothing.
END
Copyright © 2014 Chris A Paschke
Resources—Items
http://www.dkgroup.com—Finish Guard
http://www.drytac.com—Art Shield
http://www.gilmanbrothers.com—MountCor HA, Ryno, Duraplast, Eaglecell honeycomb
http://www.kooltack.com—Competition Plate (aluminum composite), HA boards
http://graphicdisplayusa.com—Fome-Cor, Gatorfoam, Dibond
For more articles on mounting basics look under the mounting section in Articles by Subject.
Additional information on all types of mounting is found in:
The Mounting and Laminating Handbook, Second Edition, 2002,
The Mounting And Laminating Handbook, Third Edition, 2008 and
Creative Mounting, Wrapping, And Laminating, 2000 will teach you everything you need to know about getting the most from your dry mount equipment and materials as an innovative frame designer.
All books are available from Designs Ink Publishing through this website.
Chris A Paschke, CPF GCF
Designs Ink
Designs Ink Publishing
840 Tucker Road, Suite H-190
Tehachapi, CA 93561
P 661-821-2188
chris@designsinkart.com