Paschke Online
Designs Ink Publishing Article Archive and Reference Library
Articles by Chris A. Paschke, CPF GCF
"Chinese Silk Embroidery"
July 2003
Over the past years here have only been a few articles on mounting silk textiles, and many more questions about the handling of the same on PPFA Hitchhikers and The Grumble, so I decided it was time to address this topic. We have read that silk scarves may be pinned, stitched, and dry mounted, but what is the best way to handle a silk embroidery?
I am approaching the moulding aspect of this issue in the first segment as I discuss embroideries as a Chinese art/craft and my experience with them, their abundance, their marketing, and their framing presentation when visiting mainland China. As most of these items are also imported into the USA, the same is often seen in local Chinatown regions of major cities such as New York and San Francisco. The tour begins...
Authentic Chinese Art
During my first trip to China my roommate purchased a framed silk embroidery as a collectible memento, as many tourists do. Since it was framed with glass and difficult to transport home we elected to dismantle it for reframing once she returned home. I was thrilled at the opportunity to be able to dismantle this piece to better see the actual framing techniques of this fine handcraft.
It must be remembered that Asian cultures highly respect and admire their artists. Their arts are valued treasures, their artists are masters, and there is a large distinction between arts and crafts. Having watched craftspeople at work and observed the ways in which they handled their completed pieces, I can say the difference between Chinese art and their more mass produced crafts is a generally lack of artistic respect. One is a treasure the other a commodity.
Mouldings and Frames
Silk embroidery, though an art, is considered a mass produced craft for the buying tourist (photo 1). There were rotating two sided embroideries, completed on the same piece of silk. They were delicate, gorgeous and framed about 24" tall using free standing sculptural units of black lacquer and a highly polished rich dark rosewood moulding, with intricately hand carved bases.
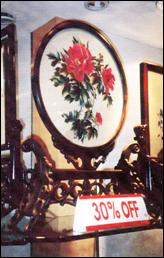 Photo 1: 3-D Silk Embroideries
Though silk embroidery is an art, in Asia it is considered a mass produced craft produced for the buying tourist. These pieces were about 24" tall and were rotating two sided embroideries, completed on the same piece of silk. Delicate, gorgeous and framed using free standing sculptural units of black lacquer and a highly polished rich dark rosewood type of moulding, with hand carved base.
During the two year break between my trips the tourist embroidery went from being a majority of framed wall pieces, table linens and clothing to numerous free standing three dimensional two sided embroideries as seen in photo 1. The Chinese too are evolving with the times I suppose. They are so geared to tourism they even price up to offered at discounts to encourage purchasing (photo 2), not unlike marketing techniques we often see in the west.
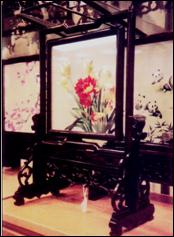 Photo 2: Marketing
They are so geared to tourism they are even priced up to then be offered at discounts to encourage purchasing, not unlike marketing techniques we often see in the west. This is just one small close up of the numerous store displays found in each market shop, of which there were many.
There were still framed wall pieces, mostly on the larger scale and often with gold metal mouldings, or very simple narrow dark woods. An interesting contrast to the 3-D carved rotating pieces of art. The rotating frames appeared to be marketed as Chinese crafts rather than framed fine art. Almost felt like a value added approach to the embroidery.
Dismantled and Examined
There are treasured fine art silk antiquities in museums and high end galleries, but the vast majority seen are contemporary pieces produced for mass consumption, as was this featured Bunny embroidery (photo 3). The embroidery appeared to have been mounted to a piece of wood as the grain was slightly visible through the thin silk and it was smooth very with no rippling.
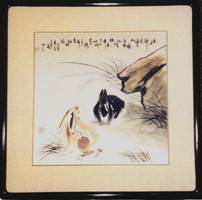 Photo 3: Framed Bunnies
It had been matted with a single crème colored black core mat board about 3" wide around, glazed using regular clear glass, and placed into a 24"x24" modified Kobe corner 1" black lacquer frame.
It had been matted with a single crème colored black core mat board about 3" wide around (complete with corner overcuts), glazed using regular clear glass, and placed into a 24"x24" modified Kobe corner 1" black lacquer frame. The backing appeared to be a piece of layered wood veneer which had been reinforced with ½" wide thin wood strips of the same around the outer edges (photo 4).
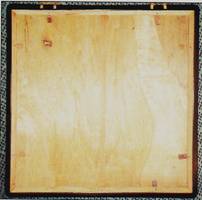 Photo 4: Wood Backing
The backing appeared to be a piece of wood veneer layered wood which had been reinforced with ½" wide thin wood strips of the same around the outer edges.
It was supported in the frame by two small wood wedges on each side that fitted between the perimeter wood strips and extended into the frame rabbet (photo 5). The piece was hung on the wall by two decorative metal 2" long hinges across the top of the frame. Tasteful and in keeping with Asian simplicity, but didn't look very preservation at initial unopened inspection.
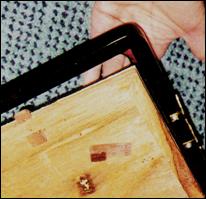 Photo 5: Wedged Into Frame
It was supported in the frame by two small wood wedges on each side that fitted between the perimeter wood strips and extended into the frame rabbet.
Mounted Bunnies
Once removed from the frame it was clear the embroidery had been edge mounted on all four sides with a wet glue or paste directly to the ¼" thin wood which was also used as its backing board (photo 6). The tacks at 4" intervals along the outer perimeter of the board that held the added wood strips to the back for the support wedges were now also visible.
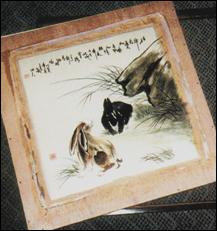 Photo 6: Edge Mounted
The embroidery had been edge mounted using some type of wet glue or paste on all four sides to the thin wood backing board.
An additional layer of either silk fabric or rice paper had been placed beneath and between the embroidery and the wood backing. Was the embroidery mounted to the inner liner? Couldn't tell. Perhaps this was meant as a barrier, perhaps as a layer to color tint the silk and help prevent the wood grain and color from ghosting through...most likely the latter (photo 7). Nonetheless the embroidery itself did not appear to be mounted, just cleanly stretched and held at the edges.
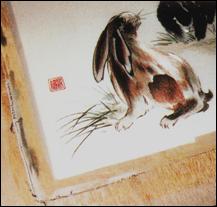 Photo 7: Barrier Layer (detail)
An additional layer of either silk fabric or rice paper had been placed beneath and between the embroidery and the wood backing, most likely to prevent color ghosting of the wood grain and from discoloring the silk art.
Having observed traditional scroll mounting ("Chinese Scroll Mounting", PFM April and May 2001) I am not in the position to second guess any of the techniques of formal mounting. It is possible this was a cooked starch paste that had been painted in a 2" strip on the wood along the edges and then as the paste dried the silk was gently manipulated into the adhesive, stretched, and squared as it set up for drying.
But this is only a guess. My question, however, is whether or not this is traditional starch application or simply mass production mounting out of a jar. Considering the store of purchase and the other items marketed there I would think it safe to guess this is the mass mounted (also marketed in airports) version and not the Shanghai Museum version of preservation mounting. I think the mounting to the wood itself negates the truly preservation aspect of this piece, and that is the very reason I was advising we remove it from the wood in the first place.
Once I encountered the mounted embroidery I made a field judgment not to proceed with additional removal at that time. It's better to be safe, even with your trusting client standing at your side as you dismantle her image. Considering we were doing all of this in a hotel room and there were possibilities of needing the advise of a conservator or at the very least a large flat table and clean pure water to test release of the adhesive, we opted to wrap the piece at this point and pack it for shipping to the USA with her other treasures.
Other Mounted Embroideries
Though many types of embroidery were matted and not pressed directly against the glazing, there were an equal number of pieces that remained unmounted, laid against a solid wood backing, then pressed to glass to prevent sagging. As framers we all know how well that technique works.
Sorry the detail photo is out of focus, my camera does not shoot close ups under 4' away, but you can still see the rippled silk along the lower right edge and bottom of this embroidery as it sits pressed between the glazing and the backing wood, hung for view. This was a large 30"x50" piece on display for sale at the same shop I photographed the beautiful 3-D free standing pieces.
1993 Revisited
In February 1993 I wrote and article for PFM about mounting silks and Chinese paintings. As we know, times and concepts have improved since then with a great deal of attention now being paid to longevity and noninvasive mounting. In my earlier article I taught the method of sewing the silk to a piece of cotton fabric then stretching it to sealed wooden bars. Correct for the times, but antiquated today.
Times have changed as have the suggestions for mounting these pieces. In 2003, a mere ten years later, a healthy respect for decorated silk art is a must, regardless of expensive collectable or inexpensive Chinatown goodie. We still frequently treat them as a valued needleart by selecting nonadhesive mounting methods.
Mounting Silks 2003
Stretching over a flannel covered padded foam board and pinning with ballpoint stainless steel pins between the fibers is one popular method of mounting large silk scarves. Another option for mounting is tension wrapping over padded cotton fabric covered foam board that is then pushed into a frame where the silk is held between the fabric wrapped foam and the moulding by tension only.
Creating a sink mat is yet another idea. Wrap a piece of matching color Crepeline (silk) or Stabiltex (polyester) over an AF foam board the same size as the silk art, which will later hold the silk in place. Allow a ¼" to ½" overlap of the window mat and back it with foam to complete the sink mat. The large mat window overlap and Crepeline will support and prevent the silk from shifting. This is the technique currently favored by textile conservators for preventing silk shifting within a frame.
Pressure mounting by placing the silk behind or encapsulating between sheets of Mylar-D (Melinex) attached to the back of a window mat is another frequently suggested idea, but not my favorite. Though pressure mounting in this manner may work, check out photo 8 again as this is the basic method used there, a bit too much like mounting between glass and backing perhaps.
Free hanging a silk embroidery or painting is also possible as long as the art is strong enough to support itself and not stretch, though generally used for heavier textiles ("Textile Mounting Techniques", PFM, May 2003). Some of the more inexpensive silk paintings purchased domestically are often backed with a rice paper and adapt well to more traditional hinge mounting and matting. They are generally stiff enough to support hinging and there are no risks of adhesive reaction or long term damage.
How about the magic of static mounting? Though touted for use with 100% polyester photographic film called an Ilfochrome Classic (aka Cibachrome), this technique also works with silk scarves because the same static principles apply ("Static Mounting Ilfochrome Classics", PFM February 1997).
Oh yes, and then there is dry mounting, and yes, I have dry mounted a ragtag silk painting, stained and ugly, from Vietnam 40 years ago that had been folded up and stored since then. Use only pure film adhesive as tissue will ghost through and discolor the silk. Though I have just stated that even the sheerest silk or chiffon may be dry mounted using a pure film adhesive and a brief visit into the press, it is not a preservation method. Also the adhesive will almost always show between an open weave and appear to have saturated through even when it has not.
Wrap Up
Silk scarves, paintings, tapestries and needlework brought back from travels to Asia, can be beautifully preservation framed, and depending on the selected materials can easily run into hundreds of dollars. But what about those small inexpensive domestic pieces picked up in Chinatown, or the 40 year old worn torn painting from Vietnam? As with many framing jobs there's a right way and a cheap way to do things.
If preservation is mandatory, nonreversible adhesives must never be used. If an inexpensive short term nonarchival presentation is elected there are ways to mount with adhesives, pressure and/or pinning. Fear not the silk embroidery...it is merely an ancient Chinese art making its way into contemporary American homes. From silk scarves to silk paintings to silk embroideries, mounting solutions in the United States vary greatly for silk. Since the issues include their soft wavy nature, sheerness, and delicacy, the selected mounting technique will definitely impact the end product.
END
Copyright © 2013 Chris A Paschke
For more articles on mounting basics look under the mounting section in Articles by Subject.
Additional information on all types of mounting is found in:
The Mounting and Laminating Handbook, Second Edition, 2002,
The Mounting And Laminating Handbook, Third Edition, 2008 and
Creative Mounting, Wrapping, And Laminating, 2000 will teach you everything you need to know about getting the most from your dry mount equipment and materials as an innovative frame designer.
All books are available from Designs Ink Publishing through this website.
Chris A Paschke, CPF GCF
Designs Ink
Designs Ink Publishing
840 Tucker Road, Suite H-190
Tehachapi, CA 93561
P 661-821-2188
chris@designsinkart.com