Paschke Online
Designs Ink Publishing Article Archive and Reference Library
Articles by Chris A. Paschke, CPF GCF
"Cockled Handprints"
March 2007
An adult handprint may not be a common nor exciting framing project, but makes for a perfect article on flattening and mounting cockled art. The handprints of a child, unstretched watercolors, or water soaked papers may all be much more common items for framing. The problem with the afore mentioned items is that when a thin paper is highly saturated with moisture the paper fibers absorb that moisture and expand. Though the paper will eventually dry, those expanded fibers will never again reduce down to their true original size, which results in paper warping known as cockling.
Poor Storage Practice
Depending on the child's art in question, paper warpage problems could be the result of heavy poster paint on lightweight paper, excessive water in the paint, or just poor storage over the years. This child's set of handprints is a thinned poster paint on heavy construction paper (photo 1). The problem is not the cockled paper, but having poorly stored it in a box with a lot of other loose stuff. The construction paper could be flattened in a press, if it were not for the gold braid. If the braid could be temporarily removed, the art could then be heat flattened without damage. If not, possible spot ironing, weighting and hinging would be in order.
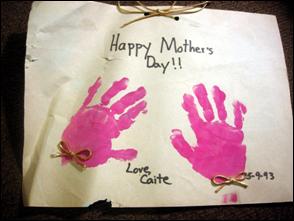 Photo 1: Mother's Day
This set of handprints is a fairly thin poster paint on heavy construction paper. The problem is not cockled paper here, but rather the gold braid. The paper itself could be flattened in a press, if it were not for the braid. Hinging may be in order.
Warping vs. Cockling
A series of test handprints were produced with commercially purchased liquid poster paint onto Arches 90# cold press watercolor paper, 90# hot press watercolor paper, and heavy construction paper producing results that were wavy and warped but not too bad (photo 2). Watercolor paper is porous enough to absorb the extra water moisture in the paint. The thinner, hard surface, nonabsorbent 22# copy paper, thin newsprint, and heavy newsprint easily illustrate when a paper is incapable of absorbing excess moisture. The handprint center bottom is a typical poster paint handprint on thin, lightweight newsprint paper.
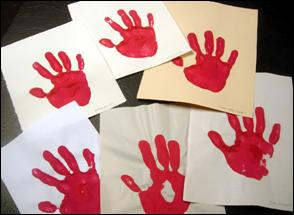 Photo 2: Warping vs. Cockling
The paper makes the difference. The top row of watercolor papers: (L to R) Arches 90# cold press, 90# hot press and heavy construction paper are wavy and warped but the bottom row (L to R) 22# copy paper, thin newsprint and heavy newsprint easily show the more absorbent a paper fiber the flatter the art. Center bottom is badly cockled.
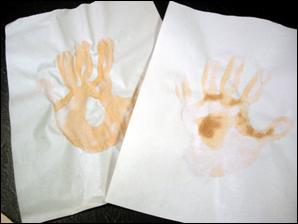 Photo 3: Water Saturation
When the two bottom newsprint samples are viewed from the back it is easy to see the water saturation through the paper. The lightweight newsprint (L) soaked through even more than the heavyweight (R). The greater the saturation the more the paper will cockle.
When the two bottom newsprint samples are viewed from the back it is easy to see the water saturation through the paper (photo 3). The greater the saturation the more the paper will cockle. The two samples of Arches 90# watercolor paper are shown in this side view, with a typical warpage for an unstretched paper (photo 4). When placed into a dry mount mechanical press or vacuum at 200ºF for a few minutes the paper and thick poster handprint are nicely flattened and ready to mount, hinge or place in archival corners (photo 5).
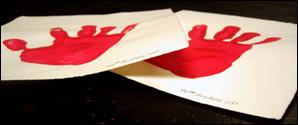 Photo 4: Only Lightly Warped
The two samples of Arches 90# watercolor paper are shown in this side view, with a typical warpage for an unstretched paper.
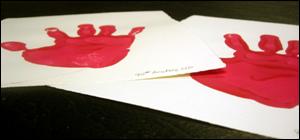 Photo 5: Heat Flattened
When placed into a dry mount mechanical press or vacuum at 200ºF for a few minutes the paper and thick poster paint handprint are nicely flattened and ready to mount, hinge or place in archival corners.
To Mount Or Not To Mount
We have debated the value of children's art for decades now and the issues over extending the life of these precious images by using proper preservation techniques. I am not arguing that point and am not writing this article to take any stand on whether or not to permanently mount a child's set of handprints. This discussion is only to better enlighten and educate the framer to the possibilities and outcome of attempting to mount anything that has been heavily warped or cockled through moisture.
This cockled paper scenario could very well have been a road map from a cross country trip that had been soaked with coffee rather than a set of handprints. The idea is to explore the results when a heavily cockled paper is flattened, dry mounted, manually pressure-sensitive mounted, or run through a roller laminator with a high tack pressure-sensitive board in an attempt to make it flat for framing. Our customers rarely ask if we should be gluing things down, but generally state, "...it just needs to be flat."
Flattening Under Heat
Examine the close up of the handprint, made with unthinned poster paint straight out of the bottle, to observe the resulting rippled, wavy paper (photo 6). When initially applied to the paper the handprint print was smooth. Then as the print dried, the paper surrounding the fingers remained smooth until the saturated fibers under the paint fully dried. The handprint itself appears relatively flat, yet it is the paint that has altered the original structure of the base paper, cockling it.
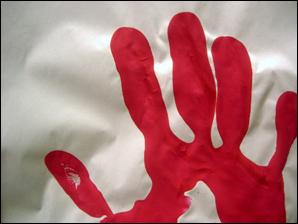 Photo 6: Unmounted and Unflattened Newsprint
This close up of the unmounted handprint on thin newsprint shows the shadows of the rippled paper.
When a lightly warped piece on porous paper is placed under heated pressure it may very well flatten out as did the watercolor images in photo 5, but when this highly cockled handprint is placed in a 190ºF-200ºF mechanical press the result is much like an eroded riverbed (photo 7). Flattening is just not that simple.
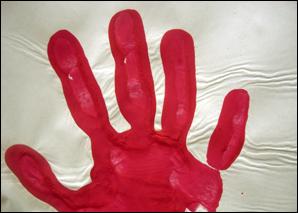 Photo 7: Heat Flattened
When pressed in a 190ºF mechanical press using no substrate or adhesive, the cockled sample created a series of very bad ripples across the hand.
This is yet a perfect example of how we may need to help educate the consumer over our ability to flatten items that may never be flattened again. The best sample you could have would be a set of mounted handprints that would show actual results (photo 8). Not only will this help teach them about cockled paper and mounting, but will be a great sales aid in selling the positive aspects of preservation hinging.
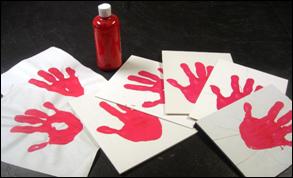 Photo 8: Mounted Samplers
The best samples you could have would be a set of mounted handprints that show actual creased results.
Heat Tested Mounted Samplers
There are four samples that were mounted on assorted boards in a small Bienfang 210M-X mechanical press. Temperature and pressure were adjusted for each sample and correct TTPM (time, temperature, pressure, moisture) rules were followed for each piece. All dry mounted samples were predried between two pieces of brown Kraft paper just prior to mounting.
The two basic heat test adhesives were heat activated foam board and pure film adhesive on 4-ply rag board. Bainbridge HAF (Heat Activated Foam) was mounted at 160ºF for 2 minutes then cooled under a weight. Because of the action of the platen evenly pressing to the entire face of the handprint the mounted wrinkles were fairly evenly placed surrounding all the fingers of the print (photo 9). The resulting wrinkles did not all mount flush to the backing board, and when a fingernail is rubbed across there remain unmounted tunnels of paper between the fingers.
 Photo 9: Heat Activated Foam Board
Since the platen evenly presses to the entire face of the handprint the mounted wrinkles are fairly evenly placed surrounding all the fingers of the hand.
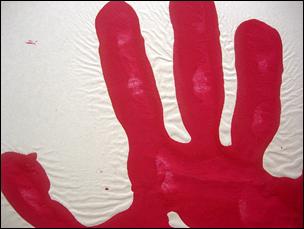 Photo 10: Pure Film on Rag
Film adhesive mounted the newsprint to 4-ply rag board, resulting in a spread of creases surrounding the fingertips, and tunnels of unmounted paper.
Film adhesive was then used to test mount the newsprint to 4-ply rag board. The result again showed a spread of creases surrounding the fingertips, which were also tunnels of unmounted paper (photo 10).
Dry Mount with Sponge
With the above results leaving unmounted tunnels of paper, the next step was to try mounting with a piece of sponge overlay foam. This would equalize the pressure between the platen and the mount board at all levels of the cockled paper while still activating the adhesive beneath it. The same Drytac Pure Film Adhesive was sized for a piece of 4-ply museum rag board and the print was mounted at 200ºF in a mechanical press for 5 minutes. I added time to the mounting because of the placement of the ½" sponge on top of the handprint, which in turn would slow down the heating up of all layers being bonded within the press. A ¼" thick foam could also be used for this.
The results show a bonded sheet with hard creases looking like paper folds against the hard museum board substrate (photo 11). These creases, though well bonded, are still not visually pleasing. The next selected substrate was a piece of Artcare 3/16" foam board. The mounting packed still includes film adhesive and sponge foam overlay for even pressure within the press. This was mounted at 200ºF for 3 minutes because only the top layer of surface paper needs to heat on foam board. The resulting bond creates creases a little flatter than when on rag board because rag creases sit on top of the substrate while the foam creases press down into the substrate (photo 12). End comment...neither is acceptable.
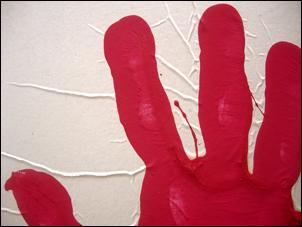 Photo 11: Film on Rag with Sponge
Film adhesive bonded the print to rag board more evenly when sponge was used to equalize the pressure, but hard creases looking like paper folds were still an unfavorable result.
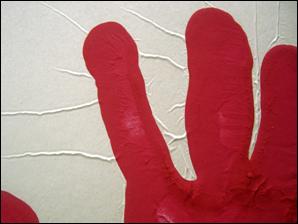 Photo 12: Film on Foam with Sponge
Film adhesive in this case bonds the creases flatter by pressing them into the foam rather than against the hard surface of the above rag board...but still there are creases.
Manually Applied Pressure-Sensitives
The next test mountings tried pressure-sensitive boards with the variable being the application technique.
The first is a manual application of the cockled print to a sized sheet of Drytac HT pressure-sensitive black 3/16" Gatorboard using a release cove sheet and rubber brayer. The release liner was folded back on one end to expose the high tack pressure-sensitive adhesive. The smooth, uncockled end of the newsprint was aligned to the adhesive and pressed to hold. The liner is then pulled from beneath the handprint while it is pressed evenly against the pre-adhesive board.
The resulting mount has an evenly distributed pattern of crinkles surrounding the entire hand, all well mounted but obviously not smooth (photo 13). In this case the fact that the substrate is black rather than white or light colored also darkens and grays the newsprint paper by ghosting the color from beneath it.
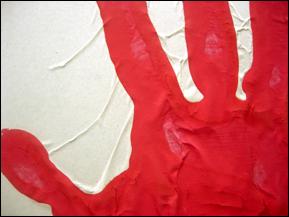 Photo 13: Manual P-S Application
When manually mounting to a high tack P-S board the creases are evenly distributed and well mounted, but still not smooth.
Roller Laminator Application
One final pressure-sensitive mount tested the same black Drytac HT (high tack) P-S (pressure-sensitive)
Gatorboard as above, but this time with the help of a roller laminator. The general assumption is that roller machines can flatten anything. It would be better stated all rollers will evenly bond about anything, but they cannot magically remove nor hide cockled paper creases.
Fold back the release liner to expose the high tack adhesive board, align the print, and nip into the roller machine. Feed through the rollers and check for a fabulous flattened handprint (photo 14). The biggest visual difference between the manual application and roller application is the distribution and direction of the resulting creases. Notice how they are all pushed down from the top of the hand toward the center of the board. The ripples have to go somewhere.
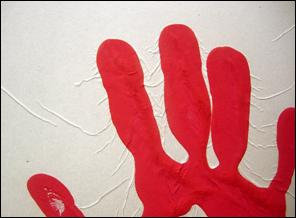 Photo 14: Roller P-S Application
When applied to the same HT P-S Gatorboard the biggest difference between manual application and roller application is the distribution and direction of the resulting creases. Notice they are all pushed down from the top of the hand in the photo.
Cutting Through the Creases
So what's the final decision? Basically we framers will never be able to flatten a cockled image enough to mount aggressively to any backing board. If spray adhesive or wet glue had been tested the results would still show mounted creases. Truth is, once the paper fibers have been changed by heavy poster paint moisture there is no going back to the flat surface the paper had before it was painted.
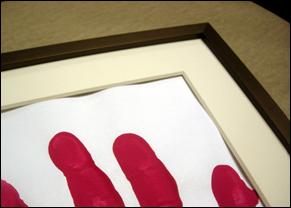 Photo 15: Waves at the Window
Final choice...hard edge creases when mounted or soft waves at the edge of the mat window when hinged.
So mounting choices are to hinge and deal with lightly cockled waves at the edge of the window mat, or mount to a sea of hard edged creases (photo 15). Though a better visual presentation, this too looks as though its time to reeducate the consumer. The only way to sell the end look to this problem may be with a good set of in-store customer samples and ogling over the tiny handprints from their adored five year old granddaughter.
END
Copyright © 2007 Chris A Paschke
For more articles on mounting basics look under the mounting section in Articles by Subject.
Additional information on all types of mounting is found in:
The Mounting and Laminating Handbook, Second Edition, 2002,
The Mounting And Laminating Handbook, Third Edition, 2008 and
Creative Mounting, Wrapping, And Laminating, 2000 will teach you everything you need to know about getting the most from your dry mount equipment and materials as an innovative frame designer.
All books are available from Designs Ink Publishing through this website.
Chris A Paschke, CPF GCF
Designs Ink
Designs Ink Publishing
840 Tucker Road, Suite H-190
Tehachapi, CA 93561
P 661-821-2188
chris@designsinkart.com