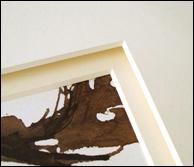
 Photo 1: Mat Spacers
A ³⁄₁₆" foam center board was used to elevate the top mat spacing it away from the bottom mat.
The 21st century world of art has embraced illusion and loves eclectic materials and panels that appear to hover in space. Platforms, lifters and spacers are essentially all names for the same thing: a mechanism for creating a gap, opening or distance between two parts. This mechanism is considered part of a mounting process regardless of whether mounting art in a float frame or installing a wall panel.
Mat and Frame Spacers
In matting, a spacer also creates a gap between two layers (photo 1). To be properly inserted it should be cut and fitted the full length and width of the mat it is under and not merely a small centered scrap. In the sample a ³⁄₁₆" foam center board was used to elevate the top mat spacing it away from the bottom mat, but ⅛" foam, 8-ply or 4-ply board may also be used (diagram 1). The spacer is attached to the back of the mat and need to be set back from the edge of the mat window so they are not visible when viewed from the front. Apply the strips as a pinwheel with a reverse bevel at one end so it may nest snuggly up against the neighboring bevel (diagram 2).
 Photo 1: Mat Spacers
A ³⁄₁₆" foam center board was used to elevate the top mat spacing it away from the bottom mat.

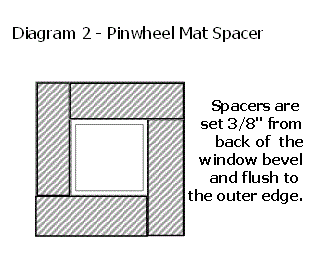
Mat spacers may be glued with a bead of PVA glue but generally ATG tape is fine to adhere spacers to the mat and the pieces all into a unit. Since all layers should remain the same basic perimeter the individual mat pieces and spacers will become a secure mat unit when assembled and taped together. An upcoming article this year will feature a full discussion and step-by-step procedure of wrapped and unwrapped mat spacers.
In float framing, a spacer—or lifter—is a short piece or strip of wood that is screwed to the base of a float frame beneath a painted panel to raise up the art. This both brings it closer to the frame face and helps create the illusion of it floating within the frame (diagram 3). A short block spacer is an inexpensive alternative to the full strip which raises a painted panel, but gives no additional support to the frame (diagram 4).
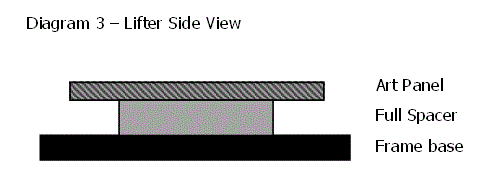
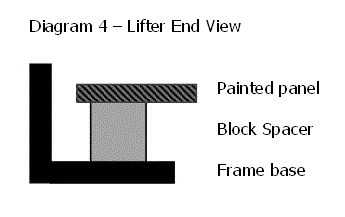
As with the above mat spacers any float frame design is best served when the lifter extends the full length of each frame leg. They are meant to be a full blown support not merely a block that suspends a few inches on each side. Though the idea is to raise the painted panel so it is within a specific distance from the frame face it also evenly supports the art as it suspends, and short blocks just cannot achieve that. In extreme humidity situations the thinner lifted panels can still warp on either side or end of mounted block spacers. So the best support is a constructed inner lifter with mitered corners or a full platform.
Platforms
A solid board that is screwed to the entire inside perimeter of a frame is called a platform (photo 2). It is smaller than the art panel—allowing it to float—yet larger than the opening in the bottom of the frame. Use of a full platform rather than lifter or spacer strips allows thinner ⅛" hardboards, ¼" plywood and 8-ply rag art panels to be glued to it which aids in its support so it won't sag or warp with fluctuations in temperature and humidity. Not only does a platform support the entire painting it also adds rigidity to the frame. The platform is smaller than the unpainted 8-ply rag board so once completed and glued to the base the art will float within the perimeter of the frame (photo 3). Additional information on floater frames and the installation of platforms may be found in "Encaustic in Floater Frames" PFM February 2008.
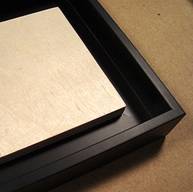 Photo 2: Platform
The platform is a solid Baltic birch plywood board that is screwed to the entire inside perimeter of a frame.
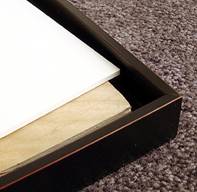 Photo 3: Panel to Platform
The platform is smaller than the unpainted 8-ply rag board so once completed and glued to it the art will float within the perimeter of the frame.
Wall Lifters
Occasionally lifters are required for more than visual aesthetics. Two large wide format digital images—one 37x48" the other 27x40"—were mounted. Prints this size would normally require at least ½" foam center board or Gatorboard, but ³⁄₁₆" foam board was selected because they were to be displayed in glassed showcases firmly and permanently attached to the back wall (photo 4). The thin foam board was selected to keep the prices down and since they were to be permanently fused to the wall any warping would be eliminated. Then the plans changed and both required surface heat lamination because they were redirected to be displayed on public walls outside the showcase. Once laminated the surface stress of the print, adhesive and laminate forced the thin foam board to badly warp.
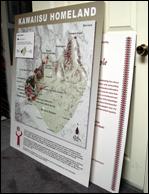 Photo 4: Large Digital Prints
Two large digital prints on standard wide format sign weight stock were mounted to lightweight ³⁄₁₆" foam.
To stabilize the and flatten the warped boards an inner lifter frame of 2"x ½" pine was mitered and built as a support and full lifter. A cross brace was also needed to fully flatten the laminated piece. The lifter was set inside the back 3" on all side, the edges were painted black and it was fully adhered to the back of each print using 3M 3797-TC Jet-Melt hot glue (photo 5). Since there was now a wood lifer frame solidly affixed the back they could be wired with D-rings and hung with using two hooks for horizontal stability. The displayed pieces are lit with spotlights on a highly textured neutral colored wall and the lifters give each a dramatic floating effect (photo 6).
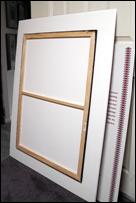 Photo 5: Wood Lifter
A 2"x½" pine frame lifter was built, cross braced, painted and fused to the back of the ³⁄₁₆" foam using 3M 3797-TC Jet-Melt hot glue.
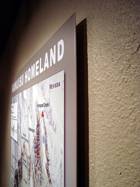 Photo 6: Floated Display
When display with spotlights the lifters give it a dramatic floating effect with lovely shadows creating additional depth.
Since the above images could not be permanently mounted to the museum walls they were able to be hung from a wire screwed to the lifters attached to the back. A practical and designer use of lifters was illustrated in "Peel Proof Photos" PFM October 2010. By designing the photo plaques with a ¾" x ½" full frame lifter behind they were transformed into a professional contemporary presentation that could be permanently mounted to the wall for security. The lifters were individually sized for each photo, chopped, built, and painted (photo 7). Each lifter was installed by nailing to the wall then the plaques were then adhered to the wall mounted lifters (diagram 5).
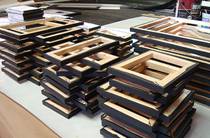 Photo 7: Permanent Mounting
All lifters are built to size, painted and ready to be installed.
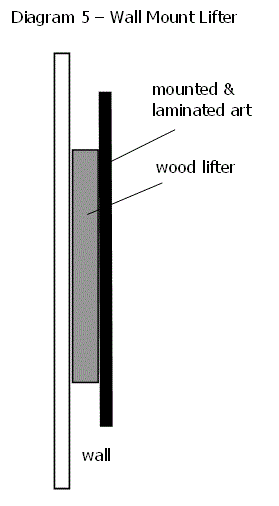
Rather than using adhesive, wood spacers and platforms are screwed to the frames so they may be easily removed and least invasive. It also allows for them to be altered for thickness of any given art panel. Wall lifters will also vary in width and thickness depending on the size and weight of the panel they are reinforcing and the space desired it hover from the wall.
Posts and Stand-Offs
Face mounting is the permanent adhering a sheet of poly (methyl methacrylate) (PMMA)—Plexiglas—acrylic, clear polystyrene, or polycarbonate to the surface of a silver-halide, Ilfochrome Classic (Cibachrome), or digital image with either double-sided, clear pressure-sensitive adhesive (PSA). The process provides a rigid support and protective glazing, while protecting from fingerprints, mold, air-borne pollutants and ultra-violet radiation. It has been used for the display of Cibachromes and transparencies—Duratrans—in advertising as backlit display and lightboxes for decades. For additional information on face mounting see "Face Mounting Basics", PFM October 2008.
Digital images using eco-solvent and pigmented inks are also being applied directly to the same type of acrylic sheet, metal and composite materials. Most of these contemporary art applications never end up in traditional frames, but rather floated unframed off the wall using lifters or posts.
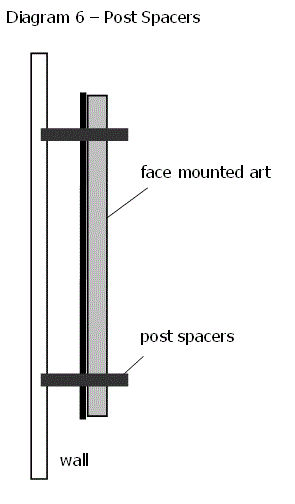
Stand-offs are the name commonly used for the tall round posts that are used to space a face mount or digital printed acrylic away from the wall (photo 8). Assorted diameters and heights of polished and brushed stainless steel as well as brass and black are available to accommodate any desired thickness of acrylic and space away from the wall. These posts are fed through holes made in the acrylic and are mounted right into the wall (diagram 6).
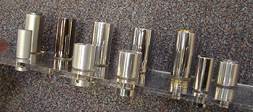 Photo 8: Stand-Offs
Assorted diameters and heights of polished and brushed stainless steel as well as brass and black are available to accommodate any desired thickness of acrylic and space away from the wall.
Packages are now being offered from numerous suppliers featuring acrylic sandwiches, sink mounts and face mounting that all use posts to suspend the presented art lifted from the wall (photo 9). Superior Acrylic Frame Co., LION Picture Frame Supplies, Ltd., UK, and Gemini Moulding are among the sources for purchasing the sheets and posts. Many print publishers are also offering digital images printed directly to acrylic, wood and metal sheets to meet the demands of today's wall décor trends.
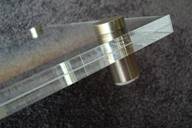 Photo 9: Posts
This acrylic package from LION Supply, UK features both front and back acrylic sheets with posts to lift it from the wall.
What to Expect
Spacers have been used to lift and separate mats for decades and just as a fillet should be considered part of any custom framers repertoire of tricks. Float frames are finally available in numerous depths to accommodate canvases from ¾" to 2" deep are now able to frame thin ¼" encaustic painting and ⅛" hardboards with the use of lifters and platforms.
Lifters and spacers may be solutions for display challenges and as additional support for painted panels in float frames, while posts dramatically display contemporary art allowing room light to become an integral part of the viewing presentation.
Who knew that leaving spaces and separating layers could ever be so profitable and become such a design element?
END
Copyright © 2011 Chris A Paschke
For more articles on mounting basics look under the mounting section in Articles by Subject.
Additional information on all types of mounting is found in:
The Mounting and Laminating Handbook, Second Edition, 2002,
The Mounting And Laminating Handbook, Third Edition, 2008 and
Creative Mounting, Wrapping, And Laminating, 2000 will teach you everything you need to know about getting the most from your dry mount equipment and materials as an innovative frame designer.
All books are available from Designs Ink Publishing through this website.
Chris A Paschke, CPF GCF
Designs Ink
Designs Ink Publishing
785 Tucker Road, Suite G-183
Tehachapi, CA 93561
P 661-821-2188
chris@designsinkart.com