 Photo 1
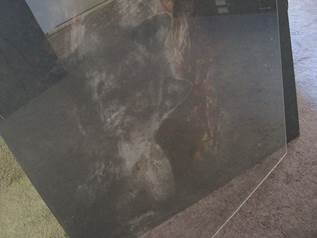
The original pastel on 4-ply mat board had been mounted with Fusion 4000 film adhesive to oversized ³⁄₁₆" clay coat foamboard.
Pastels are a delicate dry medium that require gentle handling and a full understanding of the correct way to frame them for long term preservation. Pastel is described as a medium of brilliant color that does not yellow with time, with a velvety matte surface, using dry pigment that is capable of a wide range of effects. Pastel sticks are a blend of finely ground pigment and white extender with just enough binder to enable the artist to grasp the stick of color between the fingers yet crumble when stroked across a support. It is this powdery property that accounts for its delicate surface.
Pastel Society of America (PSA)
The PSA in conjunction with Sherman Fairchild, Conservator, The Metropolitan Museum of Art, New York has established basic guidelines for pastel artists. Fairchild states there is no ideal fixative, as any liquid applied to pastel will penetrate the spaces between the fine particles of powder and cause certain colors to become dull or darken, diminishing its characteristic light-scattering property. Fixatives can also alter the color of any exposed paper. Also fixatives may only be applied by the artist, never the framer.
The most effective way to protect a pastel is by framing, which avoids accidental smudging, abrasions, or settling of dust. Whether the support is paper, canvas, or wood, it is suggested at least a ¼" space be established between the surface of the art and the glazing to protect against rubbing and the possibility of condensation should there be a rapid change in humidity or temperature. This space may be created by using multiple mats, a deep wrap mat, or by inserting spacers or lifts between the art and the glazing. All mat materials should be 100% rag.
For storage it is best to hinge, corner pocket or position unframed pastels on a sheet of rag board larger than the dimensions of the art and tape interleaving sheets or glassine to the rag board as a removable cover sheet. The margins of this support also provide an area to grasp, rather than touching the art for safer transport. It is also advised to store pastels in flat files or rag boxes.
Pastel Damage
PSA states that only anti-static materials should be used for glazing to avoid having the powder lifted off the surface. Acrylic sheeting should be used with caution because of its static charge, plus large thin sheets of acrylic may bow and rest on the surface of the pastel, as was the problem with the featured original pastel.
In a recent oversized project, a full 32"x40" previously framed pastel was brought in by a collector who had twelve other unframed original pastels, however this was the first that required reframing. The frame rabbet measured 40"x48" and had a quadruple stacked mat with inlaid feathers in a popular Southwest design from the late 1970's. The original was a new acquisition so she wanted it inspected, and to correct any framing errors, update the materials, and create a framing package that would fit in with her existing collection by the same artist.
Photo 1
The original pastel on 4-ply mat board had been mounted with Fusion 4000 film adhesive to oversized ³⁄₁₆" clay coat foamboard.
The original pastel was painted directly to 4-ply mat board that had been mounted with Fusion 4000 film adhesive to oversized ³⁄₁₆" clay coat foamboard as a support backing (photo 1), which caused a convex warp toward the glazing. The oversized acrylic sheet was concavely bowing inward pressing against the whole center of the original and the image had ghosted and imprinted to it. (photo 2)
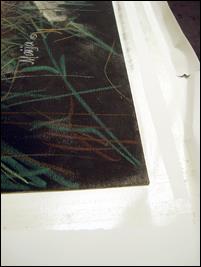 Photo 2
Acrylic was used on this original pastel which had ghosted its image to the back of the glazing.
Removal of Foam Substrate
Once the matted pastel was removed from the frame it was clear the foam substrate needed to be removed prior to proceeding with reframing. Since it is strongly advised to avoid turning any pastel facedown the foam board would need to be removed from the vertical position, keeping it perpendicular to the table. The back of the mat proved to be a good solid divider between the actual pastel and the removal process of the foam from the backing, so a sharp, thin, strong bamboo knife was used to begin the separation process. (photo 3) The knife was slid beneath layer of foam center to lift it from the surface paper.
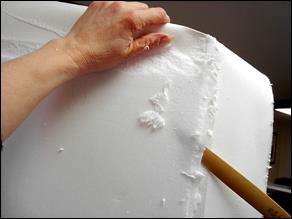 Photo 3
A bamboo knife was used to safely run between the surface clay coat paper and the foam core by running around the edges.
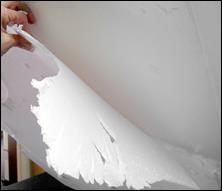 Photo 4
Once loosened the center core could be removed in strips and large chunks down to the top clay coat that was still bonded to the back of the mat board.
Once loosened, the center core was carefully stripped away from the back forward to get down to the top clay coat sheet that would remain bonded to the back of the mat board. (photo 4) The original surface paper of the foam was all that remained after the core and back clay coat paper had been removed. (photo 5) At that point the pastel finally began to lay reasonably flat without warping and the excess paper surrounding the edges could be trimmed to the edge of the pastel board. (photo 6)
 Photo 5
The remaining surface paper of the foam remained after the core and back clay coat had been removed.
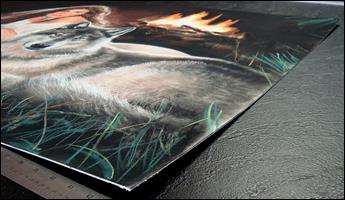 Photo 6
After the foam was removed the edges of the surface paper could be trimmed to the outer edges of the painted mat board.
Special for Bevels and Spacers
As mentions above it is best to have a ¼" space between art and glazing and it is preferable for them to be cut as reverse bevels. Though only the innermost liner mat is required to be a reverse bevel to prevent loose pastel dust from landing on a visible bevel edge, all window mats may be cut as reverse bevels. The innermost mat should also be lifted above the pastel by a reverse bevel 8-ply spacer mat, ⅛" foamboard, or commercial spacers.
As a side design note, the use of spacers in any frame package adds depth and intensity to a frame design, while physically helping draw the viewer into the art. Spacers are an inexpensive way to control the design while picking up another few additional design dollars here and there.
Mat Package
The customer and I agreed to a silk fabric top mat in this series using dominantly Bainbridge Bonsai Brown and Shitake as the manufactured silks. Occasionally yardage was purchased from Frank—s Fabrics when a better color match was required by the customer, and since she preferred to see the white bevel over a window fabric wrap it was the only one that was not reverse bevel cut.
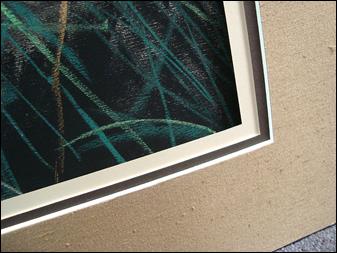 Photo 7
All window mats should be cut as reverse bevels to prevent any pastel dust from landing on a visible bevel edge. Spacers add to the depth while hiding loose pastel pigment dust.
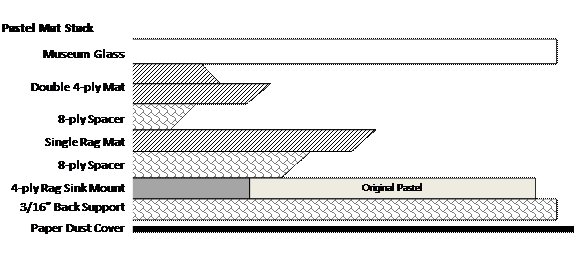
This oversized piece had a 3-7/16 top hand applied silk mat using FE-14340 Countess Light Coffee fabric and an exposed white bevel, 3-5/8 middle mat was a reverse bevel of Crescent 1184 Sable rag, and 4 wide liner mat with a reverse bevel of Crescent 1176 Suntan. (photo 7) Because of the narrow 1/8reveal of the solid core middle rag mat was attached with no spacer to the top window mat. A 4-ply spacer was placed between the top double mat unit and the bottom liner mat. Another spacer was placed behind the bottom liner mat specifically to catch and displaced pastel dust during transport or installation. Plus this gem of a client had the habit of moving and rehanging these 40x60oversized pieces—by herself—between installations so the spacers really helped keep falling pigment out of view. (diagram 1)
Sink Mount and Backing
Dry mounting is not an option for pastels, and is only an acceptable service when it involves the mounting of raw, unpainted sheets of Wallis sanded paper or other pastel receptive surface to a rigid, neutral pH substrate in preparation for pigment application. The substrate should be at least a 4-ply rag board, though 8-ply is more rigid and perhaps a better choice particularly if these are to be plein air paintings. Foam center board is not a good choice as a mounted backing because it can easily dent or bend during pigment application and this backing must survive the rigors of weeks of work and possible on-site painting.
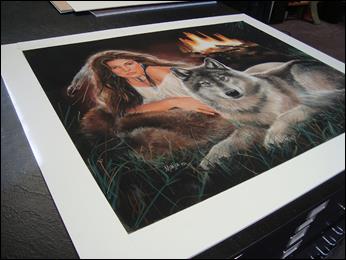 Photo 8
A 4-ply rag straight blunt cut sink mount was created surrounding the 4-ply pastel on a secondary ³⁄₁₆" foam substrate.
The project pastel was applied directly to a full sized sheet of 32x40" 4-ply mat board (not rag) which required a sink mount and additional backing support. The frame rabbet was deep enough to handle ³⁄₁₆ foam backing rather than a single 4-ply board, so a 4-ply straight blunt cut pinwheel was created as a sink mount to house the pastel and applied to another support board. (photo 8) The original was fitted into the sink mount and held by the pinwheel. Always fill the entire negative space clear to the edges of the of the mat exterior, in this case a 40x48" backing, and the strips are firmly adhered with ATG to initially hold and a bead of perimeter PVA. Sides and ends were trimmed to match the mat perimeter. (photo 9)
 Photo 9
A pinwheel construction was used to fill the negative space clear to the edges of the 40x48" backing.
The triple mat unit and sink mount backing was book hinged with high tack linen tape, firmly burnished, along the longest side for support. (photo 10) All mat and backing boards should be cut within ⅛" of the full frame size for maximum support. Use of PVA wet glue better attaches layers than ATG. (photo 11) The closed window mat was held in alignment with short tabs of ATG at the outer edges in a few places to help secure the sink mount.
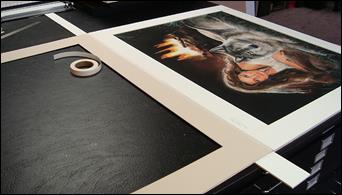 Photo 10
The triple mat unit and sink mount backing were then book hinged with high tack linen tape along the longest side for support.
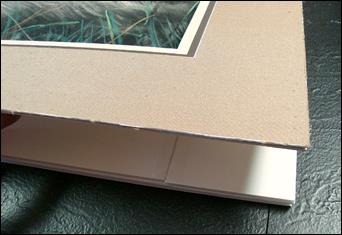 Photo 11
All mat and backing boards should be cut within ⅛" of the full frame size for maximum support. Use of PVA wet glue better attaches layers than ATG.
Glazing
This project started late 2010 when the glazing of choice for pastels remained glass. Over the years acrylic sheeting has not been recommended for pastels because of the static electricity. Acrylic was available at that time as UV- and abrasion resistant, but Optium museum had not yet hit the market. Anti-static cleaners and rags are designed to reduce static charges during the basic cleaning and assembly, but do not reduce static on a day-to-day basis. Once glass was selected it was a matter of either UV Conservation or Museum glass and the customer opted for museum glass for clarity and protection. The completed mat package was glazed with museum glass and fitted into a heavy, 40x48" solid oak LJ Tuscany frame which was beautiful and weighed about 40 pounds. (photo 12)
 Photo 12
The completed mat package was glazed with museum glass and fitted into a heavy, 40x48" solid oak LJ Tuscany frame.
Some dyes and pigments used in the fabrication of pastels are vulnerable to fading when exposed to high levels of illumination for prolonged display periods, such as a home. To slow the process of color alteration and fading, blinds or curtains should be closed, particularly when the work is not being viewed. When the work of art is not to be viewed for an extended period of time, such as during a vacation away from home, felt or other dark opaque cloth should be hung over the frame. If possible it is best to suggest display of pastels be restricted to foyers, entries, and hallways without windows. Avoid direct sunlight and fluorescent lighting. Both are rich in ultraviolet light and provoke fading.
Passe-partout and Glass Sandwiches
In 2011 famed pastel artist Richard McKinley promoted an old French method of framing called passe-partout (paspərˈto͞o) in which glass, mat, art, and backing are held together by strips of gummed paper over the edges, similar to a sealed package, but not truly sealed.
The main purpose of keeping artwork spaced away from glazing is to prevent it from adhering to that glazing resulting in damage of the art. In humid environments—or as simple as going from air conditioning into hot dry desert air—any moisture becomes trapped between the inside layer of glass and artwork, creating condensation. The original theory was that after the glazing, art, and backing were sealed together the artwork sandwich would be protected from exterior humidity. The problem with edge sealing is that unless you have a temperature and humidity controlled environment you may be actually trap moist air in with the art rather than protecting the art from it. So glass sandwiches are not the advised method for pastel paintings.
Glass sandwiches have been discussed a bit in the last few years but the concept of direct contact of glazing to pastel surface with no mat or spacers should be avoided and is not sanctioned by the Pastel Society of America. Glazing never needs to be in direct contact with any pastel. Fortunately today there is static-free acrylic available as a glazing option—Optium, Museum Optium, Static Guard Acrylic—might allow for acrylic glazing to be used on oversized pastels, making them lighter and easier to handle.
Final Strokes
Framers cannot protect any pastel artist from themselves and if you embrace the customer is always right theory then you may be stuck. But as professional custom framers it is your job to enhance and protect a customer's art and help educate customers, and artists, as to the best ways to help preserve their art. Passe-partout gave rise to both the use of mats to lift the glazing from the surface of the art, as well as the concept of a sealed package. But as a state of the art industry, framing has taken the old traditional French technique and created a more protective pastel framing package with reverse bevels and spacers, and the real sealed package using airtight MarvelSeal as taught to us by Hugh Phibbs.
END
Copyright © 2015 Chris A Paschke
For more articles on mounting basics look under the mounting section in Articles by Subject.
Additional information on all types of mounting is found in:
The Mounting and Laminating Handbook, Second Edition, 2002,
The Mounting And Laminating Handbook, Third Edition, 2008 and
Creative Mounting, Wrapping, And Laminating, 2000 will teach you everything you need to know about getting the most from your dry mount equipment and materials as an innovative frame designer.
All books are available from Designs Ink Publishing through this website.
Chris A Paschke, CPF GCF
Designs Ink
Designs Ink Publishing
840 Tucker Road, Suite H-190
Tehachapi, CA 93561
P 661-821-2188
chris@designsinkart.com