Sometimes we undertake secondary processes of a procedure singularly to attempt to correct a negligent first step mistake. But then there are the times we must integrate step two, when step one simply didn't turn out as we expected. I have stressed in past articles that when mounting we should always know what to expect from the end product, or the mounting process maybe should never be undertaken in the first place. By that I mean be familiar enough with the method of mounting selected to know what should, as well as, what might happen.
Past experiences with repetitions of dry mounting may tell us that a given 24"x36" poster when mounted to regular clay-coated ³⁄₁₆" foam board using a permanent tissue adhesive will not warp, but do you know that for sure. Odds are if attention is paid to the proper TTPM (time, temperature, pressure, moisture) aspects of mounting, the project will indeed lie flat. Understanding the reasons behind boards that warp will often allow us to prevent the occurrence or correct it when it is out of our control.
TTPM
All mounting methods have a particular time the adhesive takes to cure or mount. Sometimes it is the open or dwell time that a solvent needs to evaporate. Sometimes it's weighted time a pressure-sensitive requires to create its lasting bond, or it could be how long a dry mount film must be exposed to heat to melt. The temperature required for bonding as well as the minimum and maximum operational outdoor or indoor temperatures (weather conditions) will also impact an end result. Using a wet glue that has been sitting in a 30°F degree room overnight will not spread smoothly and the open time may be impacted.
Pressure is an important element of mounting, particularly when overcoming a warped board. Often weighting a dry mount during cooling can eliminate potential warping, and since weighting is mandatory with all cold mounting methods it will do to help override a warp. But pressure alone is neither the cause nor the solution to the real cause of warpage, which is moisture.
Mounting to Damp Materials
In order to understand warping and its potential solution, countermounting, let's consider the moisture issue. Bowing will occur where the mounting substrate has the greatest density of moisture content remaining. If a board is cool to the touch that is the first indicator there is moisture present. Even if the substrate is predried for 15 seconds as is recommended in mechanical press preparation, the paper layers on the face of the board that are in closest proximity to the platen will potentially dry while the back paper layers may still remain damp.
In order to truly predry a substrate throughout both sides and the center core, the board should be predried from both sides, and depending on the density and overall size of the substrate the board could require numerous minutes of heat application to dry totally it out. If any warm moist steam is evident to the touch when the board is removed from predrying there remains moisture in the board.
This moisture can cause two problems. First, it can prevent a smooth, even bond for when moisture reaches at 215°F degrees it turns to steam and can create trapped air bubbles under the mounting. This can particularly occur when mounting nonporous photos, low end high gloss clay coated posters and upper end thick inked or glazed posters. Second, it can create or encourage warping. Predrying is designed to cook or scare the moisture out of the selected substrate, but will do so from the platen down, thus driving the moisture out towards and hopefully through the back of the board. The front may indeed dry in 15 seconds, but the back will remain moist unless flipped and redried.
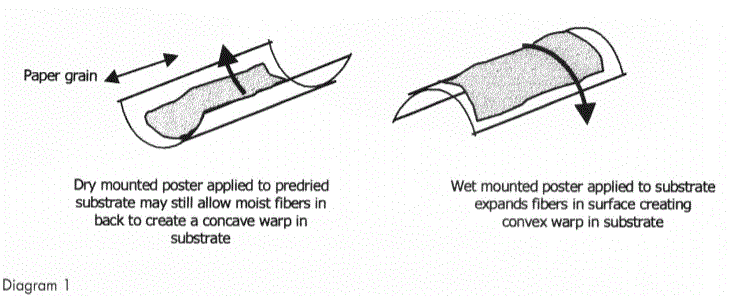
Any damp fibers that remain in the back sheets of the mount board swell or expand fiber width and create a natural concave curvature to the face of the mounting (diagram 1). The front dry fibers and layers of the substrate have been set and affixed with the mounted poster and a mounting adhesive and will better hold to the original size and shape with no expansion.

Foam center boards that function as insulators against heat transmission do not allow heat from the platen to penetrate into the center foam at all, so the back papers will never predry unless turned over and predried on both sides. Even a clay coated paper surface that does not absorb moisture can maintain microscopic water droplets on its surface which can create water vapor if dry mounted.
Wet Glue Warping
When wet gluing, warping occurs when the substrate surface layers remain moist while the back stays drier. Moisture content is needs to be applied to help expand dry paper fibers to be in unity with the application of wet adhesive to the board. Without this expansion the poster fibers remain smaller and more contracted then the expanded fibers of the substrate. This could not only warp the end mounting by restricting its expansion, but could create a weaker bond as the two surfaces fight to expand and contract at different rates. Countermounting is in order.
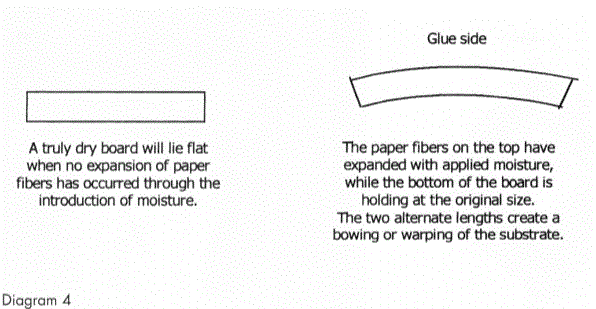
Bowing is caused by the paper fibers of a board or paper expanding in width with the introduction or presence of moisture to the fiber. Paper fibers rarely expand in length but rather thicken in width and between the fibers as moisture is allowed to remain. Both paper and wood will expand from moisture and warping (also known as bowing) which occurs when the two sides of the sheet are unequal in their moisture content thus fiber width. Wood moulding, however, will expand outwardly since the mitered corners and grain length limit length and inward expansion.
Paper Fibers and Grain
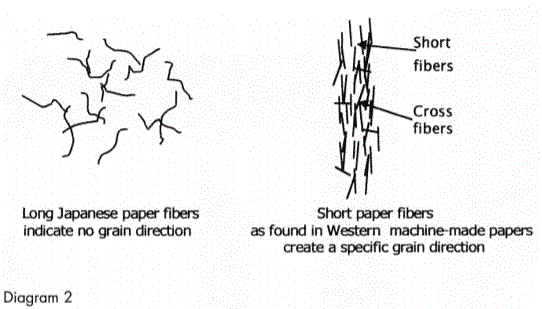
Japanese papers are handmade using long, soft, tough fibers that do not create a natural grain when folded as Western machine-made papers do (diagram 2). Western papers are made of numerous short fibers running dominantly in one direction. A few fibers run at cross pattern to hold the paper together. The grain of a paper runs the same direction as the bulk of the fibers, while cross-grain is the opposite direction.

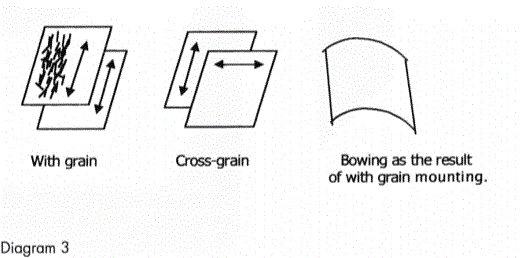
To determine paper grain, papers and boards are less resistant to being curved when they are torqued or lightly hand bent with the grain. This is because of bending fewer fibers in the process. Resistance will be felt when bent against the grain. Papers tear easier and straighter when torn with the grain. Moisture testing will also indicate grain direction. By misting a paper or board it will naturally curl with the grain direction as the bulk of the fibers thicken through moisture absorption (diagram 3).

Understanding Warping and Possible Solutions
During the course of finding a solution once a problem has occurred, it may help to think through what actually happened. Perhaps this will prevent further problems. If a substrate warps convex to the print surface (curves away from the print) the print may have contained moisture, the substrate surface wasn't predried, or perhaps wet glue expanded the board surface after application. If the warp is concave to the poster surface (curves toward from the print) then the substrate lower layers or back sheets retained moisture and expanded more than the mounted item.
In the second case if this had been a dry mounted project one solution might be to invert the project mounting and place it back into the press face down to expose the back of the substrate to drying. This could also be the case with a foam substrate. In either case total drying or cooling under an adequate weight of plate glass or the equivalent could help correct the problem.
Countermounting
The only way to compensate for fiber expansion on the surface of the mount board is to apply the same degree of tension or expansion to the back of the mount board. Countermounting is the technique of applying a mounted paper or photo paper to the verso (back) side of the substrate to counter the tension created by the front mounting.
By wet, or dry mounting a sheet of approximately same weight paper to the back of the board using the same adhesive and technique the surface tension will be created the same both front and back reducing, eliminating, or neutralizing the warp (diagram 4). The curve of the warp will generally be across the grain because the bulk of the fibers are running in one direction and as they thicken as they get wider.

When applying a mount to the verso side of the substrate the paper applied should have its grain running the same direction as the grain of the top mounted paper layer. Since dominant expansion is with cross grain as the bulk of the fibers thicken, countermounting should match the expansion as closely as possible to equal the two sides.
Selecting Substrates
Mounting at cross grain may help but may not reduce enough to compensate a warp either. If the mounting is a 40"x60" that is not intended to be placed into a substantial moulding then probably the best way to compensate for potential warping would be: 1) select a substrate rigid enough to handle the oversized project; 2) make certain all materials are fully dried; 3) countermount with appropriate matching weight materials.
Consider the thickness as well as the surface strength, but remember too that wood products and paper core materials will be more likely to maintain unwanted moisture. Selected boards must be thick enough to support both the size of the art and the added moisture. Thin X boards or equivalent 4-ply mat boards are generally suitable for 16" x 20" or less, 3X for larger than 16" x 20" and ³⁄₁₆" foam for full sized 32" x 40" mounts. Oversized 40" x 60" substrates could require Gatorboard, MightyCore, Nucor, Sintra, or hardboards such as MDF, plywood, masonite, and such.
Even when all moisture problems are taken into account, the substrate is thick enough, the paper art is moistened for fiber expansion, and the project is dried under a weight for 24 hours, warping can still occur.
Pricing for Countering
There has been some debate over what to charge for countermounting. Most of the time we shouldn't have to do it because our selected frame will be substantial enough to compensate for any warp or bow in the boards. But when it is required due to a large format mounting that could buckle into a single mat window then pricing must be considered too.
The first school of thought stands behind a simple doubling of the original mounting charge. Two mountings one front one back, twice the cost. In conjunction with that concept is the sales aid of helping nudge an overly economic or resistant customer into better moulding or a higher priced more rigid substrate when facing him with double the mounting charge just to countermount. The second school feels that since mounting charges include the cost of the substrate, adhesive, labor and profit, then the countermounting charge should be somewhat less. They believe that only the adhesive, time and profit should be covered, maybe equaling only half the original mounting charge.
One could argue the expertise alone in knowing what to do and why should increase this half charge to the full mounting charge as above. Then there is always the "charge what the market will bear" concept. In either event framers rarely charge enough for what they do and you will always end up going with your own conscious. It is a judgment call after all.
Knowing When to Counter
So knowing when to countermount and when not can hinge greatly on the desires of the customer, thickness of moulding for the frame in direct relation to the size and weight of the project, the materials selected for the project mounting, the mounting method used, and the expertise of the technique of said mounting.
Countermounting may be a fix-it for too thin a substrate or a reminder of forgetting to predry prior to mounting anything in a mechanical press. In either event it may remedy a problem or could be the catalyst to sell up into a bigger frame. Both could translate into greater profits.
END
Copyright © 1999 Chris A Paschke
For more articles on mounting basics look under the mounting section in Articles by Subject.
Additional information on all types of mounting is found in:
The Mounting and Laminating Handbook, Second Edition, 2002,
The Mounting And Laminating Handbook, Third Edition, 2008 and
Creative Mounting, Wrapping, And Laminating, 2000 will teach you everything you need to know about getting the most from your dry mount equipment and materials as an innovative frame designer.
All books are available from Designs Ink Publishing through this website.
Chris A Paschke, CPF GCF
Designs Ink
Designs Ink Publishing
785 Tucker Road, Suite G-183
Tehachapi, CA 93561
P 661-821-2188
chris@designsinkart.com