Don't you sometimes get the feeling that you'll never dig out from under? That no matter what you do there will always be unpaid bills, deadlines, and those projects that don't go well at all. So, you pay the bills, bend over backwards for customers and perhaps there really is a light at the end of the tunnel for those problem projects.
Regardless of individual talent or expertise, we all should have learned by now that we are only as good as our equipment and materials. Technique is controlled by a working knowledge of the elements of TTPM which must be remembered when attempting any mounting...wet, spray, pressure-sensitive or dry. So to reinforce the habits of good technique, we need to assess the work space or mounting station where all of these elements will be monitored.
Lighting
Working in the black hole of Calcutta? Dust and fibers will never be detected if they cannot be seen. Working in a darkened environment can not only be depressing, but can also create additional frustration and eye strain if the lighting is inadequate. Shadows created by bad light must be dealt with immediately. The light you detect deep in that tunnel might just be the new lighting fixtures which need to be hung above your mounting area.
A non-corrected fluorescent light fixture may not give you the color of natural light, but it can efficiently illuminate a work area for mounting. This in turn will allow you to see deadly particles before they migrate beneath your permanent adhesive.
As noted in last month's column, release materials need to be well lit for examination to prevent transfer of adhesive residue, wrinkles and unwanted folds onto new projects. Dry mount adhesives make mounting quick and simple, but allowing particles to be trapped between the substrate and poster will ruin the end result. Removable adhesives do allow for heat reactivation and subsequent removal of the culprit, but remember, these same undesirables cannot be easily removed when using a permanent adhesive formula.
Laminates also create additional static electricity when the peel-off backing is removed often attracting lint, dust particles, human hair and old gum wrappers. Using manufacturer's suggested preparation methods and good lighting will allow for undesirables to be seen prior to mounting.
Keep it Clean
But lighting isn't everything! Tight quarters seems to be a common scenario when it comes to most framers' facilities, nonetheless it is extremely important to stress the need for a mandatory clean, well lit work place with the proper tools and materials within reach to best execute your craft.
"Keeping it clean", PFM May 1995, concentrated on press maintenance, but it also referred to far more than just your equipment. Remember that time lost locating misplaced or buried tools, fighting with rolls of mounting tissue in a cluttered environment, or attempting to reflatten warped mounting boards due to improper storage can never be replaced. This lost time directly translates into burned up profits, if for no other reason than by limiting the projects achievable in any given day!
A clean work area often equates with a clean process and good results.
Dust and debris circulating in the air can become trapped under mounted art or fabrics. If at all possible, do not set up your mounting station near any other dust creating framing process. A miter saw will throw metal and wood chips into the air, a heavily used wall cutter may create paper dust and even glass particles could migrate to your press. Eliminate the problem prior to it being one...you will save time, money and create a much more professional and efficient environment within which to work.
Organization and Storage
Organize and arrange the mounting area to accommodate your specific requirements. If dealing with sprays, a well ventilated and masked spray booth is mandatory. Most other needs will remain the same regardless of the mounting procedure being used.
Substrate storage is best when kept clean, dry and flat, though most storage facilities allow for boards to be stood on end. By loosely standing them up, they are encouraged to warp during storage, which only adds to the warping frustration which can be created when mounting large pieces on lightweight boards. Countermounting, mounting equal weight papers on either side of a substrate to cut down on warping, should only be a last resort. Beginning any mounting process with warped materials only complicates things.
Most vacuum frames and presses are set up with an optional lower shelf which makes an ideal storage space for boxes of foam and mount board to be stored laid flat.
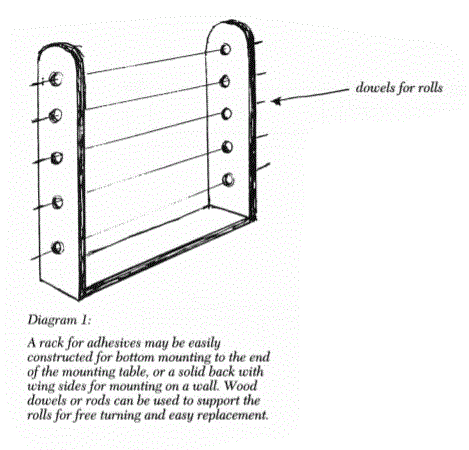
Adhesives should also be stored in a clean, dry and accessible locale. They should be well labeled to avoid mix-up and should also be stored away from release papers. A multiple roll storage or dispensing rack to the side of your mounting press is ideal (diagram 1). This way dry adhesive can be pulled to the desired length, cut, positioned, tacked and mounted with no confusion or clutter.

Location, Location, Location
The actual placement or location of your mounting equipment will vary depending on your specific mounting system and space limitations. You might wish to consider whether the dominant user is right or left handed, but this is strictly a matter of preference and convenience. If setting up a mechanical press, the ideal situation is to recess it into the work table so the sponge pad is even with the table surface. This will allow easy level insertion into and out of the press (diagram 2).

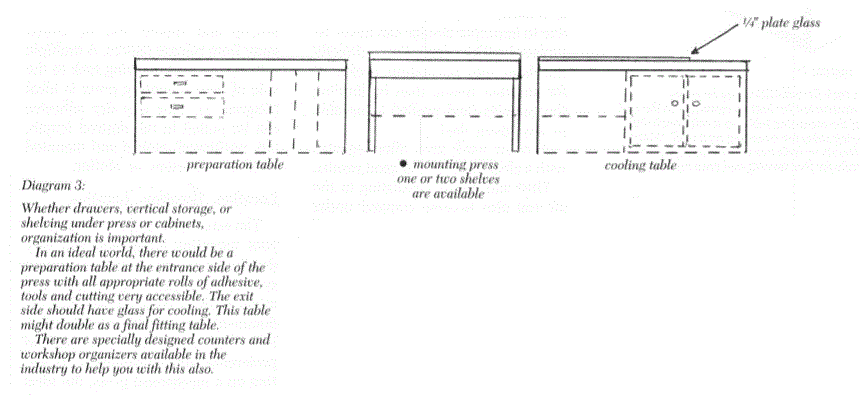
Since many removable dry mount adhesives as well as wet and spray glues need to be weighted as they cool or dry, the work table should have a cooling weight. A sheet of ¼" clear plate glass is ideal for this, and should be large enough to accommodate most average anticipated mountings, but still small enough to handle.
It is a good habit to place all newly mounted items beneath a weight to cool or dry. It will aid in flattening any potential bow and creates more consistent even pressure while bonding. Glass is an excellent choice as a weight because it is cool, may be seen through so you don't misplace a project (something we've never done!), and may also be used as a cutting surface.
An ideal work station would have the cutting/preparation table to the entrance side of the press with the weighting/cooling table to the exit side of the press (diagram 3). Since space limitations are common, the cutting/application/cooling glass space are often combined. Attempting to use the level top of a vacuum frame or press for the entire mounting process can cause undo frustrations when attempting to prepare, mount and cool projects all at the same time.

Out of the Tunnel...and Into the Light
Mounting efficiency is really rather simple, and common sense is probably the biggest help. Pay attention to your mounting environment and follow these basic guidelines:
Don't lose sight of the need for water for clean up if using wet glues and electricity for tacking irons. Drawers for small tools and miscellaneous materials would be an asset in the preparation table also.
If you have the luxury of designing a new work space try to imagine all of the extremes. Maintain adequate space around a mechanical press to allow for the benefits of oversized mounting in bites and don't forget multiple production, laminating, and creative applications. Keep materials handy, yet out of the way and remember to always light the way. Even if the area you mount in is spacious and organized you may still not have won the war, for if not well lit you may simply never see the enemy coming!
END
Copyright © 1995 Chris A Paschke
For more articles on mounting basics look under the mounting section in Articles by Subject.
Additional information on all types of mounting is found in:
The Mounting and Laminating Handbook, Second Edition, 2002,
The Mounting And Laminating Handbook, Third Edition, 2008 and
Creative Mounting, Wrapping, And Laminating, 2000 will teach you everything you need to know about getting the most from your dry mount equipment and materials as an innovative frame designer.
All books are available from Designs Ink Publishing through this website.
Chris A Paschke, CPF GCF
Designs Ink
Designs Ink Publishing
785 Tucker Road, Suite G-183
Tehachapi, CA 93561
P 661-821-2188
chris@designsinkart.com