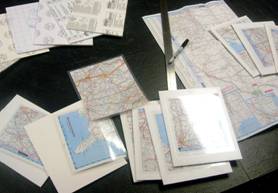
 Photo 1
P-S and HA boards were assembled, an old road map was cut into pieces and encapsulated with heat-set polyester film using a hot RL as test samples.
Deciding how best to mount an item for display is routine for any framer. Highest on the list of framer concerns is knowing the mount will stay stuck down indefinitely. One challenge that has been an on-going problem is that of mounting encapsulated maps and charts so they do not lift or bubble when they are exposed to fluctuations in temperature and humidity. Well bonded items allow the adhesive to penetrate both the substrate and the art to best fuse them together. The problem with polyester is its inability to absorb any adhesive, allowing for pressure-sensitive films to be the more obvious adhesive choice.
Preservation Encapsulation
Sealing an item between two sheets of clear film is known as encapsulation, and there are both permanent and preservation versions. Preservation encapsulation is a protective enclosure for flat art and keepsakes, created by trapping the art between two sheets of transparent polyester film that are then sealed at the edges. Mylar and Melinex are the two most popular products used for this type of reversible encapsulation. Once safely sealed the art may then be placed behind a window mat or in a recto-verso mat enclosure for two-sided viewing, and may be removed without incident by simply slitting one side open to access the original.
Vinyl Film Encapsulation
Permanent encapsulation applies either a polyester or a vinyl laminating film to both sides of the item. Vinyl laminates are heat-set surface films designed for use in framing by bonding in either mechanical or hot vacuum press. Though films may be used to seal both sides the item in question, the encapsulate remains soft and is akin to having applied clear Contact Paper to both sides. Vinyl films were designed as a glass substitute, not as an encapsulate.
Polyester Film Encapsulation
Polyester films are perfect for encapsulation and are available as pressure-sensitive (P-S) and heat activated (HA) varieties, in an assortment of mil thicknesses from 1.5 mil to 10 mil that accommodate numerous commercial and custom applications. They must be applied using a roller laminator, obviously cold for a P-S and heated for HA films. The films and RL application should be considered invasive because they are a permanent process that may never be removed without irreparable damage to the document being encapsulated.
The most common encapsulated items include menus and ID cards having been coated both sides to protect them from moisture and damage from excessive handling. Encapsulated maps, navigational charts, and informative educational diagrams are also very popular and these are most often the items that are brought in for framing. The very essence of an encapsulated chart is to eliminate surface glazing and increase its functional life during routine use. Most of the time encapsulation has been chosen by the manufacturer of the chart as the alternative to requiring the chart to be framed in order to display it. Ironically...it doesn't always work.
I have mounted numerous chiropractic and homeopathic charts over the years that came with grommets in the top corners designed for hanging. These same charts are often coated with thicker 7.5 or 10 mil films, thinking since they are thicker they may hang flatter against the wall than thinner laminates. Being coated both sides the mil thickness of the chart is twice the original film thickness. Since these films have a memory and are usually shipped rolled in a mailing tube, they are difficult to get to hang flat when unrolled. This is ultimately why they end up being brought in to be mounted and framed...to make them lie flat as originally intended.
Old Theories Die Hard
I was taught by Seal Products, Inc - now Neschen Americas - in the early 90s that only a high tack pressure-sensitive adhesive film and roller laminator was aggressive enough to hold any thick, slick, polyester film encapsulate to a substrate for framed wall display. For years I have carried that banner touting a framer could never successfully bond an encapsulated polyester chart to any backing using their traditional mechanical or vacuum presses because of limited adhesive absorption, which results in reduced or total lack of tear strength. Remember that tear strength is the separation of bonded layers when attempting to pull the fused art from the mounted backing.
There have been many anticdotes over scuffing up the back of a polyester chart to make it adhere better. And there have been numerous stories of repositionable and light tack commercial P-S films like 3M PMA and Crescent PerfectMount holding wonderfully. But neither of these products met the 90 degree tear strength requirements of ISO 8510-1:1990, Adhesives — Peel test for a flexible-bonded-to-rigid test specimen assembly — Part 1: 90 degree peel. Since polyester cannot absorb adhesive, no amount of sanding, wet adhesive tackiness, or weighting during curing will increase the saturation of any adhesive into the polyester. I did find a few commercial products, however, that do indeed hold these polyester encapsulates to a substrate without resorting to the industrial nature of a contact cement.
During 2006 I had the opportunity to run a series of tests using commercially manufactured heat activated and pressure-sensitive boards with a number of typical framer challenges, so encapsulated maps seemed like an obvious one to include. The results have changed my mounting recommendations for polyester encapsulates. An old road map was cut up into 8x10" pieces then encapsulated between two sheets of 3 mil Drytac Gloss UV polyester film using a hot RL as test samples (photo 1). A minimum ⅜" of bonded polyester film was left remaining around the outer edges of the map samples for easier grab and peel testing of the adhesive and board comparisons (photo 2).
 Photo 1
P-S and HA boards were assembled, an old road map was cut into pieces and encapsulated with heat-set polyester film using a hot RL as test samples.
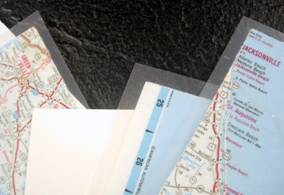 Photo 2
A minimum ⅜" of bonded polyester film was left remaining around the map samples for better adhesion comparisons.
Pressure-Sensitive Boards and Films
The first part of the test concentrated on P-S adhesive boards, with all the usual suspects in attendance (photo 3). The tested boards were Drytac PS Foam, PS Polystyrene, and PS Gatorfoam; Gilman High Tack Foam; Bainbridge SA (Self-Adhesive) Mountboard X and Foam; Alcan Self Adhesive Fome-Cor High Tack and Low Tack; Elmer's Quick Stick HT and LT Self Adhesive Foams; and Hartman HarTac.
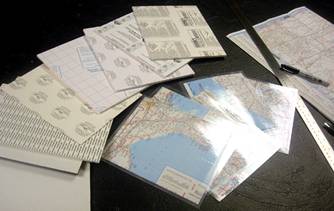 Photo 3
Clockwise from lower left: Drytac P-S Polystyrene and P-S Gatorfoam; Gilman High Tack Foam; Bainbridge SA (Self-Adhesive) Mountboard X; Alcan Self Adhesive Fome-Cor High Tack; Bainbridge SA Foam; Elmer's Quick Stick HT Self Adhesive Foam. Center front are the gloss map samples.
Because these samples are small and easy to handle, the maps are manually applied to the boards prior to running through the rollers. Correct application of slick surfaces to immediate grab high tact boards takes careful initial alignment. Peel back a few inches of the protective liner to expose the adhesive then square up the encapsulate from the bottom to the top (photo 4). Grab the folded end of the liner under the art and peel it from the mount board (photo 5). As the liner is removed from the mount board, smooth the encapsulate flat by following it down the center with a free hand to smooth air from under the nonporous encapsulate (photo 6). Cover with the removed liner and press from the center toward the outer edges with a rubber roller or plastic squeegee (photo 7).
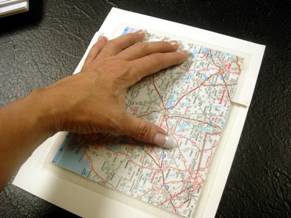 Photo 4
Peel back a few inches of the protective liner to expose the adhesive then square up the encapsulate from the bottom to the top.
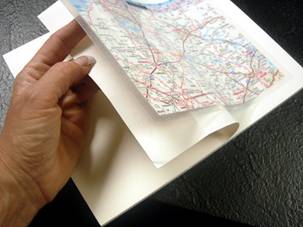 Photo 5
Grab the folded end of the liner under the art and peel it from the mount board.
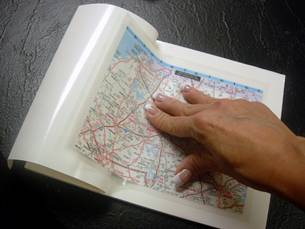 Photo 6
As the liner is removed from the mount board, smooth the encapsulate flat by following it down the center with a free hand to smooth air from under the nonporous encapsulate.
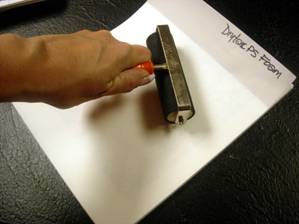 Photo 7
Cover with the removed liner and press from the center toward the outer edges with a rubber roller or plastic squeegee.
If the mount is run through a roller laminator rather than hand applied, the tacked end is tipped under the adjusted roller and the liner is peeled from the backing as the mount board is pulled through the RL by the rollers. There is no need to burnish or manually pressure roll with a brayer once mounted. Both manual and mounted boards should be placed under a weight to cure overnight. The great results showed that Elmer's Quick Stick, Drytac PS Gatorfoam, and Drytac Foam Board all passed the peel test for bonding encapsulates.
P-S Films
Assorted commonly used industry films were also tested including 3M PMA; Crescent PerfectMount; and Neschen Gudy 870 and 831. These films were applied to porous acid free foam and 4-ply mount boards. All P-S products were applied using a 25" Drytac JetMounter( cold roller laminator) then all were placed under glass weight 24 hours prior to tear strength and 90 degree peel testing. In this case the films were preapplied to the selected boards using the RL, then each sample was applied as above by peeling the liner off while running the board through the rollers. Unfortunately all of these failed.
Heat Activated Boards
Commercial heat activated boards were Bainbridge Artcare Restore, SpeedMount, and HAF (Heat Activated Foam); Bienfang Single Step and Step 150; Alcan/Crescent HA Fome-Cor; Gilman Insite Heat-Activated Foam; Hartman HartMount; Savage NuCor HA Foam and Filmtax ProCore Heavy Weight board. They were test mounted at the manufacturer suggested times and temperatures for each product in both mechanical and hot vacuum presses. All were cooled under a weight prior to checking for bond strength.
Boards were mounted in the mechanical press at manufacturer suggested temperatures of 160ºF-180ºF for 2 minutes. Vacuum tests were in a 4060 VacuSeal at 180ºF for 3 minutes. As mentioned earlier in this article a successful bond should tear the top layer of paper from the substrate rather than allow the polyester encapsulate to peel off. The photo shows a failed peel test corner (photo 8). A successful bond tears the top layer of facing paper from the board, meeting ISO 8510-1:1990, Peel test requirements (photo 9).
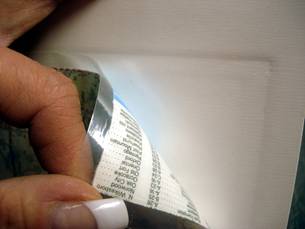 Photo 8
Clean Peel Bond Failure - Single Step was test mounted at 180ºF for 2 minutes in a mechanical press and the resulting peel test allowed for a clean peel from the backing board. This scores as a failed bond.
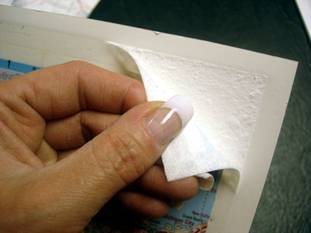 Photo 9
This sample of Bainbridge HAF in a mechanical press at 180ºF for 3 minutes tore the top layer of foam paper from the board, meeting ISO 8510-1:1990, Peel test requirements.
Of all the HA boards tested Bainbridge HAF, Step 150, HA Fome-Cor, and Gilman were the boards that passed the 90 degree peel test (photo 10). Even though Step 150 is slated to be a 150ºF degree low temperature board it has a fairly aggressive adhesive when bonded to a slick surface like an RC photo or polyester encapsulation. The surprise result was Bainbridge Restore that held the polyester aggressively enough to score a 75% bond or a 7 out of 10. Notice the separated adhesive dots on the back of the polyester and the pulled fiber from the board at left (photo 11).
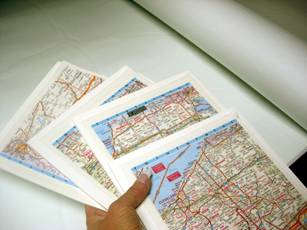 Photo 10
Clockwise from left: Bainbridge HAF; Bienfang Step 150; Alcan Fome-Cor; and Gilman Insite HA Foam.
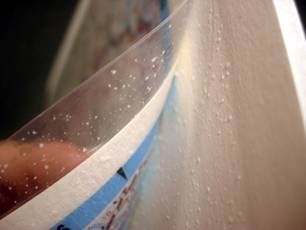 Photo 11
The surprise result was that Bainbridge Restore held aggressively enough to be rated a 7 on a scale of 1-10, with 10 passing the 90 degree peel test. Notice the separated adhesive dots on the back of the polyester and the pulled fiber from the board at left.
Final Mount
In November 2000 I wrote, "...Only a truly aggressive, high tack P-S applied with a roller machine will hold the [polyester] laminate without bubbling for framing...". Today many framers have RLs, but not the 60" wide-format, large scale, roll-to-roll production machines that mount encapsulations wonderfully.
The smaller framing models will never be comparable to the larger commercial versions, so the high tack adhesive and pressure combination required for pressure-sensitive film polyester encapsulation bonding may still not be available in today's frame shop. So thank goodness polyester bonds to select HA boards.
END
Copyright © 2008 Chris A Paschke
For more articles on mounting basics look under the mounting section in Articles by Subject.
Additional information on all types of mounting is found in:
The Mounting and Laminating Handbook, Second Edition, 2002,
The Mounting And Laminating Handbook, Third Edition, 2008 and
Creative Mounting, Wrapping, And Laminating, 2000 will teach you everything you need to know about getting the most from your dry mount equipment and materials as an innovative frame designer.
All books are available from Designs Ink Publishing through this website.
Chris A Paschke, CPF GCF
Designs Ink
Designs Ink Publishing
785 Tucker Road, Suite G-183
Tehachapi, CA 93561
P 661-821-2188
chris@designsinkart.com