 Photo 1
Wrapping the sponge pad will help protect it from adhesive residue during mounting. Use single sided release paper so it does not pull out during use.
Armed with the elements of TTPM (Jan-April 1995, PFM) are you really ready for foolproof mountings every time? Almost. Never forget, release materials are also an integral part of the mounting process. They are used to envelope the items being mounted to protect the art, and the press, from adhesive transfer, contamination, and each other. Sometimes the most obvious problem causers are the very release papers that are designed to prevent mounting problems. When that happens it's time to "release them or let them go" from their mounting responsibilities!
All Silicones Are Not Created Equal
There are many types of silicone coated papers and films, all with varying degrees of non-stick capability. Some are used as removable liners to protect pressure sensitive or heat activated adhesives until ready to use. Others might be applied to the back of laminating vinyl to allow for rolling and storage, also until ready to use. In any event, release materials are not limited to use only in the framing industry. Just notice the plastic tabs you remove from the adhesive the next time you need a band-aid.
Release materials may be in the form of plastics, vinyls, or Teflon which tend to prevent adhesive absorption making them peelable, as with the above band-aid. But they also may be variable weights of paper or board with a coating of silicone applied to its surface. These are dominantly what we deal with in the framing industry.
Release papers used in conjunction with the heat of a dry mount press have a different degree of silicone than those used only for storage protection only. Compare the difference between the release sheet from back of a laminating film to a commercial two-sided release paper for use in a press to compare the difference.
Types and Styles
Release materials for mounting come in both paper and film in a variety of widths and sizes, and are available from many different manufacturers. Clear release films are Mylar or Teflon coated and come on rolls (as the paper) and in sheets up to 50"x102". Papers are available both as single-sided and double-sided in rolls up to 54" wide. Double-sided release paper is a slick, light weight off-white paper with a silicone coating on either side. Single-sided release paper has a heavier base paper with a single side silicone coat and a pale blue appearance to help distinguish it from the uncoated paper side.
Release boards are single-sided release paper bonded to a 4-ply equivalent substrate. Release boards are commercially available up to 40"x60" in size, or you can make them yourself using a base board and a permanent, breathable adhesive. A removable adhesive would attempt to remove itself each time it was introduced to the heat mounting process. Manufactured boards are prone to a slight orange peel appearance which can transfer to mounted projects on soft substrates and RC photos. Creating your own boards would allow for selection of a smoother mat board base resulting in a smoother finish.
It's all a matter of preference when it comes to your specific choice of release materials. Brown Kraft paper is not a reasonable substitute for release paper, although it is necessary for predrying when using a mechanical press. Kraft paper could glue itself to the art or platen if any glue residue has been left on it (photo 1).
Photo 1
Wrapping the sponge pad will help protect it from adhesive residue during mounting. Use single sided release paper so it does not pull out during use.
Clear Release Film
Clear release paper isn't a paper at all but generally a Mylar or Teflon coated sheet or film. It was originally designed to be used in conjunction with glass topped vacuum presses so mountings could be better monitored. I'd like to make two points, first, if you must watch the process to make sure it's okay, you probably shouldn't be the one to mount it. And second, if you do detect a wrinkle or fold in the mount, by the time you get the vacuum released and the press open...it's probably too late. I do, however, like clear sheets for gloss photos and lacquered prints to help maintain their smooth finish.
Release Papers
The lower price and flexibility of using either side of double-sided paper makes it a big seller. The base paper is light weight making it tougher to handle when dealing with oversized mountings. It's slick, limp and more prone to folding over when working with a 40"x60" format. Single-sided release paper being of heavier base paper is more rigid and non-slippery, making it perfect for wrapping around the sponge pad of a mechanical press.
Wrapping the sponge pad will help protect it from adhesive residue during mounting. Use single sided release paper so it does not pull out during use.
Release Boards
By initiating use of a release board as top sheet of a mounting package, rather than paper, the handling of the top sheet with one hand while inserting the project to be mounted with the other is easily accomplished. As previously mentioned, the release board can play an integral part of pressure control when using a mechanical press, as it both protects the platen and helps dissipate the pressure at the outer edge of the press plates.
 Photo 2
Release boards must protrude from the press on three sides in order to dissipate the pressure at bit points.
Release boards don't easily indent, wrinkle or fold over, but I need to warn against using them both top and bottom in either a mechanical or vacuum system. In a mechanical press, the project needs to nest down into the sponge pad to ensure a constant, even pressure against the platen. Likewise in a vacuum press, the bladder or diaphragm needs to be allowed to contour up around the substrate in order to adjust it's pressure against the platen. If a board is used both top and bottom, excess pressure can occur at the outer edges as the sponge or diaphragm attempts to conform to the shape of the desired inner project. The release board can then possibly create uneven mounting pressure in the project center.
Exceptions to the rule occur when mounting an oversized project in bites, or when working with thin or no substrate. In the later case, the bottom board becomes more of a substitute for the non-existent substrate.
Wrinkles In The Sheets
Could it be...no, not wrinkles in your sheets! You know how annoying it is to have wrinkles in you bed sheets? The same annoyance can creep into your mountings when you begin the process with wrinkles in your release papers (photo 2).
Indentations, or wrinkles, are created in bottom release papers and films when mounting substrates are properly pushed down into a sponge pad of a mechanical press, or the bladder sucks up around the substrate in a vacuum press (photo 2). They are the natural result of pressure during the mounting process.
The problem with wrinkles arises when an attempt is made to push release materials beyond the point of their reasonable limit. One form of sensible and systematic use of materials is to mount projects using a release envelope close to the size of the desired end product. In this way, the possibility of abusing a 24"x36" envelope by imbedding smaller 8"x10" impressions into it will be lessened. This might later avoid the transference of the same 8"x10" indentations into the foam board substrate of a subsequent 24"x36" project.
Similarly you need to keep a lookout for any alien lines, wrinkles or blemishes anywhere within your mounting package. Check newly created or manufactured release boards for character flaws, dents or scratches prior to initial use. Pay attention to individual textures or the degree of smoothness with different release materials and manufacturers, remember the orange peel. Also watch for transferred lines of adhesive remaining on the board or paper from previous mountings. Once adhesives have cooled, they can easily be dusted away by using a soft cloth diaper as a duster rag for ensuring a clean release paper surface.
Moisture Damage
Release papers are not recommended for pre-drying because they were never designed to absorb moisture, in fact excessive moisture can really do a number on them (photo 3). Not only can the paper cockle and warp from the presence of moisture, but it can also effect the silicone surface. The sample in the photo was held in a heat vacuum press for an extra long time at a high temperature to create this dramatic visual result. Normal use will not create this extreme, but pay attention to severely warped or cockled papers as a result of moisture, the pattern and texture can be transferred to a project.
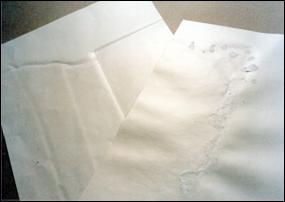 Photo 3
Release paper (L) is indented by thick and repeated substrates. Sample right is water damaged from canvas transferring.
Wrap Up
Release papers and boards will let you know when they are too tired to work any longer and should be retired. The silicone surface will last much longer than the paper itself. A board will begin to brown slightly with extended use since it's lifetime is somewhere around fifty hours of production time. Release materials will only produce smooth, clean end results if they are not attempting to transfer their own wrinkles of age or damage. Unfortunately, by stretching the use of these materials we often create our own problems.
Wouldn't it be nice to blame faulty equipment, tissues or a manufacturer's lack of quality control when a problem has arisen?Only then could we successfully avoid wearing the responsibility of our problem mountings. Unfortunately, most often it is our own inconsistency and inattention to details which gets us into trouble.
Paying closer attention to the issues of time, temperature, pressure and moisture, are wonderful, but don't overlook the support group of clean release materials. Remember...overused or wrinkled release papers could also be key offenders in the graveyard of unsuccessful mountings.
END
Copyright © 1995 Chris A Paschke
For more articles on mounting basics look under the mounting section in Articles by Subject.
Additional information on all types of mounting is found in:
The Mounting and Laminating Handbook, Second Edition, 2002,
The Mounting And Laminating Handbook, Third Edition, 2008 and
Creative Mounting, Wrapping, And Laminating, 2000 will teach you everything you need to know about getting the most from your dry mount equipment and materials as an innovative frame designer.
All books are available from Designs Ink Publishing through this website.
Chris A Paschke, CPF GCF
Designs Ink
Designs Ink Publishing
840 Tucker Road, Suite H-190
Tehachapi, CA 93561
P 661-821-2188
chris@designsinkart.com