 Photo 1
Set the locking arm at a 45-degree angle to the table with each substrate thickness.
A custom picture framer needs to be skilled at all aspects of framing from design to preservation to frame repair, and often that demands problem solving. Understanding adhesives and mounting techniques is good, but being aware of controlling time, temperature, pressure and moisture (TTPM) is the basis for all successful mounting. Whether the challenge is a bubbling spray mounted poster from the 1970s or mounting a newly printed digital image to wood...referring to the TTPM elements of mounting is the best place to start.
TTPM Review
Every technique regardless of wet, spray, pressure-sensitive, cold or hot dry mount, has a set of TTPM guidelines that needs to be followed, and in turn will hold the answers when bond failure occurs.
Time refers to tack time—the workable time allowed by an adhesive to position the print as the solvent evaporates in preparation for final set-up, also known as open time or work time. Not allowing adequate open time could affect the long term bond of a potentially successful spray mount. Application time—with wet and spray adhesives—is when a uniform coat of adhesive must be applied to guarantee proper adhesion. Any areas that have begun to dry prior to mounting will never create an even, lasting bond. Only the initial bond is created within the first hour, but with the permanent bond taking 4-24 hours to cure, undisturbed and under pressure.
There are a number of times involved with dry mounting. Draw time is the length of time it takes for all of the air to be sucked out from between a heated platen or cold frame and for the lower diaphragm within a sealed vacuum press. Dwell time is the remaining time in the press—after draw—to adequately heat all inert materials, activate the adhesive, and create the desired bond.
Temperature is more of an issue than first thought and applies to all mounting techniques. Colder temperatures stiffen liquid adhesives and solidify flow encouraging glues to clump, while higher room temperatures can slow final cooling or curing. Most can or bottled adhesives have suggested temperature usage on the label and many are restricted from shipping during the winter. Dry mount adhesives and HA boards range from 130ºF to 190ºF and not using them at correct temperatures could result in bond failure. That means all layers within the press must be heated to that bonding temperature to achieve a proper bond.
Pressure is the force that squeezes air from between bonding layers—substrate, adhesive and artwork. Pressure-sensitive adhesives are activated by the manual application of pressure by a squeegee, rubber roller, or roller machine to create the initial bond with maximum cure reached under a weight after 24 hours. Whether p-s, wet, spray, or dry mounting, the practice of weighting needs to be applied in all cases, and a piece of ¼" plate glass makes a perfect manual weight regardless of technique.
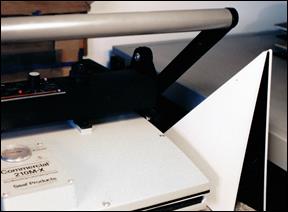
Both hot and cold vacuum presses are self-adjusting in relation to the selected mount board. During the draw of the vacuum a rubber diaphragm conforms to the thickness of the substrate adjusting for pressure. Mechanical presses must be manually set for proper pressure. Too little pressure allows air to remain; too much pressure could leave plate marks. Set the locking arm at a 45-degree angle to the table with each substrate thickness. (photo 1)
Photo 1
Set the locking arm at a 45-degree angle to the table with each substrate thickness.
Moisture is the element that varies with the process. All wet and spray adhesives contain water, so moisture is an integral part of the adhesive and the process. P-S adhesives begin dry so materials used during mounting must also begin dry. When a mount board feels cool to the touch it can be an indication of moisture content in that board. During dry mounting all materials must begin, bond, and remain dry throughout the process. Dry materials will not adhere to damp paper or board. (photo 2)
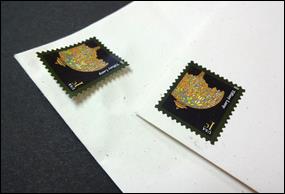 Photo 2
Dry bonds to dry (R), a self-adhesive stamp does not properly adhere to a damp envelope (L)
Mechanical presses require predrying to insure all the moisture is removed from the mount package before bonding. Heated vacuum presses automatically remove moisture from within the press during the draw of the vacuum, but even then sometimes that isn't enough to remove unwanted moisture.
Note: See Paschke articles and The Mounting And Laminating Handbook, 3rd edition for additional information on TTPM.
Problem Solving
There are two times that TTPM can help solve problems: 1) when an adhesive is not holding properly, referred to as bond failure; and, 2) when there is an unusual project with nontraditional materials needing to be bonded. TTPM is only a set of guidelines or reference points to help correct an oversight or bad habit, so even when all the elements are correctly implemented bond failure may still occur. When that happens often the first inclination is to blame the adhesive or the equipment, but bond failure is generally the result of human error.
Edges peeling up could result from a press not being hot enough, too short a dwell time, or wet glue drying too quickly. Unmelted film adhesive is too low a temperature setting, while damage to a laser print surface is too high a temperature. Air bubbles could easily be a pressure or moisture issue with a mechanical press or the selected mounting technique may not be appropriate for multiple non-porous layers in a hot vacuum press—which would require a two temperature mounting process.
So what happens when traditional manufacturers' suggestions don't align with the specific need of a project? There is always more than one solution to every problem, and each project will have a mounting technique best suited to it. That said, the framer's challenge is to think through the item being mounted and consider compatible adhesives, surface coatings, and substrates to best determine the solution. This may take testing numerous combinations until the right amount of tear strength and longevity are determined to suit the project.
Contemporary Demands
In the world of digital imagery; wide format, high tack, roller laminators; and a plethora of substrate alternatives from paper based honeycomb panels to aluminum composite material (ACM-Dibond), porosity issues can help resolve and/or exacerbate mounting demands. Digital images mount best to HA foamboards at low 130ºF temperatures or short 15 second durations of 150ºF temperature. Bonding to ACM may be achieved in a vacuum press but is best with an R-L, and facemounting—also known as acrylic mount—requires a cold R-L and optically clear pressure-sensitive film adhesive.
Artists often challenge framers with difficult and unusual requests like bonding Yupo synthetic paper to a rigid substrate so it may be fitted into a float frame rather than behind glass; or mounting multiple layers of their paper art with dry mount adhesive. A word to the wise about that final example...making any permanent modifications to original art is not ethically approved as something a framer should ever be doing. Film adhesive may be bonded with a household iron—set at just below wool—so perhaps you'd be better selling them the raw adhesive to create the art in their studio. They may do that manually, weighting each applied adhesive layer, whereas a framer would use presses and the sponge mount technique.
As substrates go, mounting to wood is not a new process. Most of us are familiar with wall plaques and awards created as trophies and certificate honors, both utilizing brass plates, but plaquing has actually been in the framing industry for decades. It lightly emulates the classic 18th century decoupage art form of applying cut paper images to wood furniture and accessories, then layering with 30-35 coats of lacquer, though plaque mounts use laminate to protect the surface rather than lacquer.
Plaque Mounts
Established and widely promoted throughout Canada in the early 70's, the concept was first introduced to the mass production and framing markets in North America, by Drytac Corporation. It uses a solid piece of wood that has been sized, routed, and painted as the substrate then vinyl laminate is applied for surface protection. (diagram 1) A laminate will not crack or shatter and protects against fingerprints, scratches, dust, moisture, and pollutants making plaques a viable alternative for children's room, restaurant, office, school, hospital, library, and other high traffic public areas.
The exterior edge of the plaque is painted and acts as an accent frame. Though pine is favored, other rigid board surfaces including Masonite, MDF, and smooth high-grade sanded plywood are also used as alternative substrates. Plaques of ⅜" coated hardboard was used in the creation of plaques for use in Tehachapi Depot Museum. (photo 3) Rather than using a routed decorative edging the boards were painted and sanded to create a 45 degree bevel at the top edge of the border.
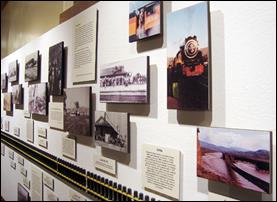 Photo 3
A local train museum requested laminated wood plaques for display for durability and ease of care.
Final Plaque
With sublimation, solvent, latex and other digital printing directly to alternative substrates—plywood, bamboo, acrylic, metal—it may seem that traditional plaque mounts are a thing of the past, but plaque mounts seem to be enjoying a strong comeback with the advent of wall decor quotes and decorative signage. Thus if a framer has the materials and the knowledge, plaque mounts should be part of their repertoire. And they remain a viable problem solving alternative when traditional framing is not an option.
END
Copyright © 2018 Chris A Paschke
For more articles on mounting basics look under the mounting section in Articles by Subject.
Additional information on all types of mounting is found in:
The Mounting and Laminating Handbook, Second Edition, 2002,
The Mounting And Laminating Handbook, Third Edition, 2008 and
Creative Mounting, Wrapping, And Laminating, 2000 will teach you everything you need to know about getting the most from your dry mount equipment and materials as an innovative frame designer.
All books are available from Designs Ink Publishing through this website.
Chris A Paschke, CPF GCF
Designs Ink
Designs Ink Publishing
840 Tucker Road, Suite H-190
Tehachapi, CA 93561
P 661-821-2188
chris@designsinkart.com