 Photo 1
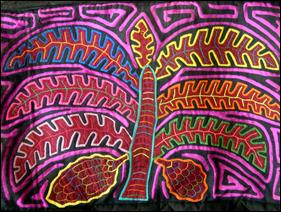
Designs should be recognizable, harmonious, well balanced, and themes include geometric patterns, nature—like this palm tree, animals, fish, and flowers.
Originating from their native word for bird plumage, mola is the Kuna Indian word for clothing, and the name of the elaborate panel that makes up the front and back of a Kuna woman's traditional blouse. The mola came about through the tradition of Kuna women painting their bodies with geometric designs, using natural pigments which in later years these same designs were woven in cotton, and later still, sewn using cloth bought from the European settlers to Panamá. Traditional designs include geometric patterns or subjects inspired by nature, animals, fish, flowers and daily life. The design should be immediately recognizable, harmonious in color, well balanced and not be confused by the addition of added filler elements or colors. (photo 1)
Photo 1
Designs should be recognizable, harmonious, well balanced, and themes include geometric patterns, nature—like this palm tree, animals, fish, and flowers.
Since mola panels have been worn as part of the traditional dress of a Kuna woman they often show signs of wear such as fading and stitch marks along the edges of the panels. Molas are often sold in pairs, the pair consisting of both front and back blouse panels. The two molas are usually two variations on a theme and the set of matched molas should be displayed or used together.
Reverse Appliqué
Molas are handmade using a reverse appliqutechnique where several layers—two to seven—of bright colored contrasting cloth are basted together. The design is created as layers are cut away exposing colors from beneath. The edges of the layers are then turned under and sewn down with nearly invisible stitches using thread the same color as the layer being sewn. The bottom layer remains uncut as the background support color.
All curves of the designs should be very smooth—not a series of short straight lines—and once hemmed, all colored lines should be straight and even in width at ⅛ to 3/32". The entire surface of the mola should be used to create a filled pattern, but all filler elements, slits, positive appliqués, triangles, rounds, and additional embroidery, should highlight the main subject and never overwhelm it.
Mola Frame Design
One of the framing elements of design is replicating or repeating a pattern or color from within the art into the frame design, which is also one of the strongest ways to visually integrate the framing with the art. The viewer's eye should always be drawn into the art from the frame and there should always be a connection between the frame and the art, there should be a reason for every selected element of the design.
The colors and playful nature of a mola easily supports the use of bright colors when framing, with the matting most often using bright coordinating colors replicating the theme. This particular design took a reverse approach by allowing a red accent color in the moulding and painted bevel to integrate with the textile instead of using more obvious bright mat colors. This also would be utilizing the repetition design element. The client loved the more neutral concept of a black frame and mat to help pull the eye into the textured black background—base color layer—of the mola while the red accents visually integrated the reds and oranges in the textile and filler slits. (photo 2)
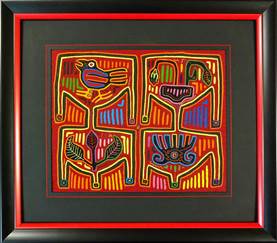 Photo 2
A 1¾" wide Red Confetti Larson-Juhl 347635 frame with Bainbridge Alpharag Ebony 8644 and blackcore liner.
A 1¾" wide Larson Juhl red Confetti frame #347635 was the perfect moulding. Crescent BriteCore BR34921—black on red—would have been perfect had the red color matched the mola but it was slightly off, so the 2⅝" top mat is Bainbridge Alpharag Ebony 8644 with a painted bevel to match, and the 3" liner mat is a textured surface 4-ply conservation blackcore. (photo 3) The original design also proposed a ⅛" spacer between the two mats, but the impact of the painted bevel was lost when the shadow from a spacer was introduced. The two mats together also better replicated the slits.
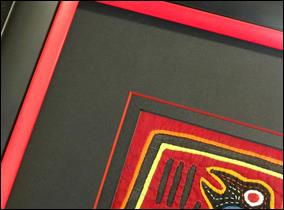 Photo 3
A double black mat was selected using a smooth top with painted red bevel and textured liner mat.
The red accent on the frame and the red bevel pull the eye into the art while also replicating the red in the mola.
The textural surface paper of liner mat was selected for two reasons: first, as a visual contrast between the top mat and the frame; second, to better replicate the textural black fabric from the mola as seen in photo 2, again utilizing the repetition element of design. If you need to create a rag version of a textured mat, simply select and size a solid core black mat and mount a sheet of Black Canson Mi-Teintes art paper to it—textured side up—with a clear film adhesive like Fusion 4000 or Flobond at 200ºF the required time for the press, then trim and cut the window. Mi-Teintes is a 98# sheet with a vellum texture on the top side, is available in 42 shades that are lightfast and acid-free. This is the paper of choice for tiered matting projects discussed in previous articles.
Step-by-Step
Hand painting a bevel is easy and should be part of any framer's repertoire. The surface of the top mat needs to be taped with 3M Removable 811 tape along the cut line to protect the face of the mat from paint. By applying 1" wide—or overlapping ½" strips as in this project—3M 811 Removable Tape to the surface of the top mat prior to cutting the window, the edge will be clean and perfect once painted and the tape is removed. Cut the window, lay the mat face up and burnish the taped edge at the top of the bevel to ensure it is fully in contact with the mat and to prevent paint bleed.
Acrylic paints were mixed to match the hue and tone of the red in the frame and mola which required two reds and a white. Test the paint on a sample of the same matboard and allow to fully dry to verify the color prior to using on the final mat. A long bristle chisel edge lettering brush was used to paint the bevel for control and even paint distribution. (photo 4)
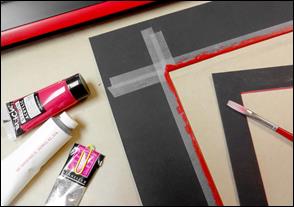 Photo 4
Acrylic paints were mixed to exactly match the tone of the red in the mola and the frame. A long bristle chisel edge lettering brush was used to paint the bevel.
Once fully dry gently remove the 811 tape by lifting up and rolling back from the bevel, leaving a beautiful cleanly painted edge. There may be a ghosted tape pattern—lower left—from dust and normal work area dirt that needs to be erased after the tape is removed. (photo 5) Use only black erasers on any dark paper or board since white erasers will leave a white mark. General's Magic Black Eraser by FACTIS is a soft, non-abrasive eraser designed for dark mats, charcoal and graphite, available from full supply art stores and online. Fully clean the surface of the mat prior to moving ahead.
 Photo 5
When dry, peel the 3M 811 removable tape by rolling the tape up and away from the painted bevel.
The ghosted dust tape pattern, lower left, is erased using a soft black eraser.
A single layer of white polyester felt is cut about ¼" smaller than the size of the mola and placed between the mola the ³⁄₁₆" acid free foamboard as light padding and to prevent sagging. (photo 6) The textile is squared for accurate placement on the backing board then attached with short stainless steel pins at the edges to help smooth, for light support, and to help maintain square. (photo 7)
 Photo 6
A single layer of white polyester felt was used as padding to both support the mola and to help hold it in place and prevent sagging.
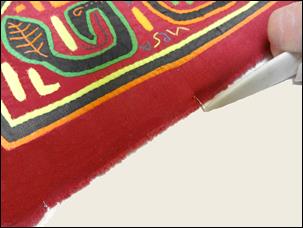 Photo 7
The mola was mounted over the felt to ³⁄₁₆" acid free foam and squared then attached with stainless steel pins at the edges to help support and hold roughly square.
Since the textile has a thickness to it a pinwheel design 4-ply sink mat was created to lift and level the mat unit and allow the textile to sit without stress or undue pressure along the edges. The strips were cut to fully fill the space between the pinned mola edge and the outer dimension of the backing board and were attached as strips totally surrounding the mola. (photo 8)
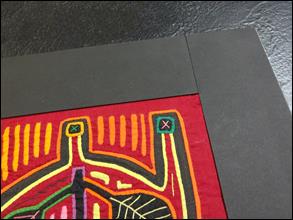 Photo 8
The mola required a 4-ply sink mount to lift the top mat and allow the textile to sit without stress. A pinwheel design was created by attaching the strips to the backing board as seen in the upper right corner.
The top mat unit is then book hinged on the longest side to the sink mount backing with Lineco Abaca.SA self-adhesive hinging tape. It is an acrylic adhesive applied to strong Abaca paper—manila hemp—that is permanent, non-yellowing, acid-free, biodegradable and comes from a self-sustaining plant. (photo 9) Once completed, the mola mat unit may be fitted into the frame with museum glass, papered and wired.
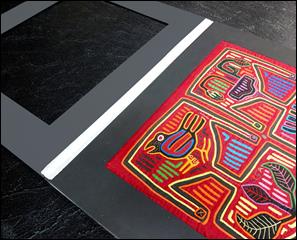 Photo 9
Top mat is book hinged along the longest side with Lineco Abaca Tape 4-ply sink mat lifter surrounding the pinned mola.
Final Thoughts
Knowledge of numerous mounting techniques were used in this project: basic dry mounting; selecting a clear film adhesive to prevent a white hairline of tissue from showing between a black surface paper and blackcore mat; pinning the textile over polyester, and sink mounting to lift the mat unit. Knowing how to do something is every bit as important as when it is necessary to use that skill. A successful framer should be skilled at design and technique.
Framing textiles from world travels is as popular with clients as family memorabilia and sports collectibles. Thinking outside the routine of what would be expected by the client is what will set you apart from another frame shop.
END
Copyright © 2017 Chris A Paschke
For more articles on mounting basics look under the mounting section in Articles by Subject.
Additional information on all types of mounting is found in:
The Mounting and Laminating Handbook, Second Edition, 2002,
The Mounting And Laminating Handbook, Third Edition, 2008 and
Creative Mounting, Wrapping, And Laminating, 2000 will teach you everything you need to know about getting the most from your dry mount equipment and materials as an innovative frame designer.
All books are available from Designs Ink Publishing through this website.
Chris A Paschke, CPF GCF
Designs Ink
Designs Ink Publishing
840 Tucker Road, Suite H-190
Tehachapi, CA 93561
P 661-821-2188
chris@designsinkart.com