Paschke Online
Designs Ink Publishing Article Archive and Reference Library
Articles by Chris A. Paschke, CPF GCF
"Scrolls: Mounting"
August 2005
Last month in "SCROLLS: Part I The Chinese Approach" we discussed the basics of Chinese scroll mounting, styles of scrolls and how an artist backs a painting. This month we get more serious with the actual steps of scroll mounting. Please remember as you read through this process that scroll mounting in Asia is the same as Western framing is to the USA. It is their framing process of choice for all types of artwork from fine art to mass production. Therefore the process I was taught during my "everything you need to know about scroll mounting in one week or less" was fast, furious and from a mass production point of view.
The 'Gallery of Kuan yu in Beijing' was the location for my studies. It is family owned and run with a staff of six girls and a master scroll mounter. I won't call it a scroll mounting sweat shop, per se, but the six young girls who work there were brought in by the shop owner from a distant village as his workers to live, work, and play together under his sole care and control. The girls seemed happy enough, but who can really say.
Being a production operation, they use standard measurements and proportions for all of their scrolls and the girls work like little robots, with very little chatter, completing a great many scrolls each day. While I was there, a 500 piece production scroll job came in of a large scale 3'x6' hand written character "longevity" that was to be sold in assorted tourist shops (photo 1).
 Photo 1
The 3'x6' hand written character "longevity" on gold flecked xuan paper was a new 500 piece scroll mounting project for the girls that was to be sold in assorted tourist shops. The completed five of them (between other projects) the first day.
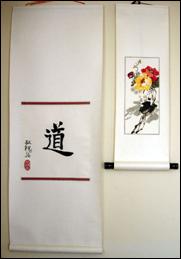 Photo 2
The 3'x6' hand written character "longevity" on gold flecked xuan paper was a new 500 piece scroll mounting project for the girls that was to be sold in assorted tourist shops. The completed five of them (between other projects) the first day.
The photo illustrates the proportions of heaven to earth, in relation to the art. Tao (left) is 17x44" long with 18" heaven (above) and 12" earth(below) the 13x14" art, in a modified Mincho A style. The Peonies (right) is 10x29" with 10" for heaven and 5" for earth with 6¼x14" artwork for a true ⅔:⅓ ratio, in a Hyogu B style (see PFM July 2005, Mastering Mounting, diagram 2).
Proportion, Placement and Backing
In preparation let's review and the general proportions from last month while looking as photo 2. The photo illustrates the proportions of heaven to earth, and in relation to the art. Tao (left) is 17x44" long with 18" heaven, 12" earth, with 13x14½" art, made into a modified Mincho A scroll style. The Peonies (right) is 10x29" with 10" for heaven, 5" for earth, with 6¼x14" artwork for a true ⅔:⅓ ratio, in a Hyogu B style.
Scrolls are built up from the art beginning with the trim or liner strips always applied to the artwork first, then scroll sides, followed by the top and bottom pieces. Close examination of any scroll easily illustrates the sequence of the application (photo 3). Last month I illustrated how to back raw artwork, which is generally done by the artist. Since many of the paintings mounted in this shop have been painted on-site, the first step in this scrolling process will be the backing of the art (photo 4).
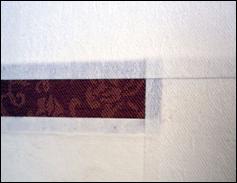 Photo 3
The details shot clearly illustrates the over lapping of the paper backed silk trim pieces at top and to the right of the Tao artwork in photo 1 left. The brown liner was adhered first, then the side pieces, last the top and bottom. Lower left is the backed rice paper character artwork.
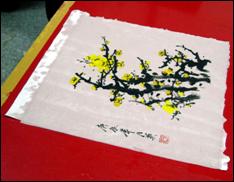 Photo 4
The art has been backed, flipped to face up, and trimmed on two sides. Nearly ready to be dried traditionally on a smooth board or in a commercial drier (see photo 14 this article).
Squaring and Sizing
Backed pieces are traditionally adhered to a smooth board and allowed to dry a few days, but large commercial operations have driers like the large 8'x10' hydraulically operated, felt lined unit used at this location. This art was wet backed then dried within ten minutes in the big press along with other pieces.
Once the backed artwork has dried it needs to be squared up for scroll mounting. An 8' long ½" thick heavy acrylic bar is used as a straightedge for all trimming during the scroll mounting process. The bottom of the art is squared off first, and a 90-degree corner is used to align the right side to the bottom. The bottom is then loosely folded to the top squaring the right trimmed side and a metal pointer (lower left in the photo) is used to prick holes in the top of the art marking the line to be trimmed (photo 5).
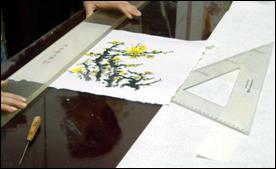 Photo 5
The dried art is being squared up for the scrolling assembly. An 8' long ½" think acrylic bar is used as a straightedge for all trimming. The bottom is squared first then the corner will be placed along it to square the sides accordingly.
The silk that is used for scrolls comes as a very sheer single layer that has been backed with paper prior to use. The same backing method is used for the silk as the art. Silk is adhered face down to the table with water; starch paste is brushed on with a 12" wide hake brush; paper backing is applied; and the unit is dried ten minutes in the drying press. The pre-backed silk is kept in rolls of assorted colors and patterns for later use.
All the pieces are sized, cut, and squared for the scroll from a pre-mounted silk paper (photo 6). There need to be two side pieces, one top and one bottom. Though all pieces are cut exact length (heaven and earth), they will be cut slightly wider than needed and trimmed to exact size after gluing to the art.
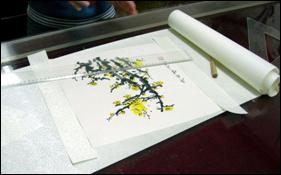 Photo 6
Once the art has been squared, pieces of paper backed silk will be sized for the scroll sides, top and bottom. The silk paper is made ahead off time and stored for later use.
Attaching Liner and Scroll Pieces
The first pieces attached to the back of the art edges are the contrasting liner strips. In this case they are brown silk cut about ¼" wide, which have already been sized for this project. Using a plastic sheet as a barrier, align along the bottom edge of the back of the art and brush starch paste about ³⁄₃₂" along the bottom (photo 7). With the art face down, attach the ¼" trim piece with about ⅓ of it to the starched artwork (photo 8). Complete all sides the liner tape needs to be applied, see Tao, photo 2.
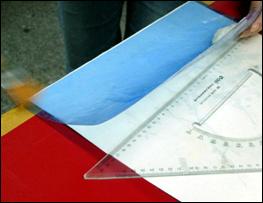 Photo 7
The blue plastic is used as a barrier to mask off the artwork edge to paste may be brushed on evenly. Left corner shows an application brush in high gear. The brown trim liner will be aligned on all four sides ⅓ overlapped onto the art with ⅔ left exposed.
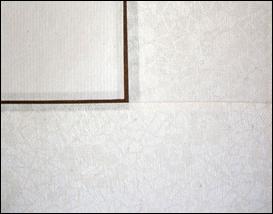 Photo 8
First layer surrounding the art is the contrasting decorative accent or trim piece of ¼" silk. This is applied the same width to all four sides attaching ⅓ to the back of the art, leaving ⅔ exposed. Once the silk strips are added the scroll pieces are applied to that trim strip leaving about ¹⁄₁₆" to ³⁄₃₂" of colored trim exposed.
Turn artwork with liner attached face up to begin attaching the scroll pieces. Apply the adhesive to the colored trip the same as above and align the side scroll pieces (photo 9). An absorbent rice paper scrap is laid over the applied adhesive bond and pressed flat manually to adhere and absorb before moving to each new step.
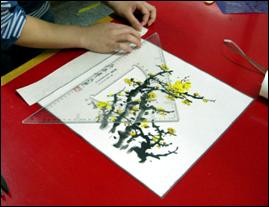 Photo 9
Once the four brown trim pieces have been applied, the silk side pieces are applied using the same technique. The top and bottom scroll pieces are added last keeping them the top layer, see photo 7.
After all four pieces have been glued, an acrylic straightedge and knife are used to trim off the excess widths of heaven and earth (photo 10). The long side edges are then very narrowly rolled over back onto itself about ⅛" to give the sides added strength. One ply paper is also added to the top and bottom of the scroll to help reinforce the it for attaching to the rods and hanging.
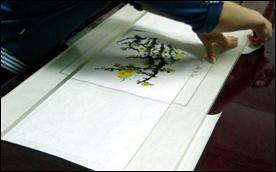 Photo 10
After all scroll pieces have been applied the acrylic bars are used to weight the scroll while excess widths are trimmed from top and bottom of scroll. Upper right and lower right the scroll pieces are wider than the side pieces.
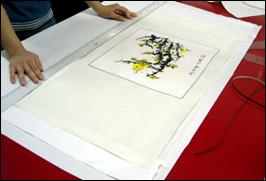 Photo 11
Reinforcement pieces have been added both top and bottom to the back of the scroll pieces for wrapping onto the wood rods. The pieced scroll is now laid face up for the backing to be cut to size.
Scroll Backing
Now the pieced scroll is laid face up over a heavier two ply rice sheet to be trimmed as its scroll backing (photo 11). Generously apply wet starch paste with a 12" wide, soft bristle, hake brush to the backing paper (photo 12). The pieced scroll is loosely rolled face up, top to bottom, for application to the backing. It is applied bottom to top while actively brushing the scroll as it is unrolled against the starched backing (photo 13). This helps ensure there are no bubbles once applied.
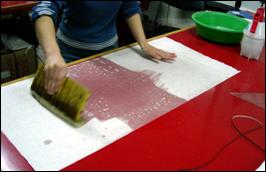 Photo 12
The heavier backing piece is evenly brushed with starch paste as preparation for aligning and mounting of the pieced scroll. This layer is required to reinforce and support the completed scroll. It is an integral part of the scroll mounting process.
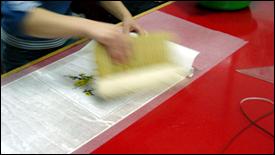 Photo 13
The pieced scroll is gently unrolled face up onto the pasted backing sheet and brushed down with a 12" wide soft hake brush. Note the ¼" trim strips lower right corner of the photo.
Finishing Up
The entire scroll is then peeled gently from the table and flipped face down for application and alignment of the title label and reinforcement tabs on the back (photo 14). The scroll is then placed in the large hydraulic dryer to be pressed flat and dried for ten minutes (photo 15). The drier is much like a large version of our dry mount presses with it's heat element in the top, but is totally encased with ¼" soft felt padding for absorption and even pressure. The starch never glues itself to the felt.
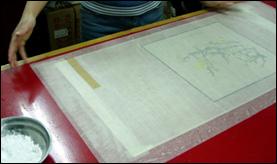 Photo 14
After the scroll has been pasted to the backing the whole unit is flipped face down to attach the label to the back for later identification. Notice the faint rolled edges of the scroll beneath the backing layer. These were rolled after piecing but prior to backing.
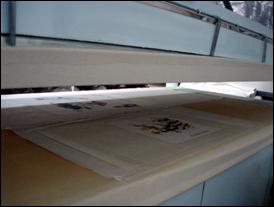 Photo 15
Commercial drier are routinely used to expedite the drying process in all production scroll operations. Much like our dry mount mechanical presses they are lined with ¼" felt pads top and bottom for moisture absorption. The lid is hydraulically operated and the scroll will be dry in five to ten minutes.
After it is dry the entire backing of the scroll is rubbed with a block of natural beeswax and aggressively rubbed with a smooth river rock to toughen and waterproof (photo 16).
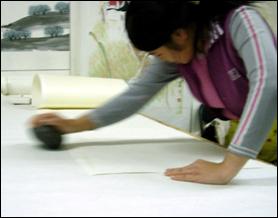 Photo 16
After drying the mounted scroll will be rubbed with a beeswax cake and aggressively burnished with a smooth river rock to help stiffen and waterproof the backing.
The final steps include the attachment of the top ½" square or half round wood piece, and the 1" wood rod at the bottom for weight and to be used as the core of the rolled scroll. Placement of the small metal rings are completed in the top wood piece and ¼" wide cording is added as the dual purpose scroll tie and hanger (photo 17).
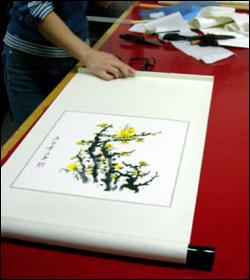 Photo 17
The completed scroll is now fitted with its large round wooden rod at the bottom and small ½" square top rod. Two hangers are added and a tie string is affixed to the hangers at top for rolling or hanging, see photo 1.
Troubleshooting
For those of you challenged and fearless enough to try scroll mounting here are a few things to look out for. And remember...this is NOT just a simple case of Western wet mounting to a rigid mount board. There are structured procedures even for mass produced scrolls of non-valuable art images, the Chinese equivalent to our posters. And there are potential hazards, as pointed out below.
Creases in Paper
Unbacked Xuan paper artwork may be folded, crushed, wadded or rolled prior to backing and all the defects will smooth out during the backing process if done properly. But once backed the art needs to be matted, framed, or scroll mounted to protect it. When storing, it requires either a tube, box, or should be placed between two rigid boards.
Bleeding Colors
When inks run or drag as the paste is applied it is a sign of old, poorly made, or inferior quality ink sticks. When colors run or bleed it can be they were not allowed to dry long enough. Both colors and inks should be allowed to dry two weeks prior to wet mounting. You will never know by appearance which inks or colors might run. And yes, there are things that can be done if they do, as I will illustrate next month in "Scrolls-Part 3: Repairs".
Which Side Up?
Prior to backing, when a xuan paper painting is wet it is very difficult to tell which is the painted side from the verso side. Take care to mount the art face down, so the backing ends up on the back. The chop and signature are generally on the left of the art, but there can be more than one chop as one is the title and one the signature. If you do not know Chinese characters you may never be able to tell right side from wrong side.
To Scroll or Not To Scroll
At the close of my articles in 2000 I advised not to try this at home...and even after studying more in depth with a far better grasp of the procedure, I still agree with my original assessment. I totally respect the art of scroll mounting, and just as we assess each new framing project deciding if it is suitable for dry mounting, such is scroll mounting.
There are levels of scroll mounting from traditional, preservation techniques to mass production.
Traditional scroll mounting remains a process no framer should be undertaking on their own. There are paper conservators and scroll mounters available to do this for your customer, so farm it out. Scroll mounting a low cost open edition piece...well it's always a judgment call.
END
Copyright © 2005 Chris A Paschke
For more articles on mounting basics look under the mounting section in Articles by Subject.
Additional information on all types of mounting is found in:
The Mounting and Laminating Handbook, Second Edition, 2002,
The Mounting And Laminating Handbook, Third Edition, 2008 and
Creative Mounting, Wrapping, And Laminating, 2000 will teach you everything you need to know about getting the most from your dry mount equipment and materials as an innovative frame designer.
All books are available from Designs Ink Publishing through this website.
Chris A Paschke, CPF GCF
Designs Ink
Designs Ink Publishing
785 Tucker Road, Suite G-183
Tehachapi, CA 93561
P 661-821-2188
chris@designsinkart.com