 Photo 1
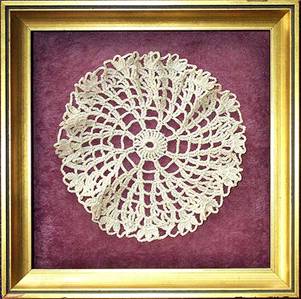
This 5" round crochet doily was made by my great grandmother around 1890.
Though the bulk of my mounting articles surround adhesive application and the basic nature of wet, spray, pressure-sensitive or dry mounting, my column actually encompasses any mounting. And for that matter mounting any thing, as the tacking strip featured in PFM, November 2002. In actuality, to truly master mounting one must be able to affix items of all kinds together with various types of attachments, both nonreversible adhesives and noninvasive attachments.
World of Textiles
In the world of textiles is found everything from needleart to christening dresses, rugs to tapestries; pillows to basketball jerseys. We surround ourselves with textiles from the moment of birth until we are laid to final rest. Even then many of these remain in our family's care and become the heirlooms and collectibles that are passed down to future generations. Hence the care, storage and display of these treasures is of vital importance to their longevity.
Textiles encompass a wide range of materials and needleart techniques including: embroidery, crewel, cross stitch, needlepoint, lace, quilting, applique, knitting, crochet, needle punch, batik, clothing, flags, rugs...and tapestries. Tapestries are decorative hand-woven fibers with designs in an over and under weaving. Long rows of continual threads are woven on a loom encompassing horizontal warp threads that are completely covered by the vertical weft threads.
As all art, textiles are subject to deterioration by traditional environmental factors including light, temperature, humidity, dust, insects, and/or improper handling, storage or framing techniques. Whether a family heirloom or part of an historic museum collection, care in presentation is foremost.
State of the Art for Textiles
There are many ways to mount a textile for presentation and viewing. Selecting the proper mounting technique will depend and be determined by the type of textile and its overall condition (see Age, Weight and Condition of Textiles). Some techniques are conservation and totally noninvasive, while others are more permanent and may be long term damaging.
Just as the state of the art use of masking tape and corrugated cardboard in 1972 has been replaced by more conservation practices, the evolution of textile framing has also improved over time. Sticky board, tapes, and staples were used for years as accepted mounting practices for textiles, but the long term conservation of these textiles is now the foremost, and those methods have generally been discarded.
Invasive vs. Noninvasive Mounting
Basic noninvasive methods of textile mounting include: stretching and pinning around foam board affixing stainless steel ball point pins at the side edges; lacing the art around the back of a support board; resistance fitting of a fallout wrapped with the textile then fit back into the window; stapling with ¼" stainless steel staples on the back of the board or strainer frame; surface edge stapling onto a padded backing board then placed in a sink mat; couching and tacking to a support strainer and screen at intervals throughout the textile; and hanging systems.
More invasive methods include traditional adhesive techniques involving wet, spray, pressure-sensitive (including tapes), and dry mounting. Most of these will involve adhesives that saturate the textile art and leave a residue after removal, making them nonconservation mounting methods. The only traditional adhesive that may not be damaging after removal might be wet mounting with a neutral pH starch paste, or reversible liquid adhesive designed for use with fabrics.
Couched Doily
The 5" round crochet doily was made circa 1890 by my great grandmother and is shown floated in an 8x8x2" gold shadowbox design (photo 1). Small and delicate pieces like this can easily be framed with a padded foam board support, or as in this case, with a strainer. A rose colored velour fabric was selected, washed, prepared and wrapped over a polyester padded strainer support. The piece has been couched at 1" intervals around the edges and inner portion allowing for the rippled decorative edging of the piece to remain as part of the design. Notice in the detail of photo 2 the sides of the box were lined with covered panels to accent and enhance the box depth.
Photo 1
This 5" round crochet doily was made by my great grandmother around 1890.
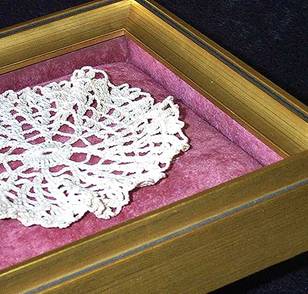 Photo 2
It has been framed in an 8x8x2" deep gold moulding couch stitched to the suede padded backing for presentation.
Strainer Supports
Stretcher bars are interlocking legs of a wood frame used to stretch canvases. They are supplied with corner keys so ongoing adjustments may be made to a canvas that is sagging or too tight (photo 3). A frame of wood permanently affixed at the corners through nails and glue is called a strainer. The advantage to building a strainer over foam board as a base support is the ability to tack to the screen at 1" intervals throughout the project to help support and prevent sagging. This is particularly important with large heavy pieces.
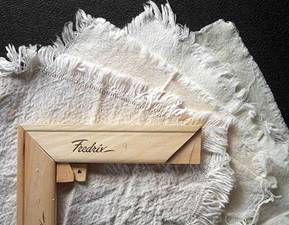 Photo 3
Selected fabric samples include (L to R) undyed heavy canvas, light canvas, medium weight cotton, and light muslin. All have been washed to remove sizing and dirt, but not yet pressed.
Once assembled, the prepared strainer (notice the permanent fused corners) should be sealed with shellac, rabbet tape, or some form of wood sealer prior to wrapping. Then polyester batting may be added to help give body to an otherwise flat textile. Add a layer of Fiberglas screening and finally the washed fabric (photo 4). The screen is the same inert material bought in rolls at the home improvement store for window screens, and comes in black, gray and silver.
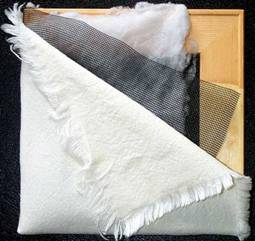 Photo 4
A sealed strainer (nonadjustable) support is covered with polyester fleece batting, Fiberglas screening and fabric covering.
Hanging Systems
There are a variety of hanging systems used to suspend textile tapestries and rugs. These include sleeve casings of twill tape sewn onto the verso top side of the art; self-made loops for rods; couching and tacking the entire piece to a reinforced backing; and Velcro. The currently preferred conservation method of using Velcro came into favor during the 1980s and replaced the older sleeve casing version previously used by many textile conservators.
The Velcro system is the most efficient and flexible method available, says the Conservation Department of the Textile Museum in Washington, D.C. It is easy to complete, it minimizes stresses on the suspension edge of the art, and allows for minor adjustments to straighten and realign a settling textile during presentation. That said of the positive reasons behind this mounting method, the down side limits its use to only well preserved textiles strong enough to support their own weight along one single edge.
The Age, Weight, Condition and Origin of the Tapestry
Each tapestry is unique, with its own set of strengths and limitations. Consideration must always be made as to the age of the textile, the manufacturer or artist who created it, and its overall condition. Knowing the approximate age, weight, fiber stability, and origin will help dictate what mounting methods will best enhance and protect the art. As mentioned a few months ago by Paul MacFarland (PFM, December 2002, "Condition Reports"), filling out a condition report on every piece of art will better educate you and your customer to existing damage, handling issues, and potential limitations to framing any art project. Once critiqued for stability and fiber strength, the Velcro system works well for blankets, quilts, rugs and tapestries. It is not suggested for fragile textiles; thin, lightweight silks; or textiles with heavy surface adornment, where gravity could be a factor. The Velcro method has two variations, the full lined backing and suspension only.
Full Lined Backing
A fully supported lined backing requires a selected fabric to match the weight and sometimes the color of the tapestry, that has been washed and pressed. It should be sized 3" wider than the art and 4½" longer. Hem the sides by turning and machine sewing the backing fabric 1½", and the bottom at 3". Machine sew the top and bottom edges of the Velcro to the top of the backing fabric and couch this reinforced backing to the verso of the tapestry across the top and down the sides only. Additional tacking at 1" intervals may also be necessary to help support the inner area. This is particularly important if there is damage and broken or deteriorated fibers (diagram 1).
The tapestry pillow is somewhat of a backed piece already. Rather than being supported by an alternate hemmed fabric through couching to the back side, it was sewn to the edges to be used as a pillow. This is a contemporary piece of tourist memorabilia not a valuable priceless heirloom, but deserves special treatment nonetheless. Though to be used as a pillow, the self pillow backing and the Velcro technique above would make it a delightful wall hanging also. It is a view of the Muse of Music, by the way.
Velcro Suspension
A wooden strip of poplar or other low-resin wood ½"x 3" must be sized ½" shorter than the width of the tapestry to be displayed, then sealed with a coat of shellac or polyurethane varnish to protect the art from any lignin in the wood. Nonrusting, stainless steel staples or tacks are then used to randomly attach a 2" strip of the hook side Velcro to the prepared wooden strip.
Velcro Step-by-Step
The loop side of the 2" Velcro is attached to a 3" wide piece of undyed cotton tape, like the canvas webbing used or upholstering by machine sewing the entire length of both sides of the strip (diagram 2). Never sew the Velcro directly to the tapestry, as the stiff Velcro can easily do damage as the needle is forced through the textile.
Place the tapestry face down on a clean flat surface and adjust it into its natural shape (square or not). Align the sewn Velcro/webbing strip horizontally across the textile about ⅜ - ½" from the top edge. Take into account the top edge of the textile might be uneven so the webbing strip should be aligned to a true horizontal level (diagram 3).
Cotton thread should be selected the color and approximate weight of the threads in the tapestry to balance both visually and be of equal fiber strength for sewing. Thread a ball point needle and attempt to work the stitches between the threads of the textile rather than splitting them. Working from the back of the art, stitch along the top edge of the webbing unit from the center line (C/L) working to the outer sides of the textile art as you would stretch a canvas.
There are two methods for stitching, the couching method (diagram 4) and the backstitch (diagram 5). Both are approved methods and are quite strong while being noninvasive.
Backstitching is a 1" long stitch followed by a short back stitch of a few threads, then another long stitch and so forth. The sealed wooden strip must have the hook Velcro randomly stapled to it, with staples about 1" apart. Staggering and altering the staple angles will make the attachment stronger. Place the Velcro the same distance from the top of the wood as it was placed from the top of the textile for proper alignment.
Attach the wood support to the wall with D-rings, flangers, mirror plates, or some other solid support. Attach the two sides of Velcro together beginning at the center aligning as it is placed. To remove a portion to realign, gently roll the edge back rather than pulling perpendicularly which could damage the textile.
Spinning a Final Thread
The mounting of textiles is no more complex nor difficult to understand than mounting a photo, digital or hinging with cooked starch paste. It may not be as quick as opening a packet of Nori ready-to-use, but it remains as simple as having all the elements of strainer material, undyed fabric, screening, and Velcro on hand to be ready for any textile when it arrives.
State-of-the-art continues to evolve techniques in our industry. Tapes and adhesives for mounting textiles should have departed your shop with masking tape and corrugated cardboard. Conservation treatment of framing textiles is only a matter of having the correct materials and building a strainer frame!
END
Copyright © 2003 Chris A Paschke
For more articles on mounting basics look under the mounting section in Articles by Subject.
Additional information on all types of mounting is found in:
The Mounting and Laminating Handbook, Second Edition, 2002,
The Mounting And Laminating Handbook, Third Edition, 2008 and
Creative Mounting, Wrapping, And Laminating, 2000 will teach you everything you need to know about getting the most from your dry mount equipment and materials as an innovative frame designer.
All books are available from Designs Ink Publishing through this website.
Chris A Paschke, CPF GCF
Designs Ink
Designs Ink Publishing
840 Tucker Road, Suite H-190
Tehachapi, CA 93561
P 661-821-2188
chris@designsinkart.com