
Hot vacuum presses automatically control pressure and moisture, but time and temperature must be set or programmed into the press. Mechanical presses also require time and temperature settings and control as well as requiring manual adjustment of the pressure whenever the substrate is changed to a new thickness. So all time, temperature, pressure and moisture controls must be attended to for a correct well bonded result.
Adjustments
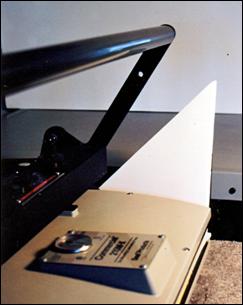
The locking nuts are the doughnut shaped outer rings that loosen when turned counterclockwise to adjust the taller, inner pressure adjusting screws. If the locking nut is too tight to loosen, insert a ³⁄₁₆" foam board—or thicker—inside the press to take pressure off the nuts, then locking the arm down looses the locking nuts. Unscrew the lower ring until they are out of the way or remove completely during adjustment.
Twisting the adjusting screws evenly to the right or in a clockwise position will drop the lever arm down, thus lightening or decreasing the press pressure. Twisting the nuts to the left or counterclockwise will raise the arm up and increase the press pressure. It's best to turn both screws at the same time when adjusting.
Shimming A Mechanical Press
Once the press is adjusted to an average ³⁄₁₆" board thickness then readjustment of the press is required each time the substrate changes or the pressure will also change. As an alternative shims may be cut and fitted to accommodate the variation in substrate thickness by placing beneath the Masonite board to make up the difference in thicknesses.
Shims must be placed beneath the Masonite, not within the platen/sponge pad mounting area. Place a strapping tape tongue on the front edge of the lower Masonite board for accessibility.
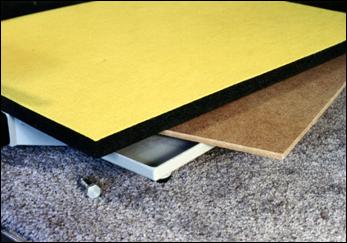
Cut three 4-ply equivalent scrap mat or mount boards about ½" smaller than the size of the Masonite. Strapping tape may also be applied to the front edge of each for easy insertion and removal. When the substrate thickness changes simply slide shims beneath the Masonite when mounting thinner substrates. If the press as been adjusted for ³⁄₁₆" foam, 3 shims equals one ³⁄₁₆" foam. For quick adjustments add 1 shim for = ⅛" foam; 2 shims = 4-ply mat board; 3 shims added for when no substrate is used as when premounting. The shims lift the Masonite making the inner space of the closed press narrow during bonding.
END
Copyright © 2014 Chris A Paschke
There is a special section in the library for all past issues of Pacific Southwest PPFA Chapter, PS Framer.
For more articles on mounting basics look under the mounting section in Articles by Subject.
Additional information on all types of mounting is found in:
The Mounting and Laminating Handbook, Second Edition, 2002,
The Mounting And Laminating Handbook, Third Edition, 2008 and
Creative Mounting, Wrapping, And Laminating, 2000 will teach you everything you need to know about getting the most from your dry mount equipment and materials as an innovative frame designer.
All books are available from Designs Ink Publishing through this website.
Chris A Paschke, CPF GCF
Designs Ink
Designs Ink Publishing
840 Tucker Road, Suite H-190
Tehachapi, CA 93561
P 661-821-2188
chris@designsinkart.com