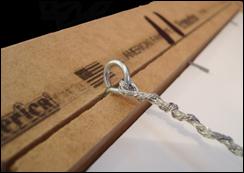
 Photo 1: Don't
Never place a screw eye in a gutter or recessed portion of a frame.
Incorrectly installing or using the wrong hardware can be fatal to original art. Mistakes are commonly made when it comes to implementing the correct methods of applying hooks, wires and hangers to completed frames in preparation for display. As noted in "The Hard(ware) Facts", TAM, March/April 2014 there are many considerations concerning the weight of your framed art in relation to the selection of wire and hangers.
Hardware
In the previous article screweyes were listed as hardware that should be avoided. Aside from that, never place a screweye or screw into a gutter or recessed portion of any frame. This particular frame is made of MDF—medium density fiberboard—which turns to sawdust as a screw is twisted into it, making it prone to failure by pulling out. Add to that it can only catch threads into the wood the length of its shaft which has been stopped by the surface of the frame. This is a screw application looking to fail. Even though it might be easier to get started twisting into the wood it is too far away from the hole to snuggly tighten (photo 1).
 Photo 1: Don't
Never place a screw eye in a gutter or recessed portion of a frame.
In order for any screw to work efficiently and hold to manufacturer's specifications it must be seated well into the wood with the entire shaft screwed down to the eye (photo 2). The very bottom threads of this long shaft screweye are attached to the frame in an attempt to bring it higher to meet the distance the stretched canvas protruding from behind the frame. Two things are wrong here: 1, the frame rabbet depth is too shallow for the canvas; and 2, the screweye is not seated fully into the frame and is likely to fail by pulling out.
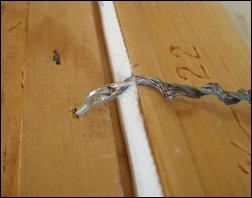 Photo 2: Don't
Always screw an eye fully into the frame for proper hold. Catching only a few threads in an attempt to keep the wire level with a protruding canvas is wire failure looking to happen.
Using only 2-3 threads of any screw will not catch enough wood to solidly hold it. Also notice how loosely the wire has been twisted around the eye, creating an additional concern. Hardware failure can also be the result of wood splitting or selecting screws that are either too short or too small. To avoid wood splitting all screw holes should be pre-drilled prior to installation. Most frame fitting failures are the result of human error.
Attaching Wire
The wire is only as strong as the knot and twist that attaches it to the hardware. This wire was on an actual "ready-to-hang" original painting. A single half hitch knot will never hold (photo 3). A full lark's head knot should be wrapped around the D-ring or hanger with 6-10 twists tightly around the wire then snugly pushed against the hanger (photo 4).
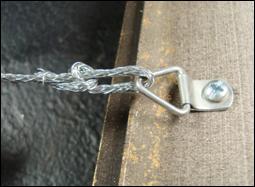 Photo 3: Don't
The wire is only as strong as the attachment to the hardware. A single half hitch as in the photo will never hold long term.
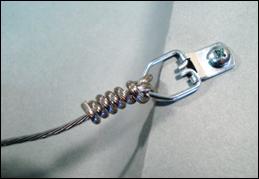 Photo 4: Do
Always use a fill Lark's Head knot at the hardware attachment to secure and prevent slipping. Push all wraps tight against the knot when done. Though this demo shows only five threads it is best to use 10-12 threads.
Considering Weight Issues
Weight is one of the most important concerns when selecting wire and hardware. Wire is available in many strengths and simply adding a send strand will not double the strength (photo 5). A very common problem is not respecting the stress placed on the sides of a frame just to hang it. Installing any hanger into a very narrow frame heavily stresses the tension at those sides. Plus if the frame package is heavy and/or large the narrow sides can crack, split or screws can pull out. Hardware called Flangers come narrow, medium and wide, the narrow are shown here. They come left and right and with the use of two screws help use leverage to balance the stresses on thin frames (photo 6).
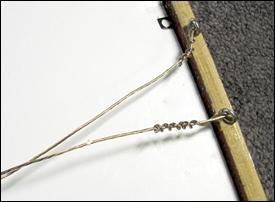 Photo 5: Don't
Never use two small eye screws in a very narrow frame thinking it is stronger. The screws weaken the wood and as a frame dries out will cause splitting over time.
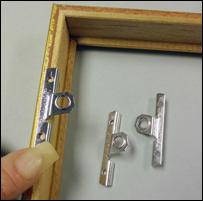 Photo 6: Do
Flangers are the logical solution the hardware for a narrow frame. They are designed to use leverage and distribute the stresses on the frame.
Canvas and Offset Clips
It is common for artists to use simple canvas clips to hold their canvas into a frame, but clips do have disadvantages. They stress the sides of the frame and the stretcher bars, and can leave metal scuff marks on the wall. They also do not allow for a dust cover. They were developed because all too often a frame rabbet—the depth of the inset—is far too shallow to cover stretcher bars (photo 7). The chosen frame should always be deep enough to hold the full depth of the canvas. A backing is meant to protect the canvas from punctures, dust, dirt, pollution and bugs. The back of the bars should be covered with foam board attached to the bars with screws and washers (photo 8). A canvas should be fitted into the frame using only tension pressure with proper depth offset clips, brads or driver points.
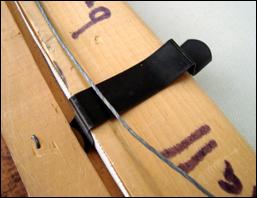 Photo 7: Don't
Canvas Clips are very popular with artists because of ease and economy but the stress the frame, leave metal marks on the wall and prevent use of a dust cover.
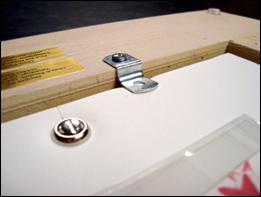 Photo 8: Do
Select a frame deep enough to fully hold your canvas and cover the back of a canvas with foamboard by screwing through it with a washer into the wood stretcher bars. Offset clips are the perfect hardware for holding a canvas into a frame.
Offset clips are z-shaped hardware with a zinc plated stair-step shape with rounded corners designed to affix various levels of stacked frames, liners or to install deep paintings. Clips are available as ⅛", ¼", ⅜", ½", ¾", 1" and 1¼"depths, with and without holes both ends, though double holes allow for the most options (photo 9).
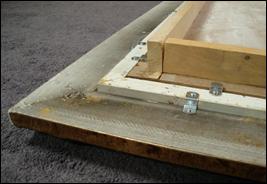 Photo 9: Don't
Though offset clips will help in many situations, stacking a frame with clips in the photo only help create a badly and incorrectly assembles frame package.
Frame Depth
When a painting juts too far out behind a frame the selected hardware for attaching wires is extremely important. Steel Hangers use multiple screws to solidly mount it to the frame. Then choose a heavier wire to tolerate the stresses over the edge of a canvas or cradle (photo 10).
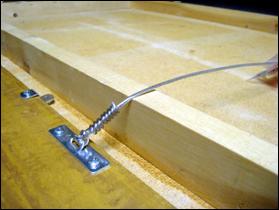 Photo 10: Do
If you insist on a frame too shallow for the cradle or canvas, steel hanger strips and #8 screws will better hold it tightly without pulling out from the stress.
Though offset clips are perfect for attaching multiple layers, when stacking frame, liner and cradle, that extra depth is a problem when framing and displaying art (photo 11). A traditional frame should be displayed flat against the wall. If a contemporary framing concept of floating off the wall is desired, a different frame is required. This is the front of the above image (photo 12). Egg Tempera painting shown permission of artist Bob Rowland, Tehachapi CA.
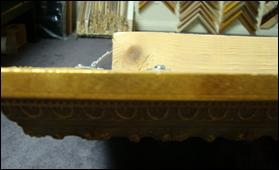 Photo 11: Don't
When a cradle protrudes out behind the frame it will float the hung art away from the wall and allow for wire rubbing.
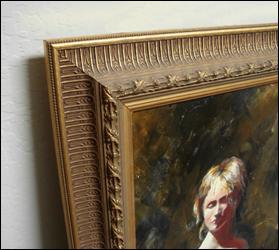 Photo 12: Don't
A traditional frame should be flat against the wall when hung not floated away from it as in this photo. Always pick an appropriate frame for the art.
Wire Length
Hardware should be attached ¼ down from top of the frame. The wire shouldn't have been longer than top of the canvas (photo 13). If the wire is too loose it encourages the painting to slant forward when hung. Even when properly hung on two hooks set at ⅓ and ⅔ the width of the frame. The highest point of the loose wire should be half way between hardware and top of the frame (photo 14).
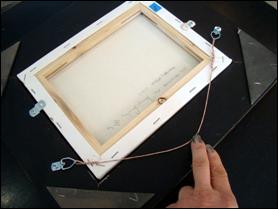 Photo 13: Don't
When a wire is too loose it will let the art tilt away from the wall once hung. This wire is way too long for the frame.
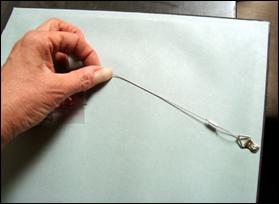 Photo 14: Do
Attach the hanging wire with hardware ¼ the distance the full top to bottom distance of the frame. The wire should be set with it loose enough only to reach half the distance between the screwed hardware and the top of the frame.
Wall Hangers
Another common mistake is mounting frames to the wall with regular nails. Nails can slant down and pull from the wall allowing the frame to fall to the floor. Frame hangers are readily available but there are many versions of the same concept and some are better than others. The aligned holes in the hanger should hold the nail at a constant 30 to 40 degree angle with no movement (photo 15).
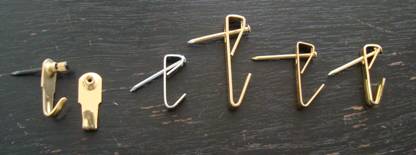 Photo 15: Don't
Attach the hanging wire with hardware ¼ the distance the full top to bottom distance of the frame. The wire should be set with it loose enough only to reach half the distance between the screwed hardware and the top of the frame.
Commercial hangers may not always have a set angle for the attachment nails. The proper angle is 30-45 degrees and it nail should not be sloppy and loose in the hanger slot.
Ziabicki Floreat Hangers are the original German made picture hooks which remain the preferred brand of hangers among professionals in the custom framing industry. They have thin tempered steel nails and solid brass knurled heads designed to be thin, strong and have nail guides that control entry of the nail into the wall at an optimum 30 degree angle and there is a small Z trademark stamped on all authentic Ziabicki products (photo 16). They are made in assorted sizes to hold 10, 20, 30, 50, and 75 pound frames that are dependable and do not harm walls.
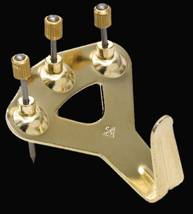 Photo 16: Do
Ziabicki Floreat Hangers are the very best with a set 30 degree angle for nail placement using a small gauge steel nail that leaves only a small hole.
All of the DON'T photos featured in this article are actual mistakes found in a local gallery. Artists beware! The frame is meant to house, hold, enhance and protect your art. It's not enough just to use the best materials when painting, you must also preserve and protect your art when framing for display and sale.
END
Copyright © 2015 Chris A Paschke
Chris A. Paschke, CPF GCF, Tehachapi CA, received Certified Picture Framer (CPF) status 1986 from Professional Picture Framers Association (PPFA) and Guild Commended Framer (GCF) status 1997 from Fine Art Trade Guild (FATG) UK. She was awarded the PPFA Award of Distinction 2008, the PPFA Award of Recognition and Innovation 2010, and PMA Distinguished Service Award 2012 for her ongoing research on framing giclées and digitals. Author of The Mounting And Laminating Handbook, Third Edition, she has been mounting specialist, educator, author and columnist to the framing industry for more than 25 years.
Resources—Items
Art Materials Servicehttp://artmaterialsservice.com—Offset clips, Straps, Super Steel Hangers
ArtRight.comhttp://www.artright.com—Offset clips, Super Steel Hangers
Frameware, Inchttp://framewareinc.com—Clips, Steel Wire Hangers, Wire
FramingSupplies.comhttps://www.framingsupplies-shop.com—Clips, Wire, D-rings, Hangers, Floreat
Jerry's Artaramahttp://www.jerrysartarama.com—Hangers, Offset clips, Wire
Picture Hang Solutionshttp://govart.com—Flangers, Offset clips, Hooks, Hangers
The Picture Frame Co.http://www.picturehardware.com—Super Steel, D-rings, Clips, Wall hooks
United Manufacturershttp://www.unitedmfrs.com—Flangers, D-rings, Clips, Screws, Wire
West Shore Frameshttp://www.westshoreframes.com—Flangers, Wire, Hangers, Hardware
Ziabicki Hangershttp://ziabicki.com—Floreat Hangers
For more articles on mounting basics look under the mounting section in Articles by Subject.
Additional information on all types of mounting is found in:
The Mounting and Laminating Handbook, Second Edition, 2002,
The Mounting And Laminating Handbook, Third Edition, 2008 and
Creative Mounting, Wrapping, And Laminating, 2000 will teach you everything you need to know about getting the most from your dry mount equipment and materials as an innovative frame designer.
All books are available from Designs Ink Publishing through this website.
Chris A Paschke, CPF GCF
Designs Ink
Designs Ink Publishing
785 Tucker Road, Suite G-183
Tehachapi, CA 93561
P 661-821-2188
chris@designsinkart.com